Prep time: 15 minutes
Cook time: 0 minutes
Total time: 15 minutes
Servings: 6-8
Are you ready to elevate your gatherings with a beautifully curated snack board? The **Stunning Spring Snack Board** is here to bring joy to your gatherings, adding vibrant colors and delicious flavors that appeal to everyone. Perfect for everything from casual get-togethers to more formal affairs, this snack board showcases the freshness of springtime ingredients. With just a few steps, you can impress your guests and satisfy their cravings, creating a delightful centerpiece for any table.
What Is Stunning Spring Snack Board: 5 Easy Steps for Joyful Gatherings?
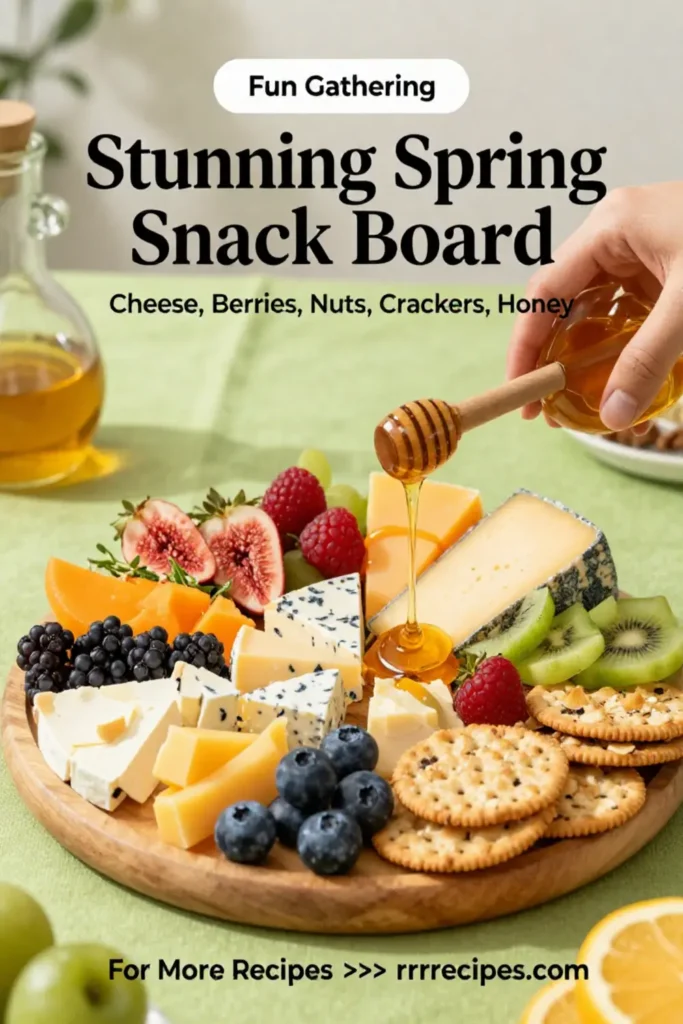
This snack board is inspired by the bounty of spring, featuring an array of seasonal fruits, vegetables, and delightful dips. The concept is simple: arrange various ingredients artfully, creating a feast for both the eyes and the palate. It encourages sharing and conversation, making it an ideal choice for any occasion. Each component adds texture, flavor, and visual appeal, ensuring that your snack board is as delicious as it is stunning.
Why You’ll Love This
There are countless reasons to love the **Stunning Spring Snack Board**. First and foremost, it is incredibly versatile. Whether you’re catering to dietary restrictions or simply presenting a variety of flavors, this board accommodates everyone’s tastes. Additionally, preparing a snack board allows you to flex your creative muscles, arranging ingredients in visually appealing ways. Finally, it requires little cooking, making it an ideal option for busy parents or those who may not excel in the kitchen.
Ingredients You’ll Need
To create your **Stunning Spring Snack Board**, gather the following ingredients:
- Fresh Fruits: Strawberries, blueberries, and kiwi slices provide vibrant colors and natural sweetness. Opt for organic if possible for the best flavor.
- Vegetables: Baby carrots and cucumber slices add crunch. They are low in calories but high in vitamins and fiber.
- Cheese: A mix of creamy brie and sharp cheddar balances creaminess and zing. Choose high-quality cheese for the best taste.
- Dips: Hummus and ranch dressing add creamy texture and flavor; they pair wonderfully with both fruits and veggies.
- Crackers: Whole grain and herbed crackers provide the perfect contrast to the fresh ingredients, adding crunch and flavor.
How to Make
- Begin by selecting a large serving platter or wooden board. The surface should be spacious enough to arrange your ingredients without crowding. A wooden board not only enhances the presentation but also absorbs moisture, keeping your snacks fresh longer.
- Start with the dips. Place small bowls of hummus and ranch dressing on one side of the board. This will serve as the anchor point for your other ingredients. Make sure to use contrasting colors to draw attention.
- Next, arrange the cheese. Slice the **brie** into wedges and place them next to the dips. Cube the **cheddar** and distribute it evenly throughout the board. The different shapes and sizes will create visual interest.
- Now it’s time to add the fruits. Scatter the **strawberries** and **blueberries** around the cheese, and lay down the **kiwi slices** along the edge for a pop of green. The juices from the fruits will flow slightly, adding to the aesthetic appeal.
- Add the vegetables by tucking in the **baby carrots** and **cucumber slices** around the dips and fruits. This will create a rainbow effect on your board, inviting guests to indulge. Consider using different heights by standing some carrot sticks upright for an added dimension.
- Finally, fill in any gaps with **whole grain and herbed crackers**. These can be placed upright in small stacks or laid flat. Be creative with your placement to ensure every inch of the board looks inviting and well-curated.
Variations & Substitutions
Seasonal Variation: Adjust your snack board to match the season by incorporating available produce. In the fall, use apples, pears, and nuts, while in summer, focus on watermelon, cherries, and peaches. Keeping the seasonal theme will not only enhance flavors but also create a seasonal experience for your guests.
Dairy-Free Option: For a dairy-free version, replace cheese with non-dairy cheese alternatives made from nuts or soy. You can also include **avocado** slices and **nut butter** for creaminess. This is perfect for guests with lactose intolerance, and it opens up your snack board to a broader range of diets.
Gluten-Free Alternative: Substitute regular crackers with gluten-free varieties. You can also serve sliced vegetables for dipping. This way, you accommodate guests with gluten sensitivities without sacrificing taste.
Common Mistakes to Avoid
When assembling your snack board, avoid the mistake of overcrowding. Placing too many ingredients can make the board look chaotic, losing its appeal. Instead, allow for breathing room between different components to highlight each item better.
Another common mistake is choosing ingredients without considering flavor balance. Pair stronger flavor profiles, such as blue cheese, with milder elements like fruits to create a delicious contrast.
Lastly, be cautious about ingredient freshness. Always inspect your fruits and vegetables before including them on the board. **Spoiled items can ruin the experience for your guests**, leading to waste.
Storage, Freezing & Reheating Tips
To maintain the freshness of your stunning snack board, store any leftovers in an airtight container in the refrigerator. Fruits and vegetables will last up to three days, while dips should be consumed within a week.
If you plan to make components in advance, such as hummus or dips, they can often be frozen for up to three months. Just ensure they are properly sealed to avoid freezer burn. When ready to enjoy, thaw in the refrigerator overnight and give them a good stir before serving.
When reheating any warmed items (if used), such as baked crackers, do so in the oven rather than the microwave. This will help maintain their crispiness instead of turning them chewy.
Frequently Asked Questions
Can I make the snack board ahead of time?
Absolutely! You can prepare many components, like the dips and sliced fruits and veggies, a day in advance. However, for the freshest experience, assemble the board just an hour or two before serving.
What types of cheese work best?
A combination of creamy and sharp cheeses is ideal. **Brie** and **cheddar** are fantastic choices, but you can also experiment with goat cheese or smoked gouda for a different flavor profile.
How can I accommodate dietary restrictions?
Always inquire about guests’ dietary preferences before planning your snack board. You can easily swap out ingredients to make it gluten-free, dairy-free, or nut-free based on those needs.
What if I have leftover components?
Leftover ingredients can be stored for future snacking. Fruits should be eaten within three days, while the cheese can last longer when wrapped tightly. Consider repurposing leftovers into salads or sandwiches.
How can I keep the presentation tidy?
Organizing ingredients in groups and ensuring a balance between colors can help keep the board looking polished. Make sure to clean up any spills or juices from the fruits, as they can detract from the overall appearance.
Conclusion:
Creating a **Stunning Spring Snack Board** is a delightful way to impress your guests, and with these easy steps, you can ensure that your gathering is memorable. The combination of fresh ingredients and artistic presentation will make your snack board a highlight, encouraging conversation and connection. So get creative and enjoy the flavors of spring while bringing joy to your next gathering!


