Prep time: 20 minutes
Cook time: 0 minutes
Total time: 20 minutes
Servings: 8
Spring is a time for renewal, and what better way to celebrate the season than with a colorful and delicious charcuterie board? Perfect for brunch gatherings, this Spring Charcuterie Board Ideas for Brunch in 5 Steps is not only visually stunning but also a breeze to put together. Whether you’re hosting friends for Easter brunch or simply enjoying a sunny weekend afternoon, this spread will impress your guests and satisfy their cravings.
In this recipe, we will highlight some of the best elements to include, making your charcuterie board both delightful and easy to assemble. Filled with fresh produce, savory meats, delectable cheeses, and sweet treats, a charcuterie board offers a variety of flavors that please every palate. Let’s dive right into how to create your very own spring-inspired charcuterie board!
What Is Spring Charcuterie Board Ideas for Brunch in 5 Steps?
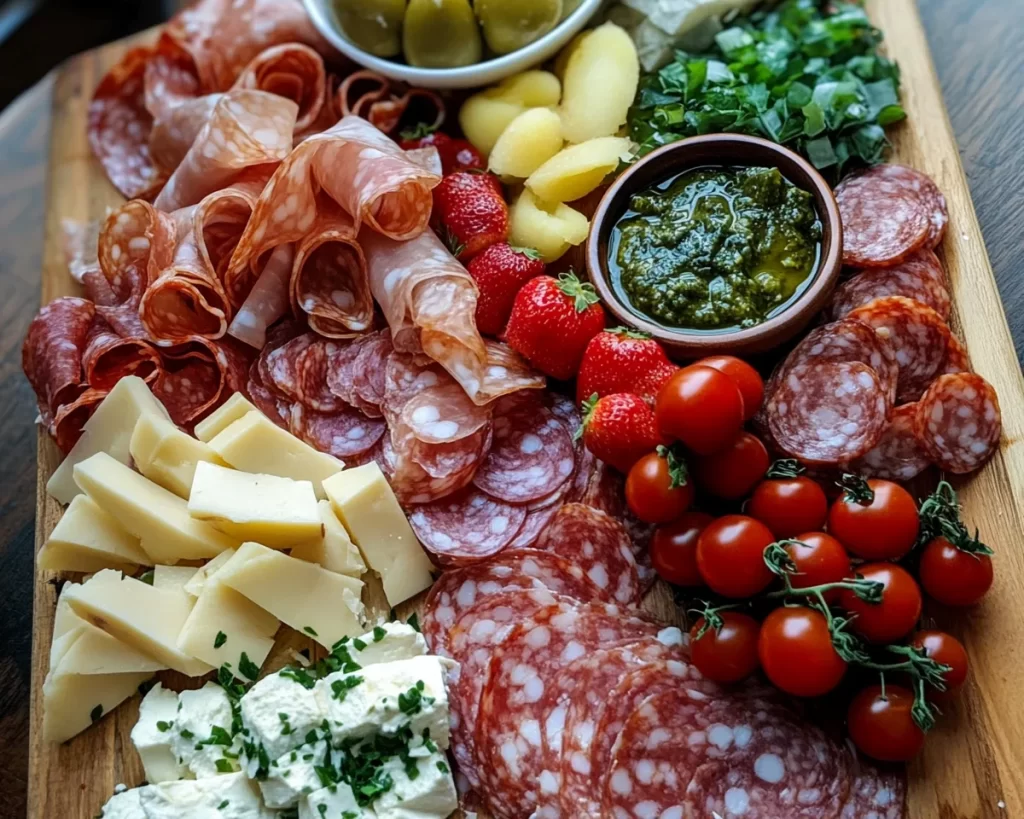
A Spring Charcuterie Board is an artful arrangement of meats, cheeses, fruits, and other accompaniments that reflect the vibrant spirit of spring. Unlike traditional charcuterie boards which might feature heavier, colder items, a spring board focuses on lighter, fresher ingredients that mirror the season’s bounty. Think of bright berries, crisp vegetables, and herbal accents that awaken the senses. You want a board that feels balanced, offering not just taste but also visual appeal.
Why You’ll Love This
Creating a Spring Charcuterie Board is not only easy but also incredibly versatile. A few reasons you’ll love this idea include:
– **User-friendly**: Even if you’re a kitchen beginner, constructing a charcuterie board is straightforward. There are no strict measurements or bake times to worry about!
– **Customization**: You can easily tailor this board to cater to various dietary preferences. Whether your guests are vegan, vegetarian, or meat-lovers, there’s something for everyone.
– **Seasonal fresh ingredients**: Spring allows you to incorporate delightful flavors that are at their peak. From asparagus and radishes to strawberries and goat cheese, the seasonal ingredients make for a vibrant and fresh board.
– **Making memories**: Gathering around a beautifully arranged board encourages sharing and conversation, creating a great atmosphere for your brunch.
– **Aesthetic delight**: Nothing beats a well-styled charcuterie board when it comes to impressing guests! The colors and textures all come together for a feast for the eyes.
Ingredients You’ll Need
To make this delightful Spring Charcuterie Board, gather the following ingredients:
- Salami – 4 ounces, thinly sliced: A classic choice that adds savory flavor and pairs well with different cheeses.
- Prosciutto – 4 ounces, thinly sliced: This delicate meat contributes a sweet, salty element that beautifully complements fresh fruits.
- Cheddar Cheese – 4 ounces: A mild cheese that provides a creamy texture and balances the stronger flavors of aged cheese.
- Goat Cheese – 4 ounces: Its tangy profile adds a sophisticated touch and pairs exquisitely with honey and fruits.
- Fresh Strawberries – 1 cup, halved: Bright and naturally sweet, these bring a burst of color and flavor.
- Radishes – 1 cup, quartered: Their crunchiness and peppery bite act as a refreshing counterpoint.
- Asparagus – 1 bunch, blanched: Adds an elegant touch and a healthy green presence.
- Olives – 1 cup: Choose a combination of kalamata and green olives for variety.
- Nuts – 1 cup mixed (almonds, walnuts): Provides a crunchy texture and rich flavor to balance the creaminess of the cheeses.
- Honey – 2 tablespoons: Drizzle this over cheeses for a sweet complement.
- Crackers – 1 box: An assortment of crackers gives a nice crunchy base for the meats and cheeses.
How to Make
Creating a beautiful Spring Charcuterie Board can be accomplished in just a few straightforward steps:
- Prepare the Ingredients: Start by prepping all your ingredients. Slice your cheeses and meats. Halve the strawberries, quarter the radishes, and blanch the asparagus for a couple of minutes to retain that vibrant green color. Make sure everything is at room temperature for the best flavor.
- Choose a Board: Select your board or platter. A wooden cheese board, marble slab, or a large plate will work perfectly. Aim for a size that allows ample space for all components, ensuring they don’t overlap too much.
- Arrange the Cheeses: Start with the cheeses first. Place them in varied spots around the board. Vary the shapes—some can be sliced, while others can be crumbled or left whole. This creates interest and balance.
- Add the Meats: Follow the cheeses with salami and prosciutto. Roll or fold the slices to add height and layers. Secure them with toothpicks if needed.
- Fill with Fruits and Veggies: Now, add in the fresh produce. Scatter strawberries, radishes, and asparagus around the board, utilizing the color contrasts. Think about balance so that colors and textures are evenly distributed.
- Accessorize: Finally, fill in any open spaces with crackers, nuts, and olives. Drizzle honey over the goat cheese, providing a touch of sweetness. Arrange crackers in piles or fanned out, giving a casual yet abundant look.
Variations & Substitutions
Cheese Variation: Instead of goat cheese, consider using a rich brie or a creamy blue cheese to elevate the flavor profile. Both of these options lend a rich, luscious quality to the board. Brie melts well, creating a beautiful, inviting texture when paired with fresh fruits, while blue cheese introduces a strong flavor that can balance out sweet elements.
Fruit Variation: If strawberries aren’t available, substitute them with fresh raspberries or blueberries, which also capture the essence of spring. For a tropical twist, add mango slices or pineapple chunks—they will provide a juicy burst and a touch of sweetness.
Vegetable Variation: Incorporate more spring veggies like sugar snap peas or bell pepper slices. Their bright colors and crisp textures will enhance the overall aesthetic and offer a crunchy addition. Consider pickled vegetables, too, for an extra zing.
Common Mistakes to Avoid
When preparing your charcuterie board, avoid these common pitfalls:
Overcrowding: One mistake is packing the board too tightly. Ensure there are open spaces to highlight the beauty of each ingredient. A crowded board can look unappealing and overwhelming.
Ignoring Balance: Be mindful of color and texture balance. A board loaded with all dark-colored ingredients may not attractively capture the eye. Mix in lighter colors and a variety of textures for a visually appealing arrangement.
Skipping Seasonality: Always consider using seasonal products. Ingredients that are in-season taste better and shine on your board. If you’re serving in spring, make sure you’re using spring produce to create the theme.
Storage, Freezing & Reheating Tips
When preparing charcuterie boards, it’s important to follow proper food safety protocols:
– **Storage:** Keep any leftovers refrigerated in an airtight container. Most cheeses can be kept for about three to five days, while meats should be consumed within a couple of days for the best quality.
– **Freezing:** Most ingredients in a charcuterie board do not freeze well, especially fruits and fresh cheeses. If you need to freeze any items, ensure they are wrapped securely and labeled with the date.
– **Reheating:** If you have leftover meats, consume them cold, or if preferred, gently heat the meat in a skillet over low heat until warm. Be careful not to overheat, as this can make them tough.
Frequently Asked Questions
Can I make a charcuterie board ahead of time?
Absolutely! You can prepare your meats and cheeses a day in advance. Just ensure you cover the board with plastic wrap and keep it in the refrigerator. However, add fresh fruits and veggies just before serving for the best flavor and texture.
How do I choose the right wines to pair with my charcuterie board?
Pair a light white wine, like Sauvignon Blanc, with fresh cheeses, or select a robust red, such as Merlot, to complement aged meats. Also, consider sparkling wines; their bubbles cleanse the palate between bites, enhancing the tasting experience.
What if I have guests with dietary restrictions?
Customize your board with various options. Include dairy-free cheeses or vegan meat alternatives, and provide gluten-free crackers for those with gluten allergies. Always ask your guests about their preferences or restrictions to ensure inclusivity.
How do I prevent the cheeses from drying out?
To avoid drying, store your cheese wrapped in wax paper, then cover it loosely with plastic wrap. Keep it in the cheese drawer of your refrigerator to help maintain moisture. When serving, remove cheese about 30 minutes before offering it to guests for the best texture and flavor.
What can I do with leftover charcuterie ingredients?
Consider incorporating leftovers into salads or pasta dishes, or make a gourmet sandwich. You can also create a charcuterie-style snack platter for a movie night at home, mixing and matching different elements of your charcuterie board for exciting new bites.
Conclusion: The Spring Charcuterie Board is a fun, creative way to delight your guests and celebrate the flavors of the season. With this guide, you’ll have everything you need to assemble an impressive spread in just five simple steps. Not only is this board a feast for the eyes, but it’s also an opportunity to indulge in fresh, seasonal ingredients that will awaken your tastebuds. Enjoy the process, embrace your creativity, and let the flavors of spring shine!


