Prep time: 10 minutes
Cook time: 10 minutes
Total time: 20 minutes
Servings: 4-6
Spring is here, and it’s the perfect time to create a stunning *Spring Charcuterie Board*. Think vibrant colors and fresh ingredients that not only taste delightful but also visually entice your guests. Whether you’re hosting an outdoor brunch, a picnic in the park, or simply enjoying a cozy evening at home, this floral cheese board can be prepared in just 20 minutes.
What Is Spring Charcuterie Board Ideas: Floral Spring Cheese Board in 20 Minutes?
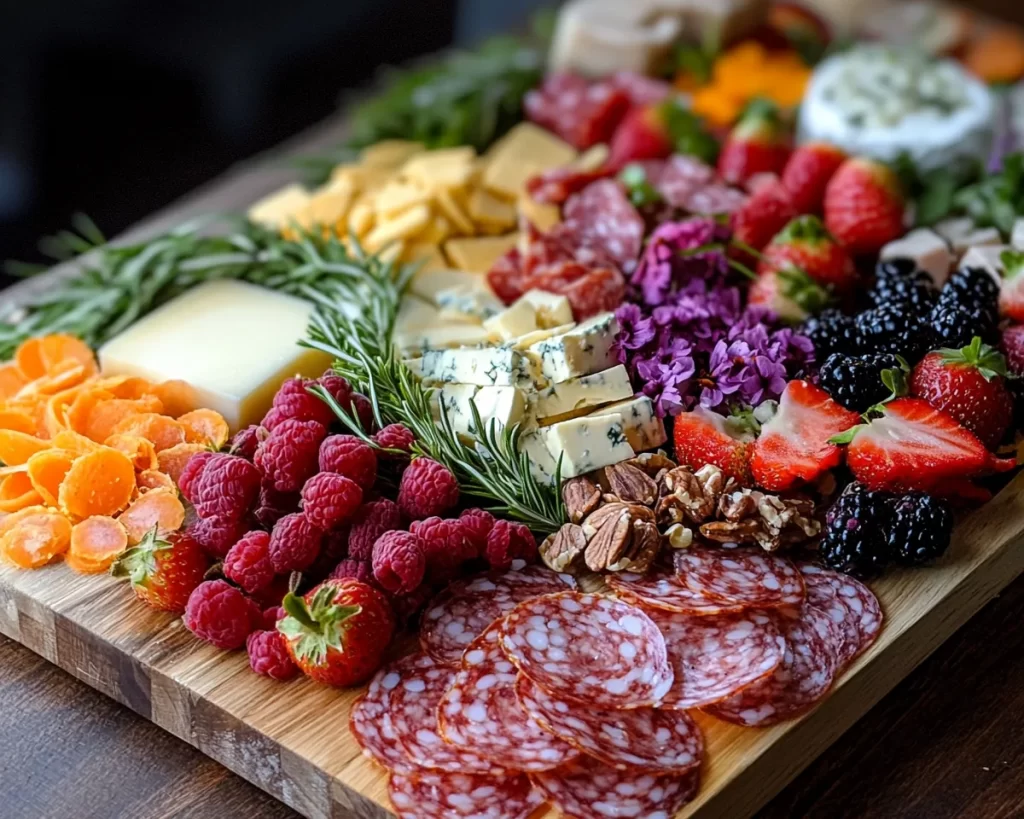
A Spring Charcuterie Board is a beautifully arranged platter filled with an assortment of cheeses, meats, fruits, nuts, and vegetables. The idea is to use seasonal ingredients that offer fresh flavors while utilizing colors and aesthetics to create a visually appealing board. For this floral cheese board, flowers like edible blooms can be included to further enhance the presentation, giving it a touch of elegance and whimsy, embodying the spirit of spring.
Why You’ll Love This
There are numerous reasons to love this Spring Charcuterie Board. Firstly, it’s incredibly versatile; you can customize it to suit your tastes and dietary preferences. Secondly, this board encourages communal eating, perfect for fostering conversation among family and friends. Additionally, preparing a charcuterie board is quick and easy, making it ideal for busy parents or kitchen beginners who want to impress without spending hours in the kitchen.
Ingredients You’ll Need
- Fresh Fruits (e.g., strawberries, blueberries): Provide natural sweetness and a pop of color.
- Assorted Cheeses (e.g., brie, goat cheese, cheddar): Different textures and flavors create a well-rounded palate.
- Charcuterie Meats (e.g., prosciutto, salami): Add savory notes that complement the sweetness of the fruits.
- Nuts (e.g., almonds, walnuts): Offer crunch and richness.
- Vegetables (e.g., cucumbers, cherry tomatoes): Add freshness and color to your board.
- Edible Flowers (e.g., pansies, nasturtiums): For decoration and to enhance the spring aesthetic.
- Crackers or Bread: Essential for serving with cheese and meats.
- Honey or Jam: Adds a sweet contrast to the salty elements.
How to Make
- Gather Your Ingredients: Collect all the items mentioned earlier on your kitchen counter. This will help you visualize how you want your board to look.
- Choose Your Board: Select a platter or wooden board that suits the size you need. A large wooden board often works best as it gives ample space for arranging your ingredients creatively.
- Start with Cheeses: Place your cheeses first, as they will serve as the focal point. Cut some into wedges and leave others whole for variety in presentation. Space them out evenly to give room for other ingredients.
- Add Meats: Next, arrange your charcuterie meats around the cheeses. You can roll them, fold them, or simply place them flat. This adds dimension to your board.
- Add Fruits and Veggies: Fill in the gaps with fresh fruits and vegetables. Their vibrant colors should pop against the cheeses and meats.
- Finish with Nuts and Flowers: Sprinkle nuts around the board for crunch, and place edible flowers strategically for a beautiful finishing touch.
Variations & Substitutions
Cheese Swap: If you prefer different types of cheese, consider using blue cheese, gouda, or a sharp feta, each bringing a unique taste that can elevate your board’s flavor profile. If someone in your group is lactose intolerant or vegan, you can explore plant-based cheese options or omit cheese altogether, replacing it with more fruits and nuts.
Fruits of the Season: Fresh fruits can greatly vary by season and region. While strawberries and blueberries are beautiful in spring, consider seasonal stone fruits like apricots or cherries during early summer or juicy figs in late summer to create an equally colorful board.
Meat Preferences: Customize the meats according to your dietary preferences. For a vegetarian option, you can skip the meats altogether or prepare a selection of savory dips such as hummus or tzatziki to maintain that savory flavor.
Gluten-Free Option: Instead of traditional crackers or bread, serve with rice cakes or sliced vegetables like bell peppers and cucumbers for a refreshing twist.
Common Mistakes to Avoid
One common mistake is **overcrowding the board**. While it’s tempting to use every ingredient, less is often more when it comes to aesthetics. Ensure you leave space between items for an inviting presentation. Another error is forgetting to **include a balance of flavors**. Try to mix sweet, salty, and savory elements so that each bite is a delightful surprise, and the palate is satisfied.
Not considering **the flow of the board** is also a mistake. Arrange your board in a way that makes it easy for guests to serve themselves. Group similar items together but leave room for movement.
Finally, ensure you **leave ingredients whole or in large pieces**, which can make your board appear more abundant. Slicing all your cheeses and meats can make the board look sparse, whereas whole pieces create intrigue.
Storage, Freezing & Reheating Tips
For optimal freshness, prepare your charcuterie board and serve it immediately. Any leftovers should be stored in airtight containers in the fridge, preferably grouped by item type to maintain flavor profiles. Cheese can typically last several days if stored well, but it’s best eaten freshly made as flavors can diminish over time.
When storing fruits, remove any that are bruised or squished to avoid spoiling the batch. If you have dips or spreads, keep those separate to prolong their freshness as well.
When it comes to reheating or refreshing ingredients, consider that cheese should generally not be reheated from a charcuterie board. If you’ve prepared multiple components separately, you can reheat items like meats in a pan or in the oven but be mindful not to overcook them to prevent dryness.
Frequently Asked Questions
Can I make a Spring Charcuterie Board in advance?
Yes, you can prepare many components in advance, such as cutting your cheeses and prepping your fruits and vegetables. However, for the freshest presentation and flavor, it is best to assemble it shortly before serving. If prepared in advance, keep ingredients chilled until it’s time to serve.
What types of flowers can I use on my charcuterie board?
Edible flowers like pansies, nasturtiums, and violets are beautiful options for a Spring Charcuterie Board. Ensure any flowers you use are pesticide-free and safe for consumption. Always verify the edibility of any flowers with your source or a reliable guide.
What sizes should I cut the ingredients?
Aim for bite-sized pieces for meats and cheeses, making them easy to pick up with your hands or a toothpick. Fruits can be whole or halved based on their size. The goal is to ensure everything looks inviting and is easy to serve.
How can I make my board more budget-friendly?
Using seasonal produce and sales at your local grocery store can greatly save on cost. You can also reduce the amounts of more expensive cheeses and meats while increasing the quantity of fruits, vegetables, and nuts for a colorful and vibrant board that doesn’t break the bank.
Can I serve a charcuterie board for a meal?
Absolutely! A Spring Charcuterie Board can stand as a light meal, especially when complemented with some bread or crackers. It’s perfect for brunch or light lunches but can also be served as an appetizer in a larger meal setting.
Conclusion: Create your floral Spring Charcuterie Board in just twenty minutes for a delightful and fresh eating experience. With vibrant colors and flavors, it is perfect for gatherings or simply enjoying at home with family. Enjoy the creativity of building a delicious board while celebrating the essence of spring!


