Prep time: 15 minutes
Cook time: 0 minutes
Total time: 15 minutes
Servings: 8
Spring is the perfect time for fresh gatherings, especially Easter brunches filled with vibrant colors and delicious bites. One of the easiest and most delightful ways to impress your guests is with a beautifully arranged charcuterie board. This guide will help you create a Spring Charcuterie Board Ideas: Easter Brunch Board With Dips in just 15 minutes. From creamy dips to fresh veggies, you’ll be ready to celebrate in no time!
What Is Spring Charcuterie Board Ideas: Easter Brunch Board With Dips in 15 Minutes?
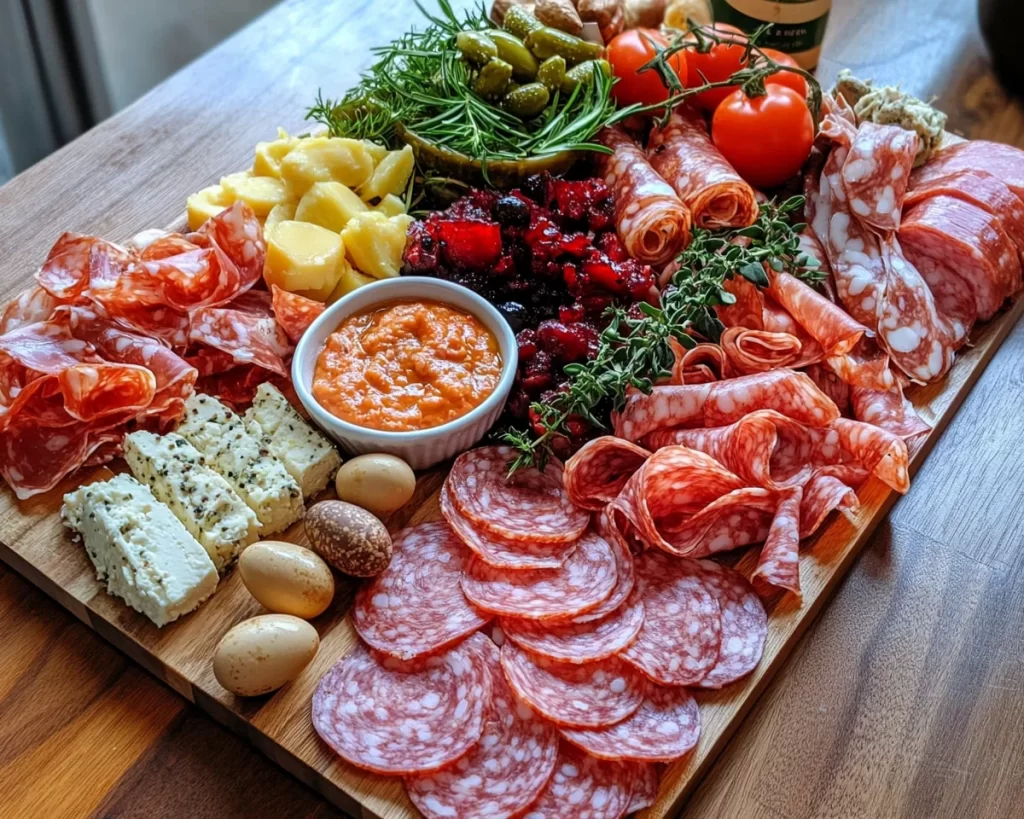
A spring charcuterie board is a thoughtfully curated selection of meats, cheeses, dips, fruits, and vegetables, artfully arranged to create an appealing presentation. This board is designed specifically for Easter brunch, making it not only a feast for the taste buds but also a feast for the eyes. The combination of colors, shapes, and textures invites guests to graze and socialize, turning a simple meal into a festive occasion.
The beauty of a charcuterie board is its versatility. You can customize it according to your preferences and dietary restrictions. Plus, building a charcuterie board allows you to get creative and express your style, all while serving up delicious flavors.
Why You’ll Love This
The Spring Charcuterie Board Ideas: Easter Brunch Board With Dips is the ultimate crowd-pleaser for several reasons. First and foremost, it’s quick to prepare—taking only 15 minutes, which is a game changer for busy hosts seeking to impress. Not only is it visually stimulating, but it also caters to a variety of tastes, ensuring there’s something for everyone, from kids to adults.
This board encompasses healthy options, such as fresh vegetables and fruits, alongside savory options like artisan cheeses and cured meats. Additionally, including vibrant and flavorful dips brings a variety of textures and tastes to the table, making it an interactive eating experience.
Ingredients You’ll Need
- Assorted Cheese (8 oz): A mix of hard and soft cheeses (like cheddar, brie, and gouda) provides a range of flavors and textures.
- Charcuterie Meats (8 oz): Slices of prosciutto, salami, and pepperoni add a savory touch to the board.
- Fresh Fruits (1 cup): Strawberries, grapes, and sliced apples brighten up the presentation and offer a refreshing contrast to savory elements.
- Fresh Vegetables (1 cup): Carrot sticks, cucumber slices, and bell pepper strips provide crunch and are great for dipping.
- Dips (1 cup total): Include a variety such as hummus, spinach dip, and a tangy yogurt dip for guests to enjoy with veggies and crackers.
- Crackers and Breads (8 oz): Offer a variety of textures—think crisp crackers and soft breadsticks—to pair with cheeses and dips.
- Nuts (1/2 cup): Almonds or walnuts add crunch and an earthy flavor to balance the palette.
- Herbs or Edible Flowers: Fresh basil or vibrant edible flowers can be used as garnishes to elevate the presentation.
INSERT IMAGE HERE
How to Make
- Gather Your Ingredients: Begin by collecting all your ingredients on a clean cutting board or serving platter. This way, you can see everything you have and plan your arrangement.
- Start with the Cheeses: Place the cheese in a few prominent spots around the board. Consider using different shapes like cubes for the hard cheese and wedges for soft cheese. This will create height and interest.
- Add the Meats: Fold or roll the charcuterie meats and arrange them next to the cheeses. Using a variety of colors and textures will make the board eye-catching.
- Incorporate Fresh Produce: Scatter the fresh fruits and vegetables around the board. Use the fruits to fill gaps and create a colorful display. For example, place strawberries near the cream cheese, as their flavors complement each other beautifully.
- Include Your Dips: Serve your dips in small bowls or ramekins on the board. Surround them with fresh veggies and crackers for easy access.
- Finish with Nuts and Garnishes: Sprinkle nuts in small piles around the board and add fresh herbs or edible flowers for a stunning final touch.
Variations & Substitutions
Vegetarian Version: For a vegetarian-friendly option, consider substituting the meat with additional vegetables and cheeses. Add items like sliced avocado, olives, and artichokes for a Mediterranean twist. Incorporate a larger variety of dips, perhaps an olive tapenade or roasted red pepper spread, which will enhance the flavors without meat.
Gluten-Free Version: For a gluten-free version, replace regular crackers and bread with gluten-free alternatives. Opt for rice cakes, gluten-free crackers, or even sliced vegetables like zucchini and bell peppers to provide crunchy, dippable options. Ensure that all store-bought dips and cheeses are gluten-free to maintain the dietary restrictions.
Sweet and Savory Mix: You can enhance your Spring charcuterie board by adding sweet elements like a small bowl of honey or chocolate sauce alongside the cheeses. This creates a delightful balance of flavors, allowing guests to drizzle sweetness over savory cheeses and pair with fresh fruits.
Common Mistakes to Avoid
When creating a charcuterie board, be cautious about overcrowding the board. Ensure there’s enough space between different items so that guests can easily access everything without needing to dig in too deeply.
A common mistake is using only one type of cheese or meat. Variety is crucial, so try to incorporate at least three different types to provide a range of flavors and textures.
Also, be aware of not balancing flavors. Aim for a mix of salty, sweet, sour, and tangy items to keep the palate engaged.
Storage, Freezing & Reheating Tips
For optimal freshness, assemble your charcuterie board just before serving. However, any leftover cheese, meats, and dips can typically be stored in airtight containers. If you have assembled a part of the board without fresh produce, you can refrigerate it for 2-3 days. Make sure to wrap any leftover meats and cheeses tightly to prevent them from drying out.
When freezing items like dips, ensure they’re stored in freezer-safe containers. They can be kept frozen for 1-2 months. To reheat dips, simply thaw in the refrigerator and warm gently on the stove or in the microwave. Do not refreeze thawed items, as it affects the texture and flavor.
Frequently Asked Questions
Can I prepare the charcuterie board ahead of time?
Absolutely! While it’s best to assemble just before serving for utmost freshness, you can prep ingredients in advance. Slice meats and cheeses and prepare dips a day before. Store them separately in airtight containers and assemble your board shortly before guests arrive.
What type of cheese is best for a spring charcuterie board?
For spring, choose light, fresh cheeses to match the seasonal theme. Consider goat cheese, fresh mozzarella, or brie for a creamy texture that complements fresh fruits well. Hard cheeses like aged cheddar can add a delightful contrast.
Can charcuterie boards be made vegan?
Yes, vegan charcuterie boards are a fantastic option! Use plant-based cheeses, a variety of fresh vegetables, fruits, nuts, and dips made from legumes or nuts. Incorporating hummus, guacamole, and nut spreads will provide a rich experience without animal products.
How many people can a charcuterie board serve?
This depends on the size of your board and the amount of food you include. As a guideline, for a small gathering, a board should comfortably serve 4-8 people. If it’s the main attraction of the meal, plan more servings per person to ensure everyone gets enough.
What can I do with leftover charcuterie items?
Think of creative ways to utilize leftovers! Add leftover cheese to an omelet, toss meats into a salad, or blend leftover dips into pasta sauce. Most cheeses and meats can be repurposed in various recipes that will delight your culinary senses.
Conclusion: Creating a Spring Charcuterie Board Ideas: Easter Brunch Board With Dips in 15 minutes is not just a practical choice; it’s a delightful way to showcase your creativity while pleasing the crowd. With its vibrant colors and rich flavors, this board transforms a simple brunch into a memorable feast. Whether you’re a busy parent or a kitchen beginner, this easy recipe proves that impressive gatherings do not require hours of preparation. Enjoy the process, and relish the delightful moments shared around the table!


