Prep time: 30 minutes
Cook time: 1 hour
Total time: 1 hour 30 minutes
Servings: 12
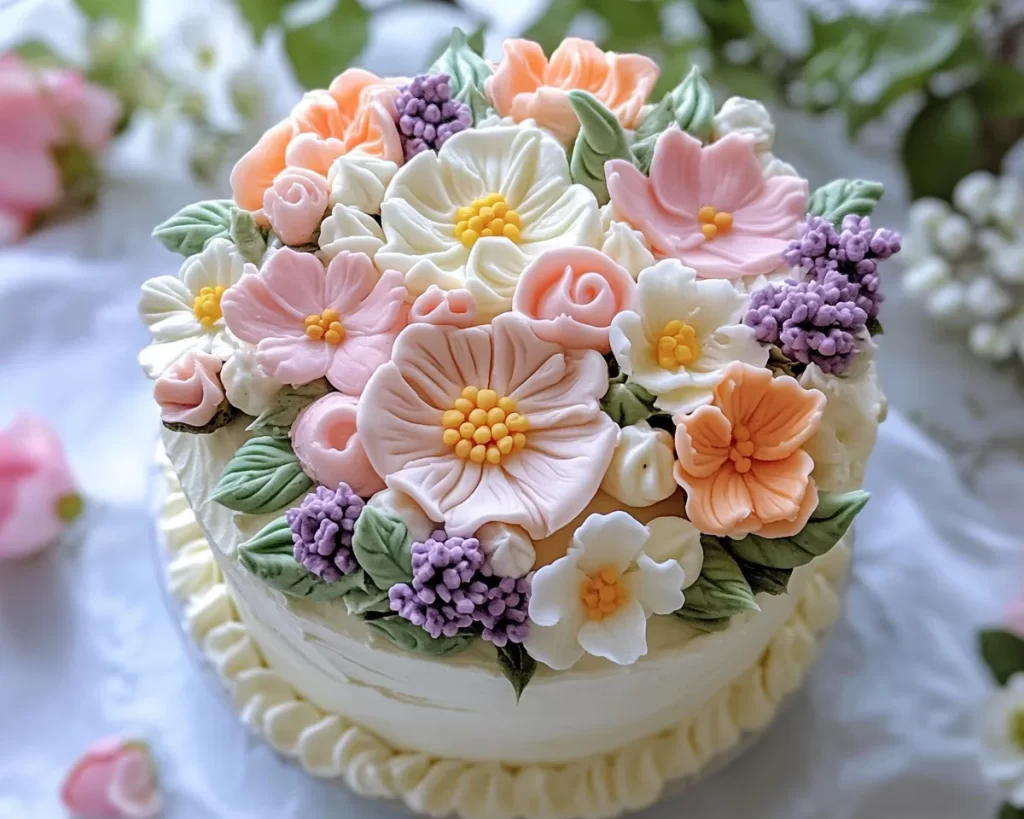
Indulging in a beautifully decorated cake can be a heartwarming experience. As busy parents or lovers of culinary art, we often look for ways to enhance our baking skills, especially when a special occasion comes up. The aroma of freshly baked cake filling your kitchen is simply irresistible. This Spring Cake Design with its Pastel Floral Cake Topper is not just a feast for the taste buds but also a visual delight. The layers of soft sponge cake, paired with a light and fluffy frosting, find harmony with delicate floral decorations that breathe life into your celebration.
In this recipe, you’ll learn everything from creating the perfect cake layers to crafting floral toppers that look as good as they taste. Whether you are a beginner struggling with cake decorating or a more experienced home cook looking to impress, this cake design will guide you through the process seamlessly.
What Is Spring Cake Designs: Pastel Floral Cake Topper Design?
The Spring Cake with a Pastel Floral Cake Topper is a splendid homage to the vibrant colors and fresh spirit of spring. Originating from the traditional layering technique of cake baking, this dessert exemplifies elegance and creativity. The key to its appealing nature lies in the flavors and textures of the sponges, typically made with light vanilla or lemon bake. This cake is often layered with a sumptuous buttercream frosting, which not only enhances the sweetness but also acts as the perfect adhesive for the beautiful floral decorations.
What sets this cake apart is the floral topper—a charming way to bring the essence of spring right into your home. Pastel colors reflect the softness of seasonal blossoms, creating an inviting look that makes it an ideal centerpiece for celebrations like birthdays, baby showers, or simply to welcome the warm weather. The cake’s flavor profile combines sweetness with a hint of citrus and floral notes, creating a balanced treat that pleases the palate.
Why You’ll Love This
This Spring Cake Design that features a Pastel Floral Cake Topper is a favorite for many reasons. First and foremost, the taste is unbeatable; the layers of soft, fluffy cake combined with the creamy frosting make every bite a delight. You can easily customize this cake to suit preferences, reducing ^sugar or using gluten-free flour, making it a versatile option that everyone can enjoy. The visual appeal alone is worth it—you’ll feel like an artist crafting a masterpiece every time you whip up this creation.
Common misconceptions often arise when it comes to cake decorating, making it seem more daunting than it truly is. Many believe intricate designs are reserved for professional bakers, but with this recipe, you’re equipped with the essential techniques that can be mastered in your own kitchen. By taking your time and following each step, you can achieve stunning results without the fuss. The effort is more than worth it when you see the joy in your family’s faces as they indulge in the deliciousness you’ve created.
Ingredients You’ll Need
To make this Spring Cake with a Pastel Floral Cake Topper, gather the following ingredients:
- 2 ½ cups all-purpose flour: The base of your cake, providing structure. For gluten-free options, substitute with almond or coconut flour.
- 2 ½ tsp baking powder: This is essential for proper rising. Ensure it’s fresh to achieve a light and airy texture.
- ½ tsp salt: Balances the sweetness while enhancing flavor.
- 1 ½ cups granulated sugar: Sweetens your cake. You can use a sugar substitute if needed.
- ¾ cup unsalted butter, softened: Adds richness; ensure it’s at room temperature for even mixing.
- 4 large eggs: The binding agents that help the cake rise and deliver moisture.
- 1 cup milk: Keeps the cake moist. You can replace it with almond or oat milk for a dairy-free version.
- 2 tsp pure vanilla extract: Enhances flavor; opt for high-quality extract for the best results.
- 2 cups buttercream frosting: The main icing, perfect for layering and decorating. Make it homemade or store-bought.
- Pastel food coloring: For tinting your frosting to create beautiful floral accents.
- Edible flowers: For decoration; ensure they are safe for consumption.
Each of these ingredients plays a vital role in crafting your cake’s texture and flavor profile. Take care in measuring accurately for the best results. For substitutions, much of this can be tailored to fit dietary restrictions or personal preferences.
How to Make
Creating the Spring Cake with a Pastel Floral Cake Topper is a joyful experience that culminates in a celebration of flavors. Follow these steps to achieve baking success:
- Prepare your baking pans: Start by preheating your oven to 350°F (175°C). Grease and flour two 9-inch round cake pans, ensuring they are well coated to prevent sticking. You can also use parchment paper for an easier release, which is particularly helpful for beginners.
- Mix dry ingredients: In a large mixing bowl, whisk together 2 ½ cups of all-purpose flour, 2 ½ teaspoons of baking powder, and ½ teaspoon of salt. This step helps to aerate the flour and ensures even distribution of leavening agents, which is crucial for a light and fluffy cake.
- Blend butter and sugar: In a separate large bowl, beat ¾ cup of softened unsalted butter and 1 ½ cups of granulated sugar with an electric mixer on medium speed until the mixture is creamy and light. This process typically takes about 3-5 minutes. Creaming the mixture properly will incorporate air, which contributes to the cake’s light texture.
- Add eggs and vanilla: Incorporate 4 large eggs, one at a time, mixing well after each addition. Then, add 2 teaspoons of pure vanilla extract. Beat until the mixture is smooth and glossy, about another minute. This ensures that the eggs are well incorporated and contribute to the overall moisture and richness of the cake.
- Combine dry and wet ingredients: Gradually add the dry mixture to the butter mixture, alternating with 1 cup of milk, starting and ending with the flour mixture. Mix just until combined; overmixing can lead to a dense cake. A few flour streaks are okay to avoid developing the gluten too much.
- Pour into pans: Divide the batter evenly between the prepared cake pans. Smooth the tops with a spatula to ensure even baking. Bake in the preheated oven for approximately 25-30 minutes or until a toothpick inserted into the center comes out clean.
- Cool the cakes: Once baked, remove the cakes from the oven and let them cool in the pans for about 10 minutes. Then, carefully turn them out onto wire racks to cool completely. This step is essential to prevent sogginess and allows the cake to set properly.
- Make the frosting: While the cake cools, prepare your buttercream frosting. If using a pre-made version, simply give it a good stir to make it easy to spread. If making from scratch, beat together 2 cups of softened butter with powdered sugar and any flavorings until you reach the desired consistency.
- Assemble the cake: Once the cakes are completely cooled, place one layer on a serving tray. Spread a generous amount of buttercream frosting on top. Place the second cake layer on top and apply a crumb coat (a thin layer of frosting to lock in crumbs) across the entire cake. Chill for about 15 minutes to set the crumb coat.
- Decorate: Finish frosting your cake with the remaining buttercream. Use an icing spatula to create smooth edges. Then, dye additional frosting with pastel food coloring. Using a piping bag fitted with a flower tip, decorate the top with piped rafts of colorful frosting. Top with edible flowers for a stunning finishing touch.
As you build your cake, remember that patience is key to achieving lovely layers and decorations. Your cake’s texture should be soft and inviting, leaving everyone excited for a slice.
Variations & Substitutions
Gluten-Free Variation: For those who follow a gluten-free diet, using a blend of almond flour and gluten-free all-purpose flour is a great alternative. This substitute gives your cake a nutty flavor while maintaining a fluffy consistency. Ensure the baking powder is labeled gluten-free as well, as cross-contamination can occur.
Lemon Coconut Variation: Adding lemon zest to the cake batter along with 1 cup of shredded coconut brings a tropical twist. This variation is perfect for those who adore citrus flavors and want a fresh take on traditional cake. The oil in the coconut keeps the cake moist and adds a delightful chewiness.
Chocolate Floral Design: For chocolate lovers, substituting half of the all-purpose flour for cocoa powder in the cake batter can transform your dessert. Don’t forget to adjust sugar levels slightly, as cocoa can be a touch bitter. Paired with a mocha-flavored buttercream, this variation creates a rich and decadent cake that pleases the chocolate enthusiasts at your gathering.
Dairy-Free Option: If you’re looking to make this cake dairy-free, opt for dairy substitutes like coconut oil or vegan butter in place of the unsalted butter. Likewise, almond milk or oat milk can stand in for regular milk. Ensure that your frosting is also made free of animal products, sometimes easier than you might expect!
Regardless of the direction you choose to take your cake, each variation brings about a distinct flavor and experience that will delight your guests and family alike.
Common Mistakes to Avoid
When embarking on your cake-baking journey, several common pitfalls can occur. One such mistake is overmixing the batter. This can lead to a dense, tough cake. Remember, mix until just combined to incorporate air while avoiding excessive gluten formation.
Another common issue arises in the baking process itself. Always check your oven’s temperature with an oven thermometer, as inconsistent heat can lead to uneven baking. If your cakes aren’t baking uniformly, you can rotate them halfway through.
Be cautious with the frosting temperature as well. If your buttercream is too warm, it can become too soft and challenging to work with. Conversely, if it’s too cold, it won’t spread easily. Aim for a silky texture that’s cool yet workable to create the best decorations.
Finally, ensure your cakes are completely cool before frosting; otherwise, the warm layers can melt the frosting, leading to a messy result.
Storage, Freezing & Reheating Tips
Proper storage is crucial to maintain the flavor and texture of your Spring Cake. Once fully decorated, it can be left at room temperature for up to two days. If you plan on keeping it longer, store it in an airtight container in the refrigerator to make it last up to a week.
For freezing, wrap individual slices tightly in plastic wrap followed by aluminum foil, or place the entire cake in a freezer-safe container. The frozen cake can last up to three months. When you’re ready to enjoy it again, thaw the cake in the refrigerator overnight for the best results. Avoid reheating; instead, let it come to room temperature naturally.
Keep in mind that food safety is paramount. If your cake has had any cream or custard fillings, it may need to be consumed sooner. When storing, always ensure to check that there are no signs of spoilage before indulging.
Frequently Asked Questions
Can I make this cake ahead of time? Yes! You can bake the cake layers a day or two in advance, wrap them individually in plastic wrap, and store them in the refrigerator or freezer. Just frost them the day you intend to serve to keep the frosting fresh and vibrant.
What can I use if I don’t have edible flowers? If edible flowers aren’t available, consider using fondant decorations or piped frosting flowers. They can create similar aesthetic effects with less hassle.
How long will the cake last once made? When properly stored in an airtight container, your cake will last about five to seven days in the refrigerator. If left at room temperature, it can stay fresh for up to two days.
Is there a vegan version of this cake? Absolutely! You can create a vegan version by substituting the eggs with flaxseed meal or apple sauce, using plant-based butter and dairy-free milk. This way, everyone can enjoy it!
Can I use a different frosting for this cake? Certainly! Aside from buttercream, a cream cheese frosting or whipped ganache can serve as excellent alternatives, imparting unique flavors and textures. Explore different frostings to discover what suits your palate best.
Conclusion:
In wrapping up this delightful journey into the world of baking, the Spring Cake with a Pastel Floral Cake Topper stands out as a culinary triumph celebrating the essence of spring. Not only is it a feast for the eyes, but it also caters to an array of tastes and dietary needs. I encourage you to embark on this baking adventure—experiment with flavors, designs, and decorations to make it uniquely yours. Share your creations with your loved ones, and relish the joy that comes from bringing people together over a lovely cake. Happy baking!


