Prep time: 30 minutes
Cook time: 45 minutes
Total time: 1 hour 15 minutes
Servings: 12
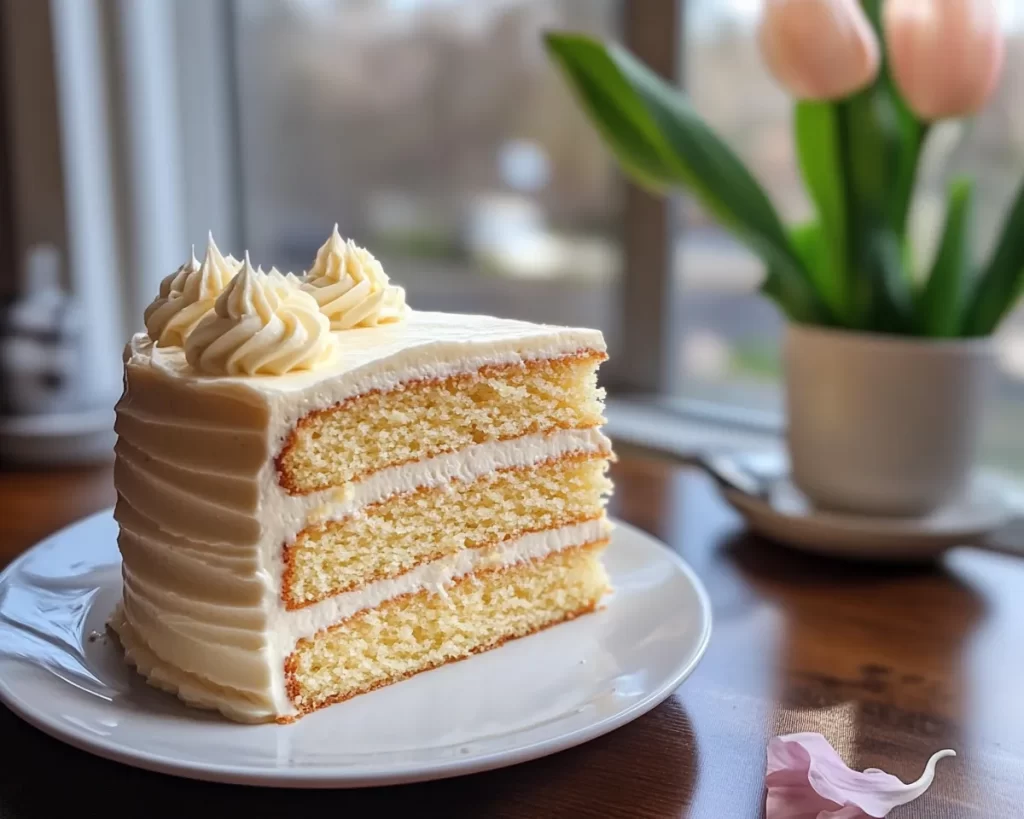
As spring unfolds, it brings with it a sense of renewal, and nothing says “celebration” quite like a beautifully crafted birthday cake. The **Spring Birthday Cake: Lemon Vanilla Layer Cake** is a delightful treat that mingles the zest of fresh lemons with the soft, sweet notes of vanilla. This cake is perfect for spring celebrations, whether you’re hosting a birthday party, an afternoon tea, or a simple family gathering.
Imagine a layer of bright, tangy lemon curd nestled between fluffy vanilla layers, topped off with a silky lemon vanilla frosting. This cake is not just a feast for the palate; it’s a feast for the eyes as well! Its vibrant colors and inviting aroma can take you back to warm afternoons spent enjoying desserts in a sunlit garden. You will learn how to create this masterpiece step-by-step, complete with tips for ensuring each layer comes out perfectly moist and flavorful.
What Is Spring Birthday Cake: Lemon Vanilla Layer Cake?
The **Spring Birthday Cake: Lemon Vanilla Layer Cake** is a celebration of flavors, combining the invigorating essence of lemons with the comforting sweetness of vanilla. This cake originates from classic American baking traditions, where layered cakes are often the centerpiece of festive occasions. With its light texture, the cake is neither too dense nor too airy, striking a perfect balance that encourages you to go back for seconds or even thirds!
When you take a bite, the first sensation is the sweet, buttery vanilla that greets your palate, quickly followed by a zesty burst from the fresh lemon. The combination of these flavors creates a harmonious blend that’s vibrant and refreshing, making it especially suitable for springtime celebrations. The layers of lemon curd add a beautiful tartness that complements the richness of the buttercream, ensuring a multi-dimensional experience with every forkful.
This cake isn’t just about flavor; it’s visually stunning, often adorned with some edible flowers or citrus slices, reflecting the beauty of spring. Whenever you slice into it, you reveal layers that are not only appealing but also signify the love and effort put into making it. Whether enjoyed as part of a birthday celebration or a simple family gathering, this Lemon Vanilla Layer Cake is sure to leave a lasting impression.
Why You’ll Love This
You will absolutely love this cake for several reasons. First and foremost, the flavor profile is elevated; the zing of the lemon is perfectly balanced by the rounded sweetness of vanilla, creating a cake that dazzles the taste buds. Furthermore, its preparation is straightforward, making it an accessible endeavor for both novice and seasoned bakers. Even if you’re busy juggling life’s responsibilities as a parent or a professional, this recipe is designed for simplicity without compromising on quality.
Cost-wise, baking at home is often more economical than purchasing a bakery cake, particularly for larger gatherings. The primary ingredients are basic pantry staples, plus some fresh lemons that can be acquired easily. So, not only is it delicious, but it’s also wallet-friendly!
There are misconceptions when it comes to baking with lemon; many believe it can be overly sour or difficult to get right. However, this recipe ensures that the lemon enhances rather than overwhelms the cake. You’ll also appreciate the versatility of this recipe; it can be customized to suit various dietary preferences, allowing you to cater to those with specific tastes or restrictions. Embrace the chance to create your very own version of this classic cake that everyone will adore.
Ingredients You’ll Need
- All-purpose flour: 2 ½ cups
This forms the base of your cake, giving it structure. If preferred, you can use a gluten-free flour blend. - Sugar: 2 cups
Granulated sugar sweetens your cake and helps create a tender crumb. Brown sugar can be used for a deeper flavor. - Baking powder: 1 tablespoon
This is a crucial leavening agent, ensuring your layers rise beautifully to create that light texture. - Salt: ½ teaspoon
A small amount of salt enhances flavor; don’t skip this step! - Unsalted butter: 1 cup (softened)
Butter adds richness; using unsalted allows you to control the saltiness of your cake. - Eggs: 4 large
Eggs provide moisture and stability; opt for farm-fresh ones for the best results. - Vanilla extract: 2 teaspoons
Pure vanilla extract boosts the cake’s flavors significantly, elevating the sweet notes. - Milk: 1 cup
Aids moisture and contributes to a tender crumb; almond milk works for a dairy-free option. - Fresh lemon juice: ½ cup
The zest of fresh lemons indeed brightens the entire cake, adding that required tanginess. - Lemon zest: Zest of 2 lemons
This ingredient amplifies the lemon flavor in a subtle manner, creating depth that enhances your overall experience. - Lemon curd: 1 cup
Use store-bought or homemade for filling between layers, adding a rich, tangy backdrop. - Powdered sugar: 4 cups (for frosting)
This sweetens the frosting and creates that signature fluffiness that everyone loves. - Lemon juice: 2 tablespoons (for frosting)
Adds tanginess to the frosting, making it the perfect complement to the cake.
Each ingredient plays a crucial role in creating the desired texture, flavor, and overall experience that defines this cake. Remember to check your pantry before you head out for any ingredients!
How to Make
1. **Preheat the oven: Start by preheating your oven to 350°F (175°C).** Make sure that your oven is properly calibrated for precise baking. Prepare two 9-inch round cake pans by greasing and lining them with parchment paper. This will ensure easy release once your cakes are baked.
2. **Mix the dry ingredients:** In a medium bowl, whisk together the all-purpose flour, baking powder, and salt until well combined. This helps distribute the leavening agent evenly throughout the flour, ensuring uniform rise in your cake layers.
3. **Cream the butter and sugar:** In a large mixing bowl, cream the softened unsalted butter with the granulated sugar until light and fluffy. This step generally takes about 4–5 minutes when using an electric mixer; it’s essential as it incorporates air and contributes to the cake’s tender texture.
4. **Incorporate the eggs and vanilla:** Add the eggs one at a time to the butter-sugar mixture, ensuring each egg is fully incorporated before adding the next. Pour in the vanilla extract, mixing until combined. The batter should be smooth and silky at this point.
5. **Add the dry ingredients and liquids:** Gradually fold in the dry mixture alternately with the milk. Start with a third of the flour mixture, then half of the milk, and repeat until all ingredients are combined. Be careful not to overmix, as this can lead to a dense cake.
6. **Blend in the lemon zest and juice:** Finally, add the fresh lemon juice and zest. Watch as the batter brightens with its zesty aroma. This will also increase the cake’s moisture content beautifully.
7. **Divide and bake:** Pour the cake batter evenly into the prepared cake pans. Bake in the preheated oven for 30–35 minutes, or until a toothpick inserted in the center comes out clean. Exact baking time may vary, so keep an eye on the cakes as they bake.
8. **Cool the cakes:** Once baked, remove the pans from the oven and allow them to cool in the pans for about 10 minutes. After that, gently remove the cakes from the pans and transfer them to a wire rack to cool completely. This cooling period is crucial; a warm cake can cause frosting to melt off!
9. **Prepare the frosting:** In a separate mixing bowl, whip the softened butter until creamy. Gradually add the powdered sugar and the lemon juice, mixing until it’s light and fluffy. Taste the frosting and adjust the sweetness or lemoniness according to your preference.
10. **Fill and frost the cake:** Once the layers are completely cooled, place one layer on a serving plate. Spread a thick layer of lemon curd on top, then place the second layer gently on top. Frost the entire cake with the lemon frosting. Be generous and smooth it out for an elegant finish.
11. **Decorate:** If desired, garnish the cake with edible flowers, lemon slices, or a sprinkle of lemon zest to elevate its visual appeal. This final touch can provide a pop of color that brings the whole cake together.
12. **Slice and serve:** Allow the cake to set for about 30 minutes before slicing into it. This will make it easier to serve and the flavors of the lemon curd and frosting will meld beautifully. Enjoy each slice with a refreshing drink or a cup of tea for a delightful experience!
Variations & Substitutions
Gluten-Free Variation: For a gluten-free version, substitute all-purpose flour with a high-quality gluten-free flour blend. Be sure to use a blend that includes xanthan gum for added structure, as this will help stabilize the cake layers. The flavor will remain wonderfully vibrant, but be cautious in checking the baking time, as gluten-free cakes can differ in their rising and baking dynamics.
Dairy-Free Variation: If you’re catering to dairy-free diets, substitute unsalted butter with dairy-free margarine or coconut oil. Additionally, use almond or oat milk in place of regular milk. This doesn’t compromise the deliciousness of the cake; the distinct flavors of lemon and vanilla still shine through beautifully.
Fruit-Filled Variation: To add an additional fruity layer of flavor, consider incorporating fresh berries or other fruits. Layer fresh strawberry slices, blueberries, or raspberries between the cake layers along with the lemon curd for a burst of freshness in every bite. Fruits can lend moisture and additional texture, making this cake even more delightful.
Chocolate Version: For chocolate lovers, infuse the batter with cocoa powder, replacing a portion of the flour with it. A chocolate lemon cake may sound unconventional, yet the vibrant lemon curd will provide a refreshing contrast to the rich chocolate flavors, creating a unique sensory experience that will surprise your guests.
Vegan Option: To make this cake vegan-friendly, replace eggs with flax egg alternatives (1 tablespoon of ground flaxseed mixed with 2.5 tablespoons of water for each egg) and opt for a plant-based butter for the frosting. Substitute regular milk with any plant-based milk for a deliciously moist cake that everyone will love, regardless of their dietary choice.
Common Mistakes to Avoid
One common mistake is underestimating the importance of room temperature ingredients. If your butter or eggs are too cold, the batter won’t emulsify properly, leading to inconsistencies in texture. Always take a moment to bring these ingredients to room temperature before starting. Additionally, avoid the temptation to open the oven door frequently while baking, as this can disturb the rising process and cause your cakes to deflate.
Another crucial point is the measuring techniques for your dry ingredients. Packing flour can lead to a heavier cake due to too much dry material in the batter. Use the spoon-and-level method for accuracy: aerate your flour by fluffing it with a spoon before spooning it into your measuring cup, leveling it off with a knife for precision.
Finally, remember not to frost the cake while it’s still warm. Letting the layers cool completely prevents the buttercream from melting, allowing for a beautifully presented cake. If you frost too soon, you may end up with a glossy, melted frosting instead of the fluffy layer you envisioned.
Storage, Freezing & Reheating Tips
When it comes to storing your **Spring Birthday Cake: Lemon Vanilla Layer Cake**, it’s best to keep it in an airtight container at room temperature if you plan to consume it within a couple of days. Refrigeration can dry out the cake, but if you need to store it longer, you can place it in the fridge wrapped in plastic wrap or aluminum foil.
For longer storage, consider freezing the cake. Slice the cake as needed and wrap each piece tightly in plastic wrap followed by aluminum foil to prevent freezer burn. You can freeze the cake for up to three months. When you’re ready to enjoy, simply take it out of the freezer, unwrap it, and let it thaw naturally at room temperature.
When reheating, avoid the microwave if possible, as it may introduce moisture and alter the cake’s texture. Instead, preheat your oven to a low setting, around 300°F (150°C), and place the cake on a baking sheet for a few minutes, just long enough to warm it without overheating it.
Frequently Asked Questions
Can I make this cake ahead of time? Yes, you can prepare the cake layers a day in advance. Just remember to cool them completely before wrapping them securely in plastic wrap and storing them in the refrigerator. You can also make the frosting ahead of time; just keep it in the refrigerator and allow it to come to room temperature before using.
How can I make the cake more lemony? If you prefer a stronger lemon flavor, consider adding more lemon zest or juice to both the cake batter and frosting. You could also substitute some of the vanilla extract with lemon extract for a more pronounced citrus aroma.
Is it necessary to let the cake cool completely before frosting? Yes! It is crucial to allow the cake layers to cool completely before frosting. If the cake is warm, the frosting will melt off. Cooling the layers also helps prevent them from breaking apart or becoming overly crumbly.
Can I use store-bought lemon curd? Absolutely! Using store-bought lemon curd is a great time-saver. Just ensure that it’s of high quality to match the depth of flavor in your homemade cake. Alternatively, you can make your own lemon curd for an even fresher taste.
What can I pair this cake with? This cake pairs wonderfully with drinks like lemon-infused iced tea, sparkling water, or a light white wine. It also complements fresh fruit salads, providing a refreshing backdrop to the rich flavors of your cake.
Conclusion:
The **Spring Birthday Cake: Lemon Vanilla Layer Cake** is not just a dessert; it’s an experience filled with vibrant flavors and beautiful memories. With its light texture and delightful lemony sweetness, it serves as the perfect centerpiece for any spring gathering. By following this detailed guide, you’ll be well on your way to creating your own stunning cake that friends and family will rave about.
Try your hand at customizing this recipe or share it with someone special. This cake beckons to be enjoyed, celebrated, and relished. So gather your ingredients, invite loved ones, and create unforgettable moments around the table. Happy baking!