Prep time: 20 minutes
Cook time: 30 minutes
Total time: 3 hours
Servings: 10
Soft and fluffy homemade milk bread is one of those comforting treats that can transport you right back to your childhood. There’s something incredibly satisfying about slicing into a warm loaf and enjoying its tender texture. You might find yourself remembering the days of sharing fresh bread with family at the breakfast table. This recipe is not only simple but also yields a deliciously tender loaf that can be enjoyed with anything from butter and jam to savory sandwiches. You’ll learn how to make a loaf that rivals those from bakery windows, filled with milk’s richness that creates a soft, pillow-like texture everyone loves.
In this article, you will learn everything from the basics of making milk bread to the subtle nuances that make it special. Whether you are a busy parent looking to whip up a quick snack or a beginner eager to impress your family, this recipe checks all the boxes. Get ready to gain confidence in your baking abilities as we navigate through flavor profiles, ingredient roles, and the magical transformation of simple components into a delightful loaf of bread!
What Is Soft and Fluffy Homemade Milk Bread?
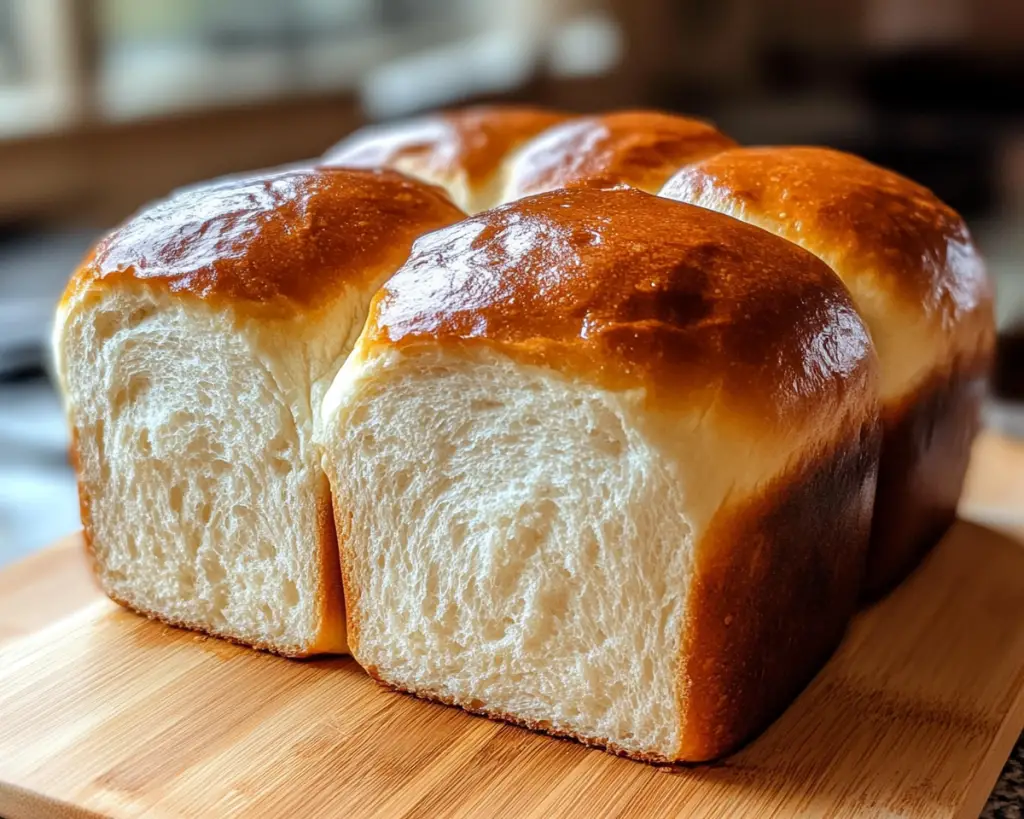
Soft and fluffy homemade milk bread has its roots in Asian baking traditions, particularly in places like Japan and China. This bread is characterized by its incredibly soft crumb and slightly sweet flavor profile. The key ingredient here is milk, which enhances the moisture content, giving the bread its sought-after tenderness. The milk reacts with the yeast to create a rich, flavorful loaf that melts in your mouth.
The texture is often described as “pillowy,” a perfect contrast to the crisp crust that forms while baking. Each slice is delicate yet sturdy enough to hold your favorite toppings. If you’re accustomed to dense, heavy breads, this milk bread will feel like a revelation. Its lightness makes it suitable for a variety of uses—from breakfast toast to sandwiches, and even as a base for French toast or bread pudding.
Despite its simple ingredients, this bread constantly surprises with its depth of flavor and softness, making it a favorite among both novice and seasoned bakers. This recipe will guide you step-by-step to achieving that perfect, airy loaf right at home.
Why You’ll Love This
You will undoubtedly fall in love with soft and fluffy homemade milk bread for several reasons. First and foremost, the taste is just divine—it strikes a balance between sweet and savory, making it perfect for breakfast, lunch, or any time snack. Adding to that, the ease of preparation makes it accessible for everyone, whether you are an experienced baker or just starting out. Plus, with the cost of ingredients being so low, you can bake in bulk and enjoy it all week long.
Another benefit is the versatility of this bread. It makes for excellent toast topped with butter and sugar, but it can also serve as the base for a hearty sandwich. Many worry about the *dough* becoming too complicated, but I assure you that with a few simple techniques and a bit of patience, you can achieve a stunning loaf. Understanding that the bread can be customized by adding fillings or glazes will also boost your confidence in the kitchen. You can explore different flavors and textures as you make this recipe your own.
It’s common to think that baking bread is an overly time-consuming process. Still, milk bread is manageable and incorporates straightforward methods that guarantee success even for novices. Say goodbye to store-bought bread and hello to warmly baked, homemade meals!
Ingredients You’ll Need
- All-Purpose Flour: The backbone of your bread, providing the structure. You can substitute with bread flour for a chewier texture.
- Milk: Whole milk is most commonly used, but you can opt for alternatives such as almond or soy milk for a dairy-free version.
- Yeast: Active dry yeast is essential for helping the dough rise, giving it the soft texture. Make sure it is fresh for best results.
- Granulated Sugar: A small amount sweetens the dough and feeds the yeast. You can use honey or agave as alternatives.
- Unsalted Butter: Adds richness and flavor; however, you may replace it with margarine or coconut oil for dairy-free needs.
- Salt: Enhances flavor and controls the yeast activity. Avoid omitting this ingredient, as it’s critical for balanced taste.
- Warm Water: Activates the yeast, bringing it to life. Make sure it is not too hot; otherwise, it might kill the yeast.
How to Make
- Begin by activating the yeast. In a small bowl, combine the warm water (about 110°F) and granulated sugar. Stir in the yeast and let it sit for 5-10 minutes until frothy. This means your yeast is alive and ready to work its magic. If it doesn’t froth, you may need to start again with fresh yeast or ensure your water was at the correct temperature.
- In a large mixing bowl, combine the all-purpose flour and salt. Give it a quick stir to ensure the salt is evenly distributed, as it’s crucial for flavor. Then, create a small well in the center and add the yeast mixture along with the milk and melted butter. Using a wooden spoon or your hands, stir the mixture until it forms a shaggy dough. The dough may feel sticky at this stage; that’s perfectly alright.
- Next, transfer the dough onto a lightly floured surface. Knead the dough for about 10-15 minutes until it becomes smooth and elastic. You can tell it’s ready when it springs back lightly when pressed. Kneading not only develops the gluten but also incorporates air into the dough, making it lighter.
- Place the kneaded dough into a lightly greased bowl, cover it with a damp cloth or plastic wrap, and let it rise in a warm, draft-free area for about 1 to 1.5 hours, or until it has doubled in size. This is known as the first proofing, and it’s essential for creating that fluffy texture. If the kitchen is cold, consider placing it in an oven with the light on to create a warm environment.
- After the dough has risen, punch it down gently to release air bubbles. This step may seem counterintuitive, but it’s critical to ensure the right texture in your final loaf. Shape the dough into a ball and let it rest for about 10 minutes, which makes it easier to handle in the next step.
- Preheat your oven to 350°F (175°C). Prepare a loaf pan by greasing it lightly or lining it with parchment paper for easy removal. Now, roll the dough into a rectangle about ½ inch thick. From one of the short sides, start rolling it tightly to form a log shape. Pinch the seams to seal and tuck the ends under, then place it seam-side down in your prepared loaf pan.
- Cover the loaf with a damp cloth again and allow it to rise for another 30-45 minutes. This second rise is just as important as the first, contributing to the overall texture of your bread. You can gently poke the dough—it should spring back slowly.
- Once it’s risen, bake the bread in your preheated oven for about 30-35 minutes, or until the top is golden brown and sounds hollow when tapped. If your bread is browning too quickly before it’s fully baked, you can cover it loosely with aluminum foil.
- After removing the bread from the oven, immediately transfer it to a wire rack to cool for at least 10-15 minutes before slicing. This resting time helps to set the texture and makes slicing easier. Don’t be tempted to slice too soon; the steam inside the loaf needs a moment to redistribute.
Variations & Substitutions
Herbed Milk Bread: If you want to elevate your bread with a flavor twist, consider adding fresh herbs like rosemary or thyme into the dough during the mixing stage. This variation gives your milk bread a fragrant aroma and turns it into the perfect accompaniment for soups and salads. Just chop the herbs finely and mix them in, but remember to adjust your salt based on the intensity of the herbs.
Whole Wheat Milk Bread: For a heartier, more nutritious loaf, you can substitute half of the all-purpose flour with whole wheat flour. This provides additional fiber and gives the bread a nutty flavor. You may need to adjust the milk slightly; whole wheat flour absorbs more liquid, so start with less milk and add until you reach the desired dough consistency.
Sweet Milk Bread: For those with a sweet tooth, incorporating chocolate chips or nuts into the dough can be delightful. Add about ½ cup of these mix-ins after the first kneading. You could also brush the dough with melted butter before the second rise, then sprinkle with a coarse sugar topping to create a crunchy crust.
Vegan Milk Bread: As a delicious dairy-free option, substitute the milk with your choice of plant-based milk and replace the butter with coconut oil or vegan margarine. Ensure the yeast is also plant-based. The texture will still be wonderfully fluffy, suitable for any dietary need.
Milk Bread Rolls: Instead of baking it as a loaf, you can portion your dough into smaller pieces and shape them into rolls. Bake them for around 20-25 minutes. These rolls work wonderfully for parties, welcoming guests, or serving alongside meals.
Common Mistakes to Avoid
One common mistake people make is not letting the dough rise enough. Insufficient rising time can lead to a dense and heavy loaf. Make sure to give it enough time to double in size during both proofing stages, as this contributes to the *soft texture* you’re aiming for. If your kitchen is cool, it might require an extra 10-15 minutes. Keep an eye on it!
Another critical mistake is checking for doneness too early. A loaf of bread should sound hollow when tapped; a perfectly baked milk bread will give you that satisfying sound. If you accidentally take it out too soon, it may collapse as it cools, losing its fluffiness. Verify its baked status by checking with an instant-read thermometer—an internal temperature of 190°F is ideal.
Finally, not allowing the bread to cool completely before slicing can wreak havoc on its texture. Cutting too soon can result in a gummy loaf rather than the light, airy texture you desire. Patience is key here; resist the urge to cut into it immediately!
Storage, Freezing & Reheating Tips
To maximize the freshness of your homemade milk bread, store it in a cool, dry place wrapped in plastic wrap or in a bread box. This helps retain moisture, keeping the crust soft. However, if you happen to have leftovers, it can also be stored in the refrigerator for up to a week, though the texture may change slightly.
If you want to make this recipe ahead of time, consider freezing the loaf. After it has cooled completely, wrap it tightly in plastic wrap and then in aluminum foil. It can be frozen for up to three months without significantly compromising taste or texture. When you’re ready to enjoy it, simply remove it from the freezer and let it thaw at room temperature. For warm, fresh-toasted slices, pop it in the oven at 350°F for about 10-15 minutes after thawing.
For reheating, you can also slice the bread first and toast it in a toaster or on a skillet. Spread a bit of butter on top while it’s still warm, and you’ll have a delightful snack in minutes. Keeping food safety measures in mind is essential—ensure that your homemade bread is always protected from moisture and air to avoid mold.
Frequently Asked Questions
Can I use active dry yeast instead of instant yeast for this recipe?
Yes, you can absolutely use active dry yeast. The only difference is that you will have to activate it in warm water first, as described in the recipe. Instant yeast can be added directly to your flour mixture without activating, making it slightly more convenient. However, both will yield excellent results.
What can I do if my dough isn’t rising?
If your dough isn’t rising, the most likely issue is the yeast. Ensure you’re using fresh yeast and that your water temperature isn’t too hot, which can kill the yeast. Environmental factors also play a role; if your kitchen is too cold, find a warmer spot to let the dough rise or use the oven as described earlier. Sometimes, dough may require a little more time.
How do I know when my bread is done baking?
A good indicator is the golden-brown color on top, along with the hollow sound when you tap the bottom of the loaf. If you have a thermometer, check the internal temperature; it should be around 190°F for fully baked bread. Underbaking will lead to a doughy center, which you want to avoid.
Can I add flavorings like cinnamon or vanilla?
Absolutely! Adding spices like cinnamon, nutmeg, or vanilla can transform your basic milk bread into something extraordinary. A teaspoon of cinnamon mixed into the flour or a splash of vanilla extract added to the wet ingredients can make delightful variations. Just ensure to balance the sweetness with your other ingredients.
How long does milk bread last?
When stored properly, homemade milk bread can last up to a week at room temperature but may start to dry out. Freezing is a great option for long-term storage, where it can last for three months. Ensure it is properly wrapped to maintain freshness. Always check for signs of spoilage if unsure.
Conclusion:
Soft and fluffy homemade milk bread is not just a recipe; it’s an experience that brings warmth and comfort into your kitchen. You’ll relish the delightful aroma wafting through your home as the bread bakes. With its simple ingredients and easy-to-follow steps, this loaf allows room for creativity and customization. Don’t hesitate to experiment with flavors, or even shape it as rolls, making it suitable for various meals and occasions.
Try this recipe for yourself and discover how baking homemade milk bread can transform your daily meals and snacks. Share your creations or variations with friends and family, and revel in the compliments they’ll give you. Happy baking!


