**Prep time:** 30 minutes
**Cook time:** 20 minutes
**Total time:** 50 minutes
**Servings:** About 24 cookies
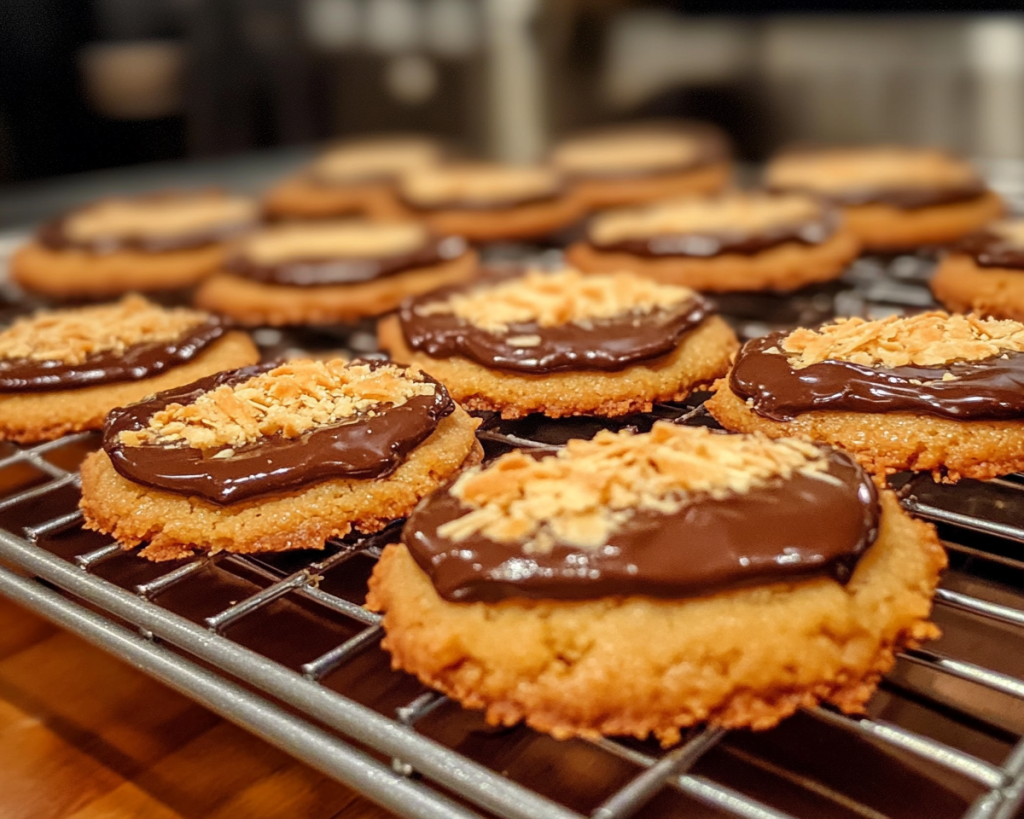
Samoas cookies, also known as Caramel deLites, are a delightful combination of sweet, toasted coconut, and rich chocolate, creating a cookie that is both chewy and crunchy. Inspired by the flavors of the iconic Girl Scout cookies, these treats are not just nostalgic; they capture a unique interplay of texture and flavor that transforms a simple cookie into a delicious indulgence.
Making Samoas cookies at home is easier than you might think! In this article, I’ll guide you through every step of the process with helpful tips, variations, and FAQs to guarantee that your homemade Samoas will be nothing short of amazing. You’ll learn about the ingredients you need, the best techniques for toasting coconut, and how to perfectly coat your cookies in chocolate.
What Are Samoas Cookies?
Samoas cookies are a type of cookie typically made with a buttery shortbread base, topped with caramelized coconut and drizzled with a rich chocolate coating. These cookies have a chewy texture from the caramel and coconut and a satisfying crunch from the crisp base. The balance of sweetness, nuttiness from the toasted coconut, and the slight bitterness of dark chocolate creates a symphony of flavors that is irresistible.
Originating in the United States, Samoas have become a beloved treat, especially during the Girl Scouts’ cookie-selling season. Their combination of flavors and textures makes them a crowd favorite, and their nostalgic value brings back memories of selling cookies door-to-door or the excitement of finding that treasured box of Samoas.
Why You’ll Love These Samoas Cookies
There are countless reasons to fall in love with homemade Samoas cookies. Here are just a few:
– **Flavor Explosion**: The rich caramel, toasted coconut, and dark chocolate create a layered flavor experience that comes together beautifully in each bite. Unlike many store-bought cookies, these homemade gems are packed with real ingredients that elevate the taste.
– **Customizable**: You have full control over the quality and type of ingredients used, allowing you to adjust the sweetness, chocolate type, or even add additional flavors like vanilla extract or almond.
– **Easy to Make**: While they might seem complex, the process is quite straightforward, with just a few key steps. With proper guidance, you can whip up these cookies without spending all day in the kitchen.
– **Perfect for Sharing**: Samoas cookies make fantastic gifts and are perfect for parties or gatherings. Who wouldn’t love receiving a box of homemade cookies?
– **Freshness Guaranteed**: When you make them at home, you enjoy the fresh flavor of the cookies, much superior to those that may have been sitting on store shelves for weeks or months.
If you’re worried about making cookies from scratch, don’t be! You’ll find that the steps involved are simple and manageable, even for beginner bakers. Now, let’s dive into what you’ll need to make these fantastic cookies!
Ingredients You’ll Need
To make approximately 24 Samoas cookies, gather the following ingredients:
– **For the Cookie Base**:
– 1 cup unsalted butter, softened: This adds richness and flavor to your cookies. If needed, you can substitute with coconut oil for a dairy-free version.
– 3/4 cup granulated sugar: For sweetness and to help achieve a tender bake.
– 2 cups all-purpose flour: The foundation of your cookies; ensure it’s measured correctly for optimal texture.
– 1/4 teaspoon salt: Enhances the overall flavor and balances the sweetness.
– 1/2 teaspoon vanilla extract: A key flavor ingredient in baked goods; it adds warmth and complexity.
– **For the Topping**:
– 2 cups sweetened shredded coconut: Toasted coconut provides that signature chewy texture. If desired, use unsweetened coconut for a less sweet version.
– 15 oz caramel candies (about 50 candies): These are melted down to create the topping. You may substitute with soft caramels if you prefer.
– 2 tablespoons heavy cream or coconut milk: This will help soften the caramel for easy spreading on the cookies.
– **For the Chocolate Drizzle**:
– 1 cup semi-sweet or dark chocolate chips: Adds a rich finish to your cookies. You can use milk chocolate for a sweeter result or even white chocolate for a twist.
– 1 tablespoon coconut oil: This helps to thin the chocolate for easy drizzling, creating a smoother finish.
How to Make Samoas Cookies
Follow these step-by-step instructions to create your delicious Samoas cookies:
1. **Make the Cookie Base**: In a large mixing bowl, cream together 1 cup of softened unsalted butter and 3/4 cup of granulated sugar until light and fluffy. This should take about 3-5 minutes using an electric mixer. Scrape down the sides of the bowl as needed. The creaming process is essential as it incorporates air into the dough, creating a light texture.
2. **Combine Dry Ingredients**: In another bowl, whisk together 2 cups of all-purpose flour and 1/4 teaspoon of salt. Gradually add the dry ingredients to the wet ingredients, mixing on low speed until just combined. Be careful not to overmix, as this can lead to tough cookies.
3. **Chill the Dough**: Cover the dough in plastic wrap and refrigerate it for 30 minutes. Chilling the dough helps solidify the butter, which contributes to a better texture in the final cookies.
4. **Preheat the Oven**: While the dough is chilling, preheat your oven to 350°F (175°C). Line two baking sheets with parchment paper to prevent sticking.
5. **Shape the Cookies**: After chilling, roll the dough into 1-inch balls and place them on the prepared baking sheet, spacing them about 2 inches apart. Flatten each ball slightly with the bottom of a glass or your hand. Use a small round cutter or your finger to create a hole in the center of each cookie, forming a donut shape.
6. **Bake the Cookies**: Bake the cookies in the preheated oven for about 10-12 minutes, or until the edges are lightly golden but the centers are still slightly soft. Remove them from the oven and allow them to cool on the baking sheet for a few minutes before transferring them to a wire rack to cool completely.
7. **Prepare the Coconut Topping**: While the cookies are cooling, toast the shredded coconut. Spread it evenly on a baking sheet and bake at 350°F (175°C) for about 5-7 minutes. Keep a close eye on it, as shredded coconut can burn quickly. Stir the coconut halfway through baking to ensure even toasting.
8. **Melt the Caramel**: In a saucepan over low heat, melt the caramel candies with 2 tablespoons of heavy cream or coconut milk. Stir constantly until smooth, ensuring there are no lumps. Once melted, remove from heat and mix in the toasted coconut.
9. **Assemble the Cookies**: Once the cookies have cooled completely, use a small spoon or offset spatula to spread the coconut-caramel mixture on top of each cookie. Make sure to leave a little bit of the cookie edges exposed for that classic Samoas look.
10. **Dip in Chocolate**: In a microwave-safe bowl, combine 1 cup of chocolate chips with 1 tablespoon of coconut oil. Microwave in 30-second intervals, stirring in between until the chocolate is fully melted and smooth. Gently dip the bottom of each cookie into the chocolate, coating it fully. Allow any excess chocolate to drip off before placing the cookies back on parchment paper.
11. **Drizzle with Chocolate**: Once all cookies are dipped, transfer the remaining chocolate to a piping bag or a plastic sandwich bag with a small cut in one corner. Drizzle the melted chocolate over the tops of the caramel-topped cookies in a crosshatch pattern.
12. **Cool and Set**: Let the cookies sit at room temperature until the chocolate has fully set. You can also place them in the refrigerator for a quicker set.
And voilà! You’ve created your very own Samoas cookies, capturing that same beloved flavor profile that so many of us cherish.
5 Variations & Substitutions
While the classic Samoas recipe is delicious on its own, here are some variations and substitutions to mix things up:
1. **Nutty Addition**: Add finely chopped nuts, such as pecans or almonds, to your coconut mixture for extra crunch and flavor. This will enhance the texture, giving your Samoas a delightful nutty twist.
2. **Use Different Chocolate**: Experiment with different types of chocolate. Try using white chocolate for a sweeter contrast, or dark chocolate for a more decadent and bittersweet experience.
3. **Dairy-Free Version**: For a dairy-free recipe, use vegan butter in the cookie base, and coconut or almond milk in the caramel. Ensure that your chocolate chips are also dairy-free.
4. **Flavored Caramel**: Enhance your caramel by adding a teaspoon of sea salt to create a salted caramel version. This balances the sweetness and adds complexity. Alternatively, you could infuse the caramel with a hint of espresso or coffee for a mocha twist.
5. **Gluten-Free Option**: Substitute the all-purpose flour with a gluten-free flour blend to make these delicious cookies gluten-free. Just make sure to choose a brand that measures cup-for-cup with regular flour.
Common Mistakes to Avoid
While making Samoas cookies is relatively simple, some common mistakes can happen, especially for first-timers:
– **Overmixing Dough**: Be careful when mixing your cookie dough; overmixing can develop gluten, leading to tough cookies instead of soft and tender ones. Mix just until combined.
– **Incorrect Oven Temperature**: Make sure your oven is correctly calibrated. If it’s too hot or too cold, it can affect your cookie’s texture. Use an oven thermometer if you’re unsure.
– **Burnt Coconut**: Toasting coconut requires close attention. Check on it frequently when it’s in the oven, as it goes from perfectly toasted to burnt very quickly.
– **Caramel Isn’t Smooth**: If your caramel is too thick or lumpy when melting, it may be due to the heat being too high. Always melt your caramels on low heat, stirring consistently until you achieve a smooth consistency.
– **Chocolate Setting Too Quickly**: If your chocolate sets too fast while dipping, you can reheat it gently to ensure it stays liquid for dipping. Alternatively, you could also work in smaller batches to prevent it from hardening.
Storage, Freezing & Reheating Tips
If you manage to have any Samoas cookies left over (which is unlikely!), here’s how to store them:
– **Storage**: Keep your cookies in an airtight container at room temperature. If stored properly, they can last for up to 5 days.
– **Refrigeration**: You can also refrigerate them if you’re in a warmer climate to prevent the chocolate from melting. Just let them sit at room temperature for a few minutes before eating for the best texture.
– **Freezing**: For longer storage, freeze the cookies. Place them in a freezer-safe container or a zip-top bag, separating layers with parchment paper. They can be kept in the freezer for up to three months. To enjoy, simply thaw them at room temperature for a few hours.
Frequently Asked Questions
1. **Can I use different types of sweeteners?**
Yes, you can substitute sugar with alternatives like coconut sugar or brown sugar for a different flavor profile. However, keep in mind that this might slightly alter the texture of the cookies.
2. **Is it necessary to toast the coconut?**
While it’s not strictly necessary, toasting the coconut enhances its flavor, making it nuttier and more aromatic. Raw coconut will not have the same depth of flavor.
3. **Can I make Samoas cookies vegan?**
Absolutely! Use vegan butter, and ensure the chocolate chips and caramel are dairy-free. Many brands offer vegan caramel options now as well.
4. **What’s the best way to melt chocolate for dipping?**
The best way to melt chocolate is to use a double boiler or the microwave in short bursts, stirring in between. This prevents overheating and burning the chocolate, ensuring a smooth finish.
5. **How do I customize the cookie shape?**
You can use cookie cutters of any shape if you’d like to create designs other than the traditional ring shape. Just ensure that the cookies are evenly sized for consistent baking.
In conclusion, making your own Samoas cookies at home allows you to enjoy these classic treats made fresh with your favorite ingredients. The elaborate process can be a fun baking project for weekends or special occasions, and every bite will surely bring nostalgia. So gather your ingredients, roll up your sleeves, and indulge in this sweet and savory adventure! Trust me, once you’ve tasted these homemade Samoas, you’ll never want to buy the packaged ones again. Happy baking!
[Read also: Easy Dessert Recipes for Beginners]