Prep time: 15 minutes
Cook time: 10 minutes
Total time: 25 minutes
Servings: 24 pieces
When cravings strike, nothing quite satisfies like a sweet treat that combines textures and flavors in every bite. Enter Rocky Road Candy, a confection that perfectly marries rich chocolate, crunchy nuts, and gooey marshmallows. This recipe is not only versatile and customizable, but it also brings a sense of nostalgia, evoking memories of family gatherings, bake sales, or cozy evenings spent savoring homemade sweets. Plus, it’s incredibly easy to make, which makes it perfect for beginners and busy parents alike.
In this article, you’ll learn about the origins and delightful qualities of Rocky Road Candy, the simple ingredients involved, and step-by-step instructions for creating your own delicious batch. We’ll also explore possible variations and common pitfalls to avoid, ensuring that your candy turns out perfectly every time. So, gather your ingredients, and let’s make something sweet!
What Is Rocky Road Candy?
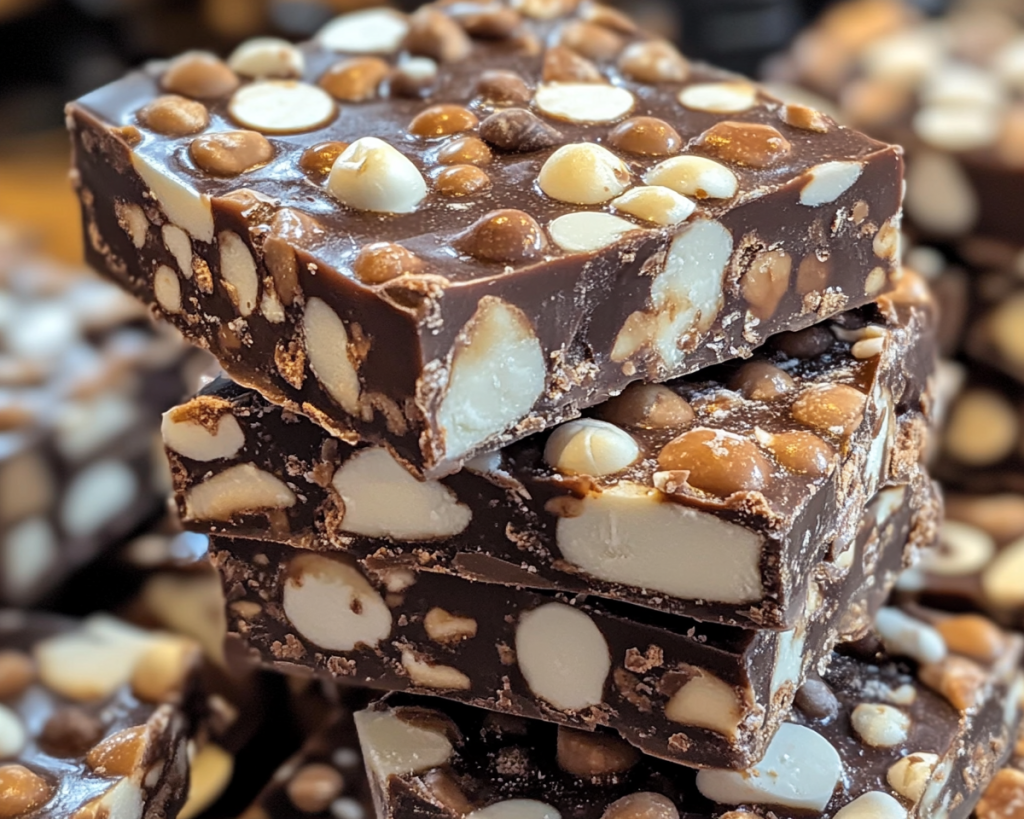
Rocky Road Candy is a delightfully sweet confection that originated in the United States, dating back to the Great Depression in the 1920s. Though there are many variations, the traditional version features chocolate—usually melted chocolate morsels or a chocolate base—as the foundation. The star of the show is undoubtedly the delightful combination of crunchy nuts—typically walnuts or almonds—and soft, fluffy mini marshmallows, which contribute to the candy’s signature texture.
This treat can be cut into bite-sized squares or bars, making it an excellent option for parties, holidays, and special occasions. The vibrant mix of flavors and textures creates a taste sensation that will keep you coming back for more. And one of the best parts? You can easily put your spin on Rocky Road Candy, making it as unique as you are!
Why You’ll Love This Rocky Road Candy
There are a myriad of reasons to fall in love with Rocky Road Candy, but here are a few of the highlights:
– **Delicious Flavor**: The rich chocolate pairs beautifully with the crunchy nuts and chewy marshmallows, creating an indulgent experience with every bite. This harmony of flavors makes it hard to resist grabbing just one more piece!
– **Ease of Preparation**: This candy comes together in a mere 25 minutes, during which time you can multitask and catch up on your favorite show or chat with kids in the kitchen. It involves no complicated techniques or equipment—just simple melting and mixing.
– **Budget-Friendly**: With a few staple ingredients, you can whip up a batch of Rocky Road Candy without breaking the bank. It’s an affordable treat that delivers big flavor and satisfaction.
– **Versatility**: Customize your Rocky Road Candy to suit your preferences! Whether you want to substitute nuts for seeds, replace marshmallows with dried fruit, use dark or white chocolate, or even add toppings like coconut, the options are endless.
– **Family Favorite**: From kids to adults, it’s a hit with everyone. With its playful name and deliciousness, it’s bound to become a family favorite for years to come.
Rest assured, it’s easy to prepare, too. However, be aware of common misconceptions such as making it too sweet by adding excess marshmallows, or failing to properly melt the chocolate. Each ingredient plays an important role, contributing to this delightful candy that feels indulgent yet remains accessible for all skill levels.
Ingredients You’ll Need
Here’s a list of the essentials to prepare Rocky Road Candy:
– **Chocolate Chips or Chocolate Bars**: About 2 cups of semi-sweet or milk chocolate chips are ideal. You can also use dark chocolate for a richer flavor. If you prefer a more luxurious treat, consider using high-quality chocolate bars for melting.
– **Mini Marshmallows**: A standard 2 cups is recommended for that chewy texture. Choose mini marshmallows for better distribution throughout the candy. If you’re feeling adventurous, try flavored marshmallows like strawberry or peppermint for a unique twist.
– **Nuts**: 1 cup of walnuts, almonds, or even peanuts add a delightful crunch. Choose nuts that are fresh and toasted for added flavor. If you’re catering to nut allergies, feel free to omit them entirely or substitute with crunchy cereals such as Rice Krispies.
– **Butter**: 2 tablespoons of unsalted butter helps in achieving the right consistency when melting chocolate. This will give your candy a beautiful sheen and smooth texture.
– **Vanilla Extract**: Optional but recommended! A teaspoon enhances the flavor of the chocolate, providing a lovely depth.
– **Salt**: Just a pinch can cut the sweetness of the candy and highlight the chocolate flavor.
How to Make Rocky Road Candy
Now that you have your ingredients, let’s dive into the step-by-step instructions to whip up a delicious batch of Rocky Road Candy. Follow these easy steps:
1. **Prep Your Pan**: Start by preparing an 8-inch square or rectangular baking dish. Line it with parchment paper, allowing some overhang on the sides to easily lift out the candy once set. This step is crucial for easy removal and cleaning.
2. **Melt the Chocolate and Butter**: In a medium saucepan over low heat, combine the chocolate chips and butter. Stir constantly until completely melted and smooth. This process should take about 3-5 minutes. Make sure not to let the chocolate burn, as it can become grainy and unappetizing. If you prefer, you can melt the chocolate and butter together in the microwave, heating in 30-second intervals and stirring afterward.
3. **Add Vanilla and Salt**: Once the chocolate and butter are melted and smooth, remove the saucepan from the heat. Stir in the vanilla extract and a pinch of salt to enhance the flavor. Give it a good mix to ensure everything is well-combined.
4. **Incorporate Nuts and Marshmallows**: Now, fold in the nuts and mini marshmallows gently into the melted chocolate. It’s essential to combine these ingredients carefully to avoid breaking the marshmallows and to ensure an even mixture throughout.
5. **Transfer to the Pan**: Pour the mixture into your prepared dish and spread it evenly using a spatula. Smooth out the top to help with the presentation, making sure it’s an even layer.
6. **Chill Until Set**: Place the pan in the refrigerator and allow it to set for at least 1-2 hours. The candy should be firm to the touch. If you’re in a rush, you can place it in the freezer for about 30 minutes, but keep an eye on it to prevent it from freezing solid.
7. **Cut and Serve**: Once set, lift the candy from the pan using the parchment paper overhang. Place it on a cutting board and slice it into squares or rectangles. Your Rocky Road Candy is now ready to be enjoyed!
6 Variations & Substitutions
1. **Nut-Free Version**: For those with nut allergies or preferences, omit the nuts entirely and increase the amount of mini marshmallows, or consider adding in some crispy rice cereal for that added crunch.
2. **Different Chocolate Types**: Experiment with various chocolate types. Dark chocolate adds a richer flavor, white chocolate provides a sweet and creamy profile, and even butterscotch chips can add a unique twist. Mix and match based on your cravings!
3. **Add Dried Fruit**: Incorporate dried fruits like cranberries, cherries, or raisins for a fruity touch that provides additional texture and a burst of flavor. This variation gives a wonderful contrast to the chocolate and marshmallows.
4. **Peanut Butter Rocky Road**: Stir in a few dollops of creamy or crunchy peanut butter to the melted chocolate. This not only adds richness but complements the chocolate beautifully. Ensure you mix thoroughly so that everything is evenly distributed.
5. **Mint Rocky Road**: Add a drop or two of peppermint extract to the melted chocolate for a refreshing twist. You can also use mint-flavored marshmallows for an extra minty kick.
6. **Sprinkles or Toppings**: Once you’ve poured the chocolate mixture into the pan, consider adding colorful sprinkles, toasted coconut flakes, or crushed graham crackers on top. This will elevate the look and give a delightful texture contrast.
Common Mistakes to Avoid
Even with a simple recipe like Rocky Road Candy, there are certain pitfalls to sidestep to ensure your candy turns out perfectly. Here are a few mistakes to avoid:
– **Burning the Chocolate**: Melting chocolate can be tricky. Always opt for low heat, and don’t rush the process. If you notice the chocolate becoming thick or grainy, it might have burned. If that happens, there may be no fixing it—so take that extra time to melt it right!
– **Over-Stirring**: When incorporating the nuts and marshmallows into the melted chocolate, do so gently. Over-stirring can break the marshmallows, resulting in a messy texture that isn’t pleasing. Be gentle and deliberate in your mixing.
– **Insufficient Cooling Time**: Give the candy adequate time to set. Rushing this process by cutting into the candy too soon can lead to a gooey mess instead of perfect squares. Patience is key!
– **Wrong Ratio of Ingredients**: Maintaining the right balance of chocolate to marshmallows and nuts is essential. Adding too many marshmallows can lead to overly sweet candy, whereas too few may not provide the desired texture.
Storage, Freezing & Reheating Tips
Once you’ve mastered the art of crafting Rocky Road Candy, you’ll want to ensure it stays fresh for as long as possible. Here are some tips for storage:
– **Storage**: Keep your Rocky Road Candy in an airtight container at room temperature. Ideally, it should be consumed within a week for optimal flavor and texture.
– **Refrigeration**: If you live in a warm climate or prefer a firmer texture, you can store the candy in the refrigerator. However, be aware that this may alter the texture slightly, making it a bit harder.
– **Freezing**: For longer storage, you can freeze Rocky Road Candy. Wrap it tightly in plastic wrap and then place it in a freezer-safe bag. It can last for up to three months in the freezer. To enjoy, simply allow it to thaw at room temperature for a few hours.
– **Food Safety**: Remember, if you suspect the candy has been sitting out too long or if any elements (like nuts) seem off, it’s best to err on the side of caution and discard it.
Frequently Asked Questions
1. **Can I use baking chocolate instead of chocolate chips?**
Yes, you can use baking chocolate, but keep in mind that it usually comes in blocks, so you’ll need to chop it into smaller pieces for easy melting. Also, you may want to adjust the sweetness, as baking chocolate is often unsweetened. Adding a sweetener can help balance out the flavors.
2. **Can I make Rocky Road Candy vegan?**
Absolutely! To make a vegan version, use dairy-free chocolate chips and replace the butter with coconut oil or a vegan butter substitute. Ensure that your marshmallows are also gelatin-free, as traditional marshmallows contain animal products.
3. **How do I prevent the marshmallows from sinking to the bottom?**
To prevent marshmallows from sinking, try folding them in gently after the chocolate has cooled slightly. This slight cooling allows it to thicken a bit, helping to hold the marshmallows in place as you pour the mixture into the pan.
4. **Can I add additional flavors or extracts?**
Definitely! Beyond vanilla, you can experiment with almond extract, hazelnut extract, or even a hint of orange zest for a unique flavor twist. Just watch the quantities; a little goes a long way!
5. **What’s the best way to cut the candy?**
Use a sharp knife or a pizza cutter for clean cuts. You may want to heat the knife slightly under warm water and dry it off before cutting to achieve perfectly smooth edges.
In conclusion, Rocky Road Candy is a scrumptious, easy-to-make treat that everyone will love. With its delightful combination of flavors and textures, along with endless possibilities for customization, it’s a recipe that can fit any occasion and satisfy any sweet tooth. I encourage you to try making this candy yourself—whether for a holiday gathering, a special dessert, or just a sweet indulgence at home. You’ll find the experience rewarding and the results irresistible!
Share your creations with friends and family, and don’t hesitate to experiment with different variations. Remember—the joy of Rocky Road Candy lies not just in eating it, but in the love and creativity that goes into making it. So grab your ingredients today and start your Rocky Road adventure!
[Read also: Easy Dessert Recipes for Beginners]