Prep time: 30 minutes
Cook time: 12 minutes
Total time: 42 minutes
Servings: 12 whoopie pies
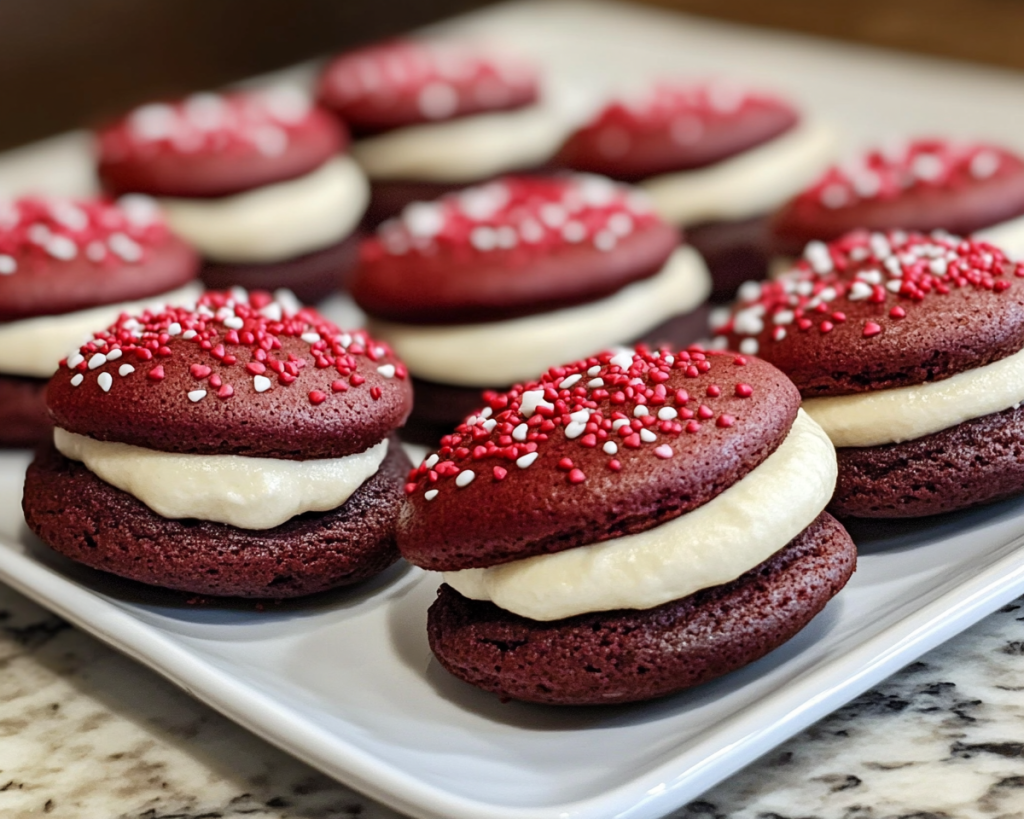
Indulging in a delightful treat is one of life’s little pleasures, and if you’re looking for something irresistibly sweet and charming, then this Red Velvet Whoopie Pies recipe is just what you need for Valentine’s Day or any special occasion. These delightful desserts consist of two soft, rich red velvet cake rounds that are filled with a creamy, luscious buttercream frosting. Each bite offers a harmonious blend of sweetness and a touch of cocoa, making them a perfect sweet-tooth satisfying treat.
This recipe stands out not just for its striking color but for the way it conjures up memories of love, celebration, and all the joy that desserts can bring. You’ll find that making these whoopie pies is a fun and exciting project that will add a romantic touch to your gatherings. Throughout this article, you will learn how to create incredibly moist whoopie pies that are sure to impress your loved ones. Additionally, we’ll explore variations to accommodate different tastes and dietary needs, tips to enhance your baking experience, and ideas to customize these delightful treats according to your preferences.
What Is Red Velvet Whoopie Pies Recipe Easy Valentine’s Day Dessert?
Red Velvet Whoopie Pies have their roots in traditional New England cuisine, where they are adored for their unique and appealing characteristics. The red velvet cake is a classic dessert that features a distinct flavor profile, enhanced by a subtle cocoa undertone. The mixture of buttermilk and a touch of vinegar gives the cake a slightly tangy flavor, which beautifully complements the sweetness of the frosting. With its eye-catching crimson hue and decadent cream filling, this dessert is not just a visual treat; it’s also a culinary delight.
In terms of texture, Red Velvet Whoopie Pies are soft and cake-like yet rich and indulgent. When you take a bite, you’ll experience a tender crumb that melts in your mouth, effortlessly blending with the smooth and creamy buttercream filling. The combination of these factors makes Red Velvet Whoopie Pies a well-loved dessert that is perfect for Valentine’s Day or any celebration that calls for something sweet and extraordinary.
What sets these whoopie pies apart is not just their classic flavor, but also their fun, handheld format. Unlike traditional cakes that require plates and forks, these pies are compact, making them ideal for parties and gatherings. You can grab one and enjoy it without any fuss. Plus, they pair beautifully with cake pops, cookies, or even a lovely cup of coffee.
Why You’ll Love This
There are countless reasons to embrace this Red Velvet Whoopie Pies recipe. For one, the taste is simply divine. The soft textures paired with the luscious cream filling create a dessert that is comforting and incredibly satisfying. Whether you are a red velvet enthusiast or a dessert lover in general, you will find it hard to resist these treats. The tanginess from the buttermilk combined with the sweetness of the frosting creates a flavor balance that charms everyone who tries them.
Another reason you’ll love this recipe is its ease. Cooking can often seem intimidating, especially for beginners in the kitchen. However, this recipe simplifies the process, allowing you to enjoy making these whoopie pies without unnecessary complications. The ingredients are straightforward, and the step-by-step instructions ensure that you will achieve maximum flavor with minimum fuss.
Furthermore, the cost of ingredients is relatively low, making this dessert approachable for budget-conscious bakers. And let’s not forget the health perspective. While enjoying treats is part of a balanced diet, you can feel good serving these whoopie pies knowing they’re made from scratch. You have control over quality and can opt for organic ingredients if you prefer.
Common misconceptions about red velvet desserts often revolve around the amount of cocoa used and whether they are too sweet. Unlike many cakes that are overly sugary, these whoopie pies strike the right balance. If you’re worried about being overwhelmed by sweetness, rest assured; the cream filling is light and airy, complementing the cake without overpowering it. This recipe is indeed for anyone who enjoys a tantalizing balance in their desserts.
Ingredients You’ll Need
To create these delightful Red Velvet Whoopie Pies, you will need the following ingredients:
- All-purpose flour: The base of the whoopie pies, providing the structure. If gluten-free is needed, consider using a gluten-free flour blend.
- Cocoa powder: This infuses a subtle chocolate flavor into the pies. You can use unsweetened cocoa for the best results.
- Baking soda: A leavening agent ensuring the pies rise beautifully. Ensure it is fresh for the best rise.
- Salt: This enhances the flavors in the cake. A pinch of salt can do wonders to balance sweetness.
- Buttermilk: Essential for that rich, tender texture. If you don’t have buttermilk, combine regular milk with a teaspoon of vinegar or lemon juice for a quick substitute.
- Vegetable oil: This keeps the pies moist and tender. Feel free to use melted unsalted butter for a richer flavor.
- Sugar: Both granulated and brown sugars can be used; they add sweetness and moisture respectively.
- Red food coloring: A key ingredient that gives red velvet its signature color. You can opt for natural colorings if desired.
- Vanilla extract: This adds an aromatic quality and depth to the flavor profile.
- Eggs: They provide stability and richness. Room temperature eggs work best for an even mix.
- Butter: For the filling. Using unsalted butter allows you to control the salt level in the frosting.
- Powdered sugar: This will be the foundation of your frosting, giving it that light, airy texture.
- Cream cheese: A classic addition that adds richness and tanginess to the buttercream filling.
Having these ingredients ready means you can bake without interruptions! Make sure to measure carefully to achieve the ideal consistency and taste, and note that room temperature ingredients blend more smoothly.
How to Make
Now, let’s dive into the step-by-step process of bringing your Red Velvet Whoopie Pies to life! Follow these instructions carefully for best results.
- Preheat the oven: Begin by preheating your oven to 350°F (175°C). This step is crucial because your whoopie pies need a hot environment to bake properly. You want to ensure that the oven reaches the right temperature before placing your batter inside.
- Prepare your baking sheets: Line two baking sheets with parchment paper. This prevents the pies from sticking and allows for easy removal after baking. If you don’t have parchment paper, lightly grease your baking sheets with a bit of vegetable oil.
- Mix dry ingredients: In a medium bowl, whisk together the all-purpose flour, cocoa powder, baking soda, and salt until well combined. This process ensures that everything is evenly mixed and helps avoid any clumps of cocoa powder in your batter.
- Combine wet ingredients: In a large mixing bowl, combine the buttermilk, vegetable oil, sugar, and red food coloring. Whisk them together until smooth. It’s important to mix these well to incorporate the sugar into the wet mixture fully.
- Add eggs and vanilla: To the wet ingredients, add the eggs one at a time, mixing well after each addition. Finally, stir in the vanilla extract. This ensures the eggs and vanilla are evenly distributed throughout your batter, adding richness and flavor.
- Combine dry and wet mixtures: Slowly add the dry ingredients into the wet mixture while gently folding them together with a spatula. Be careful not to overmix; you want the batter to be smooth but not overworked. Overmixing can lead to dense pies instead of light and fluffy ones.
- Scoop the batter: Using a cookie scoop or spoon, drop rounded tablespoons of batter onto your prepared baking sheets, spaced about 2 inches apart. The batter will spread as it bakes, so give it enough room to breathe.
- Bake: Place the baking sheets in the preheated oven and bake for about 10-12 minutes, or until the edges are set, and the tops spring back when lightly touched. Make sure not to open the oven door too frequently as it can alter the baking process.
- Cool: Once baked, remove the sheets from the oven and let them cool for about 5 minutes on the sheets before transferring them to wire racks to cool completely. Cooling is crucial as it prevents the filling from melting when added.
- Make the filling: In a separate mixing bowl, beat the softened butter and cream cheese together until creamy and smooth. Gradually add the powdered sugar and mix until well combined. The frosting should be fluffy and thick enough to hold its shape.
- Assemble the whoopie pies: Once the red velvet cakes are completely cooled, take one pie half and spread a generous tablespoon of filling on its flat side. Top it with another half, flat side down, to create a sandwich. Repeat this process until all the whoopie pies are assembled.
- Serve: Your Red Velvet Whoopie Pies are now ready to serve! You might want to dust them with a sprinkle of powdered sugar for an extra touch of sweetness and beauty. They can be enjoyed right away or refrigerated for a more chilled experience.
These steps are your pathway to creating scrumptious Red Velvet Whoopie Pies, and with a little practice, you will become a pro in no time!
Variations & Substitutions
Creating these whoopie pies is a delightful experience, but the fun doesn’t have to stop there. Here are some tempting variations and substitutions you can explore.
Chocolate Chip Red Velvet Whoopie Pies
For an indulgent twist, consider adding mini chocolate chips to your whoopie pie batter. The cocoa flavor and chocolate chunks harmonize beautifully, providing pockets of melted chocolate in every bite. This variation is perfect for chocolate lovers who crave that extra richness. Simply fold in one cup of mini chocolate chips into your batter before scooping onto the baking sheets. This adds a melt-in-your-mouth sensation that will have your taste buds dancing.
Gluten-Free Option
If you’re baking for someone with gluten sensitivities, you can easily substitute the all-purpose flour with a gluten-free flour blend. Look for blends specifically designed for baking to ensure that your whoopie pies maintain their tender texture. It’s also a good idea to include a binding agent like xanthan gum if your blend doesn’t already contain it. This adjustment will allow everyone to enjoy this sweet treat without worry.
Vegan Whoopie Pies
For those following a vegan diet, you can make these whoopie pies completely plant-based. Replace the eggs with flaxseed meal (1 tablespoon of flaxseed meal mixed with 2.5 tablespoons of water equals one egg) or applesauce. Use dairy-free butter and cream cheese alternatives for the filling to maintain that rich, creamy texture without using animal products. Make sure your red food coloring is vegan-friendly to keep your pies fully plant-based.
Coconut Cream Filling
If you’re a coconut fan, consider swapping out the traditional cream cheese filling for a coconut-flavored frosting. To do this, mix shredded coconut into the frosting, or use coconut cream in your recipe. This variation adds a tropical flair and an extra texture that pairs incredibly well with the red velvet.
Nut-Free Variation
If allergies are a concern, ensure all ingredients are free of nuts. Opt for nut-free alternatives in your butter and cream cheese substitutes. This adjustment ensures your dessert remains safe for anyone with nut allergies while still delivering on flavor and texture.
Exploring these variations allows for creativity and customization, making these whoopie pies even more delightful!
Common Mistakes to Avoid
Even the most seasoned bakers can encounter pitfalls in the kitchen when concocting delicious desserts like the Red Velvet Whoopie Pies. Here are some common mistakes and how to easily overcome them:
One of the most frequent issues is not properly weighing or measuring your ingredients, which can lead to a misbalanced batter. Too much flour can create tough whoopie pies rather than the soft, tender texture you want. To avoid this, invest in a kitchen scale for precise measurements or spoon your flour into the measuring cup and level it off with a knife for accuracy.
Another common mistake is skimping on the creaming process when mixing the butter and sugar. This step is essential for adding air into the batter. Insufficiently creamed mixtures can result in denser cakes that don’t rise as they should. Make sure to beat these ingredients together until they become light and fluffy, typically taking 4-5 minutes.
Pay close attention to your oven temperature as well. An oven that is too hot can bake the cakes too quickly, leading to a crust that forms before the centers have had a chance to rise properly. Always preheat your oven and, if you’re unsure of its accuracy, use an oven thermometer to gauge the temperature.
Also, remember that cooling the cakes completely before assembling is crucial. If they are even slightly warm, it can cause the frosting to melt and run out, resulting in a messy presentation. Practice patience, and let your whoopie pies cool on a wire rack entirely.
Finally, don’t be tempted to rush through the baking time. Every oven is different, and you want to check for doneness based on a set time, but also by touch and look. Avoid removing them too early; they should spring back lightly when touched and not look wet or shiny on top.
By being aware of these potential pitfalls, you can confidently step into your baking journey, ensuring each batch of whoopie pies turns out perfect!
Storage, Freezing & Reheating Tips
Storing your Red Velvet Whoopie Pies correctly is essential for maintaining their freshness and flavor. These delightful treats can be stored at room temperature in an airtight container for about 3 days. If you prefer your whoopie pies to stay super fresh, refrigerating them is advisable, especially if you live in a warm climate. They can last up to a week in the refrigerator, but be aware that they may slightly firm up when cold. You can bring them back to room temperature for a more comfortable bite.
For longer storage, freezing is a great option. Place the whoopie pies in a single layer on a baking sheet and freeze them for about an hour until they are solid. Once frozen, transfer them into a freezer-safe container or zip-top bag, separating layers with parchment paper to prevent sticking. They can be frozen for up to 3 months without losing quality. When you’re ready to enjoy your whoopie pies, thaw them in the refrigerator overnight or at room temperature for a few hours.
If you’ve already assembled the whoopie pies with filling, it’s best to consume them within a week for optimal freshness. Reheating isn’t typical for these, but if you find some have been frozen, allow them to thaw gently, and place them in the oven for a few minutes to return to a soft state. Just be careful not to overheat them as that can dry them out.
Ensuring you follow these storage practices guarantees that every bite remains as fresh and delightful as the day you made them!
Frequently Asked Questions
Can I use another type of frosting instead of cream cheese?
Absolutely! While cream cheese frosting is a classic choice, you can use traditional buttercream, a whipped cream frosting, or even a ganache for a rich touch. Each option offers its flavor and texture, allowing you to customize the whoopie pies to your taste preferences.
Can I make the whoopie pies in advance for an event?
Yes, you can make the whoopie pies in advance! In fact, they can taste even better after a day or two as the flavors meld together. Just ensure you store them properly in an airtight container. You can also freeze the cakes separately and assemble them just before your event for ultimate freshness.
Why did my whoopie pies turn out flat?
Flat whoopie pies are usually a result of over-mixing the batter or not having fresh baking soda. Make sure to mix just until incorporated and check the expiration date on your leavening agents to ensure they’re still good for baking.
Can I change the food coloring to another color?
Certainly! While red food coloring is traditional for Red Velvet Whoopie Pies, you can use any color you desire. This makes them adaptable for different holidays or events! Just ensure that any alternative coloring doesn’t alter the wet-to-dry ratio of your batter significantly.
What if I don’t have cocoa powder?
You can use carob powder as a substitute for cocoa powder, though it will alter the flavor slightly. Alternatively, you can skip the cocoa entirely to create a vanilla version; just ensure that you adjust other components accordingly for taste and color.
Conclusion:
There you have it! The delicious and visually stunning Red Velvet Whoopie Pies that are guaranteed to brighten any celebration or simply satisfy your sweet cravings. With their rich flavor, easy preparation, and stunning appearance, these gems are sure to impress your loved ones and even yourself. Through this guide, you’ve learned everything from the preparation and assembly to variations and storage options.
So roll up your sleeves, gather your ingredients, and dive into the sweet, velvety world of whoopie pies. Don’t forget to share your creations with friends and family—you’ll want everyone to experience this delightful treat! Happy baking!


