Prep time: 30 minutes
Cook time: 25 minutes
Total time: 1 hour 5 minutes
Servings: 12
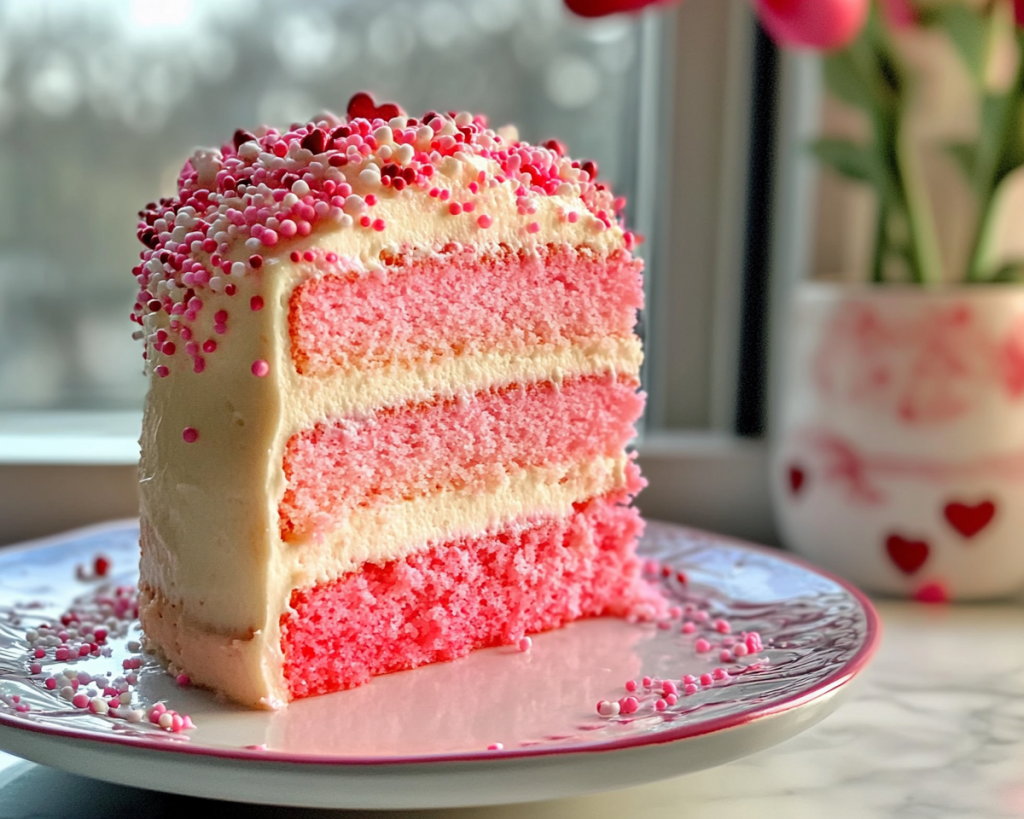
Are you ready to whisk up a slice of joy this Valentine’s Day? Imagine a stunning cake where every layer morphs from soft blush pink to deep rose, radiating warmth and love. The Pink Ombre Layer Cake is not just any cake; it’s a beautifully crafted showstopper that embodies the essence of the season. Its layered design can easily elevate any celebratory occasion, making it perfect for Valentine’s Day, birthdays, anniversaries, or just because. This cake is not only visually appealing but also a delightful treat, satisfying your sweet cravings with layers of moist vanilla flavor accented with a light, fluffy buttercream frosting.
In this recipe, you will learn the art of creating a beautiful ombre effect, the best methods for baking and assembling cakes as well as how to adapt the recipe for various dietary needs. You’ll come across some essential tips along the way, ensuring that even beginners can achieve impressive results. So grab your baking tools, and let’s create a dessert that will leave your loved ones in awe.
What Is Pink Ombre Layer Cake Recipe Easy Valentine’s Day Showstopper?
The Pink Ombre Layer Cake is a captivating dessert that features soft layers of pink vanilla cake, delicately frosted with a creamy buttercream icing. This cake not only looks enchanting but also tastes heavenly with its moist texture and rich vanilla flavor. The ombre effect—where each layer transitions from light pastel pink to a vibrant rose—adds a sophisticated touch, making it an ideal centerpiece for any celebration.
Originating from the French patisserie, the ombre style has taken the baking world by storm. Cakes that exhibit this gradient effect are often chosen for special occasions due to their artistic appeal. When it comes to texture, this cake maintains a light and airy crumb, complemented by smooth and creamy frosting that melts in your mouth. Each bite is a delightful contrast, offering both sweetness and richness without being overwhelmingly sugary.
Whether you’re a seasoned baker or a newbie in the kitchen, this cake allows for artistic expression and flexibility. Its versatility means you can easily adjust flavors, colors, and decorations to suit personal taste or dietary preferences. Perfect for those who appreciate both aesthetics and flavor, this Pink Ombre Layer Cake promises to be a showstopper that your guests will remember long after the last bite is taken.
Why You’ll Love This
There are several reasons why the Pink Ombre Layer Cake is adored by bakers and cake lovers alike. First and foremost, its stunning visual appeal makes it a conversation starter, especially at gatherings. The ombre effect not only captivates the eye, but it also brightens up any table setting, setting it apart from a standard cake. When you slice into the cake, the beautiful layers are revealed, making each piece an enticing delight.
Moreover, this cake is straightforward to make, even for novice bakers. With some simple steps and techniques, you’ll master the art of layer cakes in no time. Plus, it is budget-friendly, which is crucial when trying to create memorable moments without breaking the bank. Most of the ingredients are pantry staples, making this recipe both accessible and economical.
Another reason to love this cake is its versatility. You can accommodate various dietary restrictions—whether by using gluten-free flour, dairy-free butter, or natural sweeteners. This dish can easily cater to different preferences while still standing out as a gorgeous showpiece. It’s a cake that can transform to meet the needs of friends and family, ensuring everyone can revel in a delicious slice.
And don’t worry if you make a mistake along the way—baking is all about learning. You’ll quickly realize that a few extra sprinkles or a splash of color can turn an unexpected blunder into an even better creation.
Ingredients You’ll Need
- All-purpose flour: Provides the structure for the cake. You can substitute with gluten-free flour for a gluten-free version.
- Baking powder: Ensures your cake rises and has a light texture. Be sure it’s fresh; old baking powder can lead to dense cakes.
- Salt: Enhances flavor and balances the sweetness.
- Unsalted butter: Adds rich flavor and moisture. For a dairy-free option, you can use vegan butter.
- Sugar: Sweetens the cake. You may use a natural sweetener alternative if needed.
- Eggs: Help bind the ingredients together and add richness. Flax eggs can be used for a vegan version.
- Vanilla extract: Provides a deep, aromatic flavor. Ensure you use pure vanilla for the best taste.
- Milk: Adds moisture; buttermilk can be used for a slightly tangy flavor.
- Food coloring: Essential for achieving the ombre look. Gel colors give the best results.
- Powdered sugar: For the buttercream frosting base. Sifting it ensures a smooth frosting.
- Heavy cream: Adds creaminess to the frosting. You can substitute this with coconut cream for a dairy-free version.
Each of these ingredients plays a pivotal role in achieving the perfect Pink Ombre Layer Cake. Make sure to have everything ready before you start baking to streamline the process.
How to Make
- Preheat the oven: Begin by preheating your oven to 350°F (175°C). Proper initial temperature ensures even baking. Prepare three 8-inch round cake pans by greasing them with butter and lining the bottoms with parchment paper.
- Mix dry ingredients: In a large bowl, whisk together the all-purpose flour, baking powder, and salt. This step makes sure that the leavening agents are well distributed throughout the flour, preventing any clumping.
- Cream the butter and sugar: In a separate bowl, beat the unsalted butter until it becomes creamy and light. Gradually add the sugar and continue to mix for about 4-5 minutes until the mixture turns pale and fluffy. This air incorporation is vital for a light cake.
- Add eggs and vanilla: Add in the eggs one at a time, ensuring that each is fully incorporated before adding the next. Stir in the vanilla extract. This will impart a wonderful aroma to your cake.
- Combine wet and dry mixtures: Gradually add the flour mixture and milk in alternating batches, starting and ending with the flour. Mix just until combined. Beware of over-mixing, as this can lead to a tough cake.
- Color the batter: Divide the batter evenly into three bowls. Add different amounts of pink food coloring to each bowl to achieve your desired ombre effect—light pink, medium pink, and dark pink. Use a spatula to gently fold the color into the batter, being cautious not to deflate it.
- Pour batter into pans: Carefully pour each colored batter into the prepared pans. Level the tops by gently spreading it with a spatula. Tap the pans on the counter a couple of times to eliminate air bubbles.
- Bake the cakes: Place the pans in the preheated oven and bake for 25-30 minutes or until a toothpick inserted into the center comes out clean. The cakes should bounce back when gently pressed.
- Cool the cakes: Once baked, let the cakes cool in the pans for about 10 minutes before transferring them to a wire rack to cool completely. Removing them while warm helps to prevent sticking.
- Make the frosting: In a bowl, beat the softened butter until smooth and creamy. Gradually add the powdered sugar and heavy cream, mixing until smooth. You can adjust the consistency with more sugar or cream as necessary. This frosting should be fluffy yet hold its shape.
- Assemble your cake: Once the cakes are completely cooled, level them with a serrated knife if domed. Start with the darkest layer, spread frosting over it, and place the next layer on top, repeating until the final layer is added. Use a thin layer of frosting around the edges (a crumb coat) to trap any crumbs.
- Decorate: After the crumb coat, chill the cake for about 30 minutes. Then frost the top and sides with the remaining buttercream. Use a spatula or cake scraper for a smooth finish. Feel free to add sprinkles or edible flowers for additional decoration!
- Serve: Slice and serve your beautiful Pink Ombre Layer Cake. Each piece reveals the stunning layers, creating a feast for the eyes and taste buds. Enjoy alongside a warm cup of coffee or tea!
Making this cake may take some time and effort, but trust me, the end result is worth every minute in the kitchen. The aroma of freshly baked vanilla cake will fill your home, creating an atmosphere of warmth and excitement.
Variations & Substitutions
Chocolate Ombre Layer Cake: Want to introduce a chocolate twist? Substitute half of the all-purpose flour with unsweetened cocoa powder. This will give your cake a rich chocolate flavor while retaining the ombre effect. The combination of chocolate and vanilla is always a crowd-pleaser, especially for those who adore rich desserts. If you’re making this as a Valentine’s treat, the contrast of brown and pink layers can be incredibly striking.
Gluten-Free Version: To make this cake gluten-free, replace the all-purpose flour with a gluten-free all-purpose blend that contains xanthan gum. You may need to adjust the liquid slightly, as gluten-free flour can sometimes absorb more moisture. Additionally, double-check your baking powder to ensure it is gluten-free. This version allows everyone to enjoy a slice without allergy concerns, making it perfect for gatherings.
Vegan Friendly: For a vegan option, replace the eggs with flax eggs (1 tablespoon ground flaxseed mixed with 2.5 tablespoons water per egg). Use plant-based milk instead of regular milk, and opt for dairy-free butter for the frosting. This adaptation doesn’t compromise on taste—it still yields a moist and delicious cake that’s perfect for vegan guests.
Flavored Frosting: Want a twist on traditional buttercream? Incorporate different flavors into your frosting, such as almond extract, lemon zest, or even a hint of orange. This adds a unique dimension to the cake and can complement the vanilla layers beautifully. You can also swirl in fruit preserves or purees for a burst of fruit flavor that plays well with the sweetness of the cake.
Common Mistakes to Avoid
While baking can often feel like a walk in the park, mistakes can happen! One common error is over-mixing the batter. This can lead to a tough cake. When combining your wet and dry ingredients, mix just until no flour is visible to ensure a tender crumb.
Another mistake to avoid is skipping the cooling phase. It’s essential that your cakes are completely cooled before you begin frosting; otherwise, the heat can melt your buttercream, resulting in a messy, melted frosting disaster.
Always measure your ingredients accurately. Baking is a science, and precise measurements are critical for achieving the desired texture and flavor. Use weight measurements if you can; this ensures consistency from one baking session to another.
Lastly, make sure to have all your tools and ingredients ready before you start baking. This is a great way to manage your time in the kitchen and ensures you won’t end up scrambling halfway through your process.
Storage, Freezing & Reheating Tips
To store your Pink Ombre Layer Cake, place it in an airtight container in the refrigerator. The cake will stay fresh for up to 5 days—and trust me, it tastes just as delightful after a couple of days! If you decide to freeze it, ensure that it is completely cooled and wrapped tightly in plastic wrap, followed by aluminum foil to prevent frostburn. You can freeze it for up to 3 months.
When you’re ready to eat it, allow the cake to thaw in the refrigerator overnight for the best texture. If you want to freshen it up, you can whip up some extra frosting to cover any dryness caused by freezing. This will revive the cake, making it taste as good as new!
For those busy parents or who are meal prepping for the week, this cake can also be prepped ahead of time. Just make the individual layers and frost them in the morning or on the weekend. This saves time while still allowing you to treat your family to something special during the week.
Frequently Asked Questions
Can I use different colors for the ombre effect? Absolutely! While pink is a classic choice, you can experiment with any color combinations that speak to you or represent a special occasion. Think of using light blue to create a winter wonderland theme or combining purple and blue for a whimsical effect. The key is to achieve a gradient that transitions beautifully.
What if my cake is domed on top after baking? If your cake layers rise too much in the center, don’t worry! Simply use a serrated knife to level them off. Leveling not only makes for a prettier presentation but also ensures that the layers stack evenly without wobbling. This is a common issue for bakers and easily fixed.
Can I make this cake in advance? Yes, you can! The layers can be baked a day or two beforehand. Just wrap them tightly in plastic wrap and refrigerate. This not only saves time but can enhance the flavors as they rest. Just remember to frost the cake shortly before serving to maintain its freshness.
How do I know when the cake is done? The best way to test the cake is to insert a toothpick into the center. If it comes out clean or with a few moist crumbs attached, your cake is done. If the toothpick is wet with batter, continue to bake for another 5-10 minutes, checking it often.
What frosting can I use if I don’t like buttercream? If buttercream isn’t your favorite, there are plenty of alternatives. Swiss meringue buttercream is a beautiful choice that’s lighter and silkier than traditional frosting. Cream cheese frosting can add a rich flavor that pairs wonderfully with vanilla cake. You can also choose whipped cream or ganache for a delicious but different finish.
Conclusion:
The Pink Ombre Layer Cake is an enchanting dessert that dazzles both the eyes and the palate. Perfect for Valentine’s Day or any celebration, it offers a delightful blend of flavors and an impressive appearance that will surely impress your loved ones. This recipe allows for customization, meaning you can adapt it according to dietary preferences while maintaining its charm. I encourage you to give this cake a try, perhaps even adding your unique twist or exploring the variations suggested. Remember, baking is all about experimenting and expressing your creativity—so don’t hesitate to get in the kitchen and create this delightful masterpiece to share with friends and family. Enjoy the magic of baking and make wonderful memories with this beautiful cake!


