Prep time: 20 minutes
Cook time: 30 minutes
Total time: 50 minutes
Servings: 12 servings
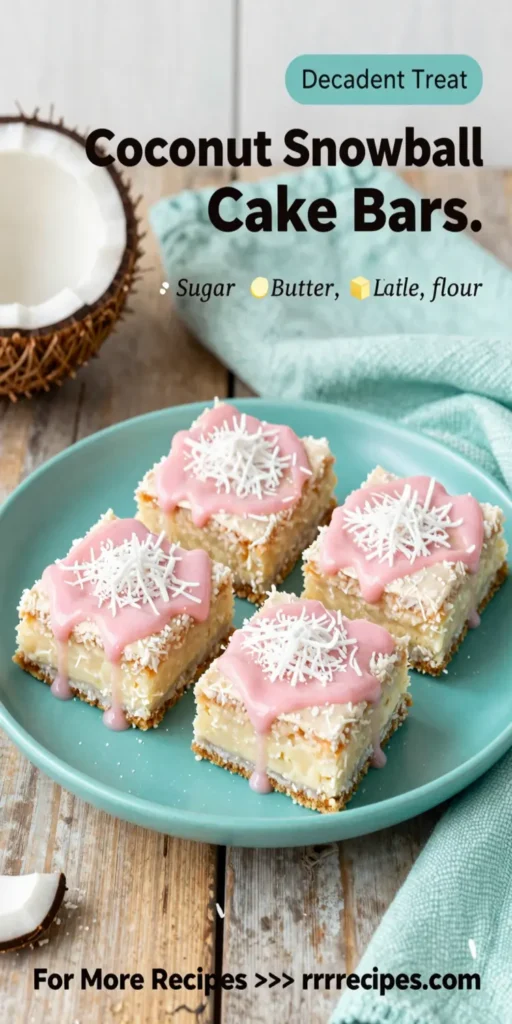
Pink Coconut Snowball Cake Bars are a delightful dessert that captures the essence of indulgence in a beautifully simple recipe. If you’re looking for something vibrant and fun to bring to a gathering or craving a sweet treat at home, this recipe is sure to impress. Combining fluffy cake layers with a rich coconut flavor and a snowy pink coating, these bars are not only visually stunning but also incredibly delicious. You’ll enjoy the delightful blend of textures and flavors, making each bite a memorable one.
What Is Pink Coconut Snowball Cake Bars?
Pink Coconut Snowball Cake Bars are decadent dessert bars that feature a soft, moist cake base topped with fluffy coconut frosting and covered in a blanket of shredded coconut. The pink hue comes from a delightful blend of flavoring that adds both sweetness and visual appeal. This dessert is perfect for special occasions and celebrations, but it can also brighten up your everyday dessert repertoire.
Why You’ll Love This
There are countless reasons to fall in love with Pink Coconut Snowball Cake Bars. For starters, the combination of flavors is simply irresistible. The sweetness of coconut paired with the soft cake creates a delightful contrast that is hard to beat. Additionally, they are incredibly easy to make, making them perfect for busy parents or kitchen beginners who still want to create something special without feeling overwhelmed. The colorful presentation also makes them a hit at potlucks, parties, or holiday gatherings. Finally, these bars can be tailored to fit various dietary needs, offering plenty of room for substitutions and variations.
Ingredients You’ll Need
- All-purpose flour: 2 cups. This forms the base of the cake, giving it structure and texture.
- Granulated sugar: 1 cup. Adds sweetness to the cake mixture.
- Baking powder: 2 teaspoons. This helps the cake rise, making it fluffy.
- Salt: 1/2 teaspoon. Enhances the sweetness of the cake.
- Unsalted butter: 1/2 cup, softened. Provides richness and flavor to the cake.
- Eggs: 3 large. These bind the ingredients together and give moisture to the cake.
- Vanilla extract: 1 teaspoon. Infuses the cake with a warm flavor.
- Unsweetened coconut milk: 1 cup. Enhances the coconut flavor in the cake.
- Pink food coloring: A few drops. Gives the cake a lovely pink hue.
- Shredded coconut: 2 cups. Used for topping, adding sweetness and visual appeal.
- Coconut frosting: For spreading on top, made from butter, powdered sugar, and coconut milk.

How to Make
- Prepare the oven and pan: Preheat your oven to 350°F (175°C). Grease a 9×13-inch baking dish or line it with parchment paper for easy removal. This will ensure the cake comes out neatly once it’s baked.
- Combine the dry ingredients: In a large mixing bowl, sift together the all-purpose flour, granulated sugar, baking powder, and salt. This step helps incorporate air into the mixture, leading to a lighter cake.
- Mix wet ingredients: In a separate bowl, cream the softened butter until smooth. Add the eggs, vanilla extract, and coconut milk, mixing until well combined. This creamy mixture is essential for a moist cake.
- Blend the mixtures: Gradually add the wet mixture to the dry ingredients, stirring gently until just combined. Be careful not to overmix, as this can lead to a denser cake. Add a few drops of pink food coloring and swirl it into the batter.
- Pour and bake: Pour the batter into your prepared baking dish, smoothing it out with a spatula. Bake in the preheated oven for 25-30 minutes or until a toothpick inserted in the center comes out clean. The edges should be lightly golden.
- Cool and frost: Once baked, remove the cake from the oven and let it cool in the pan for about 10 minutes. Carefully transfer it to a wire rack to cool completely. After the cake has cooled, spread a generous layer of coconut frosting on top and sprinkle shredded coconut over the frosting. Make sure to press down slightly so the coconut sticks well.
- Cut into bars: Using a sharp knife, cut the cake into rectangles or squares. Enjoy the fluffy texture and beautiful colors of the Pink Coconut Snowball Cake Bars!
Variations & Substitutions
Gluten-Free Option: If you’re looking for a gluten-free alternative, you can substitute all-purpose flour with a gluten-free flour blend. Just ensure that the blend contains xanthan gum to mimic the structure and texture of traditional flour. The flavor will remain just as delicious!
Vegan Option: To make this recipe vegan, replace eggs with flaxseed eggs (1 tablespoon of flaxseed mixed with 3 tablespoons of water per egg). Use a vegan butter alternative and ensure that your coconut milk is entirely plant-based. These adjustments will not only keep the cake free of animal products but will also maintain the moistness and flavor that everyone loves.
Chocolate Coconut Snowball Bars: If you’re a chocolate lover, consider adding cocoa powder to the cake batter. Just reduce the flour equivalent by the same amount of cocoa powder used, and you’ll have a delightful chocolate variation that still maintains the coconut flavor.
Mixed Berry Coconut Bars: For those dreaming of a tropical twist, consider adding fresh or frozen mixed berries like blueberries or raspberries into the batter before baking. The tartness from the berries balances wonderfully with the sweetness of coconut.
Common Mistakes to Avoid
When making Pink Coconut Snowball Cake Bars, there are a few common pitfalls to be aware of. Overmixing the batter is one issue that can lead to a dense texture; only mix until ingredients are just combined. Not preparing the pan properly can also lead to a sticky situation; make sure to grease or line it adequately. Additionally, underbaking can result in wet, gooey bars while overbaking makes them dry. Always check with a toothpick a few minutes before the timer goes off!
Storage, Freezing & Reheating Tips
To store your Pink Coconut Snowball Cake Bars, place them in an airtight container; they can be stored in the refrigerator for up to 5 days. For longer storage, wrap the bars individually in plastic wrap or aluminum foil and place them in an airtight container before freezing. These bars can be frozen for 2-3 months. When ready to eat, thaw them in the refrigerator overnight or at room temperature for a couple of hours. If you’d like to enjoy them warm, pop them in a microwave for 10-15 seconds, being careful not to dry them out.
Frequently Asked Questions
Can I use sweetened shredded coconut instead of unsweetened?
Yes, you can use sweetened shredded coconut for an extra touch of sweetness. However, be mindful of the additional sugar content in your recipe, as it may alter the overall taste.
What can I do with leftover coconut milk?
Leftover coconut milk can be stored in the refrigerator and used in various recipes, such as curries, smoothies, or even as a base for soups. Make sure to use it within a week to avoid spoilage.
Can I make this recipe ahead of time?
Absolutely! These bars can be made a day in advance, stored in the refrigerator, and frosted just before serving. This allows the flavors to enhance and meld beautifully over time.
How can I make the frosting less sweet?
To make the frosting less cloying, you can reduce the amount of powdered sugar or add a pinçh of salt to balance the sweetness. Cream cheese or Greek yogurt can be added for a tangy flavor and creamier texture instead of frosting solely made with butter and sugar.
Can I add food coloring in the frosting too?
Yes! If you want to add extra vibrancy to your frosting, feel free to mix in some food coloring. This is especially fun for themed parties or if you’re looking to match colors!
Conclusion:
The Pink Coconut Snowball Cake Bars recipe is a delightful treat that caters to a variety of tastes and dietary needs. Easy to prepare and visually stunning, you can enjoy them at home or share them at gatherings. The combination of flavors, textures, and colors makes these bars a must-try. So gather your ingredients and create this sweet sensation today!


