## Oreo Cupcakes – Rich, Creamy & Made Easy with a Doctored Cake Mix!
You know that feeling when you want something sweet that feels like a warm hug? Something comforting, where each bite whispers memories of childhood? For me, that treat is always a rich Oreo cupcake. Imagine fluffy chocolate cake topped with an ultra-creamy frosting, perfectly blended with pieces of Oreos – it’s pure indulgence in each fluffy bite.
These Oreo cupcakes capture that nostalgic essence, delivering a chocolate experience that’s both decadent and simple to make. Even better, we’re using a doctored cake mix, so you can whip these cupcakes up quickly, leaving you more time to enjoy the sweet moments with family and friends. Whether it’s a birthday celebration, a cozy evening at home, or an impromptu gathering, these cupcakes are bound to steal the spotlight.
### What are Oreo Cupcakes?
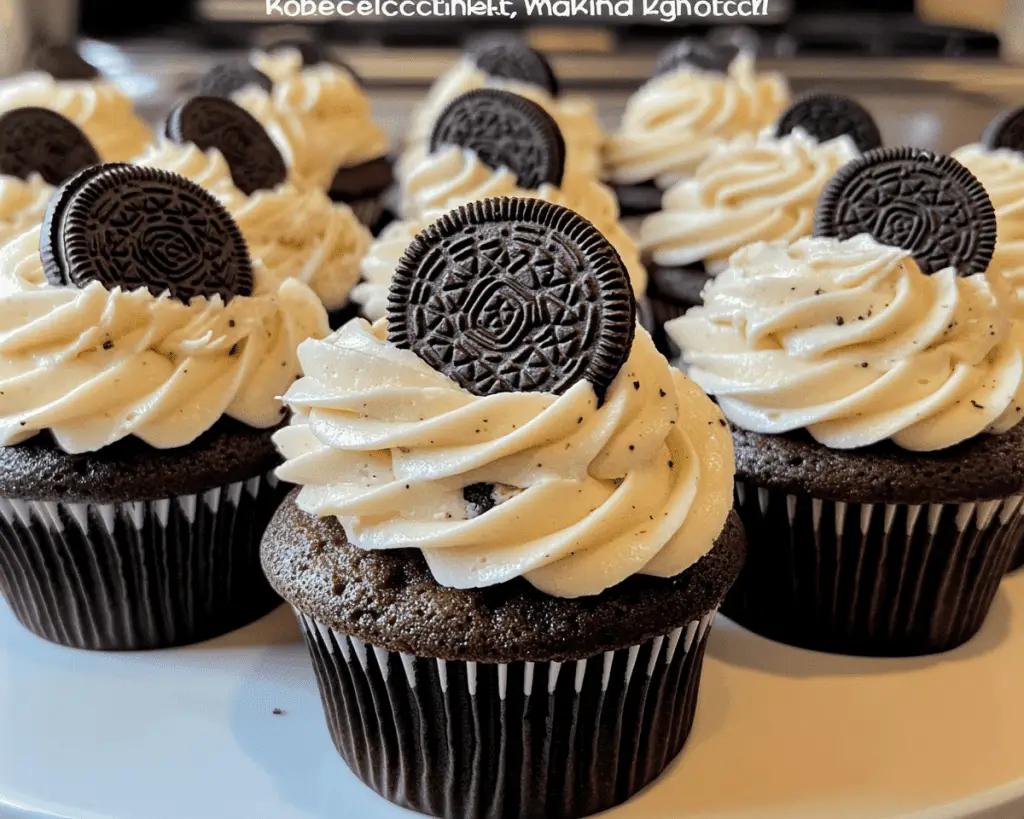
At their core, Oreo cupcakes are a delightful fusion of moist chocolate cake and the iconic Oreo cookie. They typically feature a chocolate cupcake base with chunks of Oreo cookies blended into the batter, giving it an extra crunch and depth of flavor. Topped with a luscious frosting that may or may not include crushed Oreos, these cupcakes are both a feast for the eyes and the palate.
Oreo cupcakes originated from the famous cookie’s versatility in desserts, having transcended from just being a snack to inspiring countless recipes. The addition of Oreos brings a **crunchy texture** and **creamy flavor**, making them a cherished treat for both kids and adults alike. With chocolate cake draping around the classic cream, it’s a combination that takes you back to weekends spent baking with loved ones – a true testament to the joy that comes from the kitchen.
### Why You’ll Love This Oreo Cupcake Recipe
These Oreo cupcakes stand out for several reasons. First and foremost, they are incredibly simple to make, thanks to the doctored cake mix, meaning you don’t have to spend hours in the kitchen. Just imagine: within 30 minutes, you could be savoring ultra-moist cupcakes that taste as though they came straight from a bakery.
– **Rich chocolate flavor:** The doctored cake mix yields a chocolate cake that’s lush and tender.
– **Oreo goodness:** The crushed Oreos folded into the batter add delightful surprises in every bite.
– **Family-friendly:** Perfect for a fun cooking project with kids or an easy solution for a potluck.
– **Quick and easy:** You can have these mouthwatering cupcakes ready to serve in no time.
Crafting these cupcakes not only satisfies that sweet tooth, but they provide an opportunity to showcase your baking skills while enjoying a nostalgic experience. Who doesn’t love biting into fluffy cake and sharing memorable moments with loved ones?
### Ingredients You’ll Need
Here’s a rundown of what you’ll need to bring these delightful cupcakes to life:
– **Chocolate Cake Mix (15.25 oz.)**: Use your favorite brand. This forms the base; don’t worry, we’ll doctor it for moistness.
– **Eggs (3 large)**: These will help bind everything together and add rich flavor and texture.
– **Water (1 cup)**: This keeps the cupcakes moist, balancing the ingredients.
– **Vegetable Oil (½ cup)**: Adding oil helps result in a tender crumb.
– **Crushed Oreo Cookies (1 cup)**: This is where the magic happens; they’ll provide delightful bites of cookie goodness throughout.
– **Cream Cheese (8 oz., softened)**: For the frosting, this gives creaminess and depth.
– **Unsalted Butter (½ cup, softened)**: Adds buttery richness that balances the sweetness.
– **Powdered Sugar (4 cups)**: For sweetness and a fluffy texture in the frosting.
– **Vanilla Extract (1 tsp)**: Enhances all the flavors and adds a comforting aroma.
– **Extra crushed Oreos (for garnish)**: To sprinkle on top for that finishing touch.
When purchasing ingredients, opt for fresh ones, especially eggs and butter. Quality greatly affects the outcome — fresh ingredients will lead to better flavor and texture.
### How to Make Oreo Cupcakes
#### 1. Preheat and Prepare:
Begin by preheating your oven to 350°F (175°C). Line a standard muffin tin with cupcake liners. This simple step sets the stage for what’s to come.
#### 2. Combine Dry Ingredients:
In a large mixing bowl, combine the chocolate cake mix and crushed Oreos. This step infuses the cake mix with the sweet, rich flavor of Oreo, which begins to create visual excitement. Stir gently to combine the two ingredients.
#### 3. Mix Wet Ingredients:
In another bowl, whisk together the eggs, water, and vegetable oil until well blended. The colors will swirl beautifully — a promise of the heaviness and moisture you’ll be incorporating into the next steps.
#### 4. Blend the Mixtures:
Pour the wet mixture into the dry ingredients and mix until just combined. Avoid overmixing, as this will yield dense cupcakes. Visual signs include a slightly lumpy batter with no dry streaks. The aroma will start to fill the kitchen, a warm and inviting scent teasing your taste buds.
#### 5. Fill and Bake:
Scoop the batter into the prepared liners, filling each about two-thirds full. This allows room for the cupcakes to rise beautifully. Bake for 18-20 minutes or until a toothpick inserted in the center comes out clean. You’ll know they’re done when they turn a gorgeous, deep chocolate brown on top and spring back to the touch.
#### 6. Cool the Cupcakes:
Once baked, remove the cupcakes from the oven and let them cool in the pan for about 5 minutes. Then transfer them to a wire rack to cool completely. This step is crucial; frosting warm cupcakes will melt your beautiful frosting!
#### 7. Creamy Oreo Frosting:
While your cupcakes cool, it’s time for the frosting. In a mixing bowl, beat the softened cream cheese and butter together until smooth and creamy. Gradually add the powdered sugar and vanilla extract. Beat until fluffy. This frosting’s texture should be light; it needs to be stable enough to hold its shape when dolloped onto the cupcakes.
#### 8. Garnish and Serve:
Once cupcakes have cooled completely, frost generously with your Oreo frosting. Top each with a sprinkling of extra crushed Oreos for that classic touch. Your culinary creation is now visually stunning and ready to wow everyone who lays eyes on it!
### Tips, Tricks & Variations
– **Storage:** These cupcakes can be stored in an airtight container for up to 3 days at room temperature or a week in the fridge.
– **Freezing:** Freeze unfrosted cupcakes for up to 3 months. Wrap each cupcake tightly in plastic wrap and aluminum foil before freezing.
– **Vegan Option:** Substitute eggs with a flaxseed mixture (1 tablespoon of ground flaxseed + 3 tablespoons of water = 1 egg).
– **Dairy-Free:** Swap cream cheese and butter with dairy-free alternatives for a great dairy-free frosting.
– **Frosting Variations:** Try adding a tablespoon of espresso powder for a mocha flavor or a dash of peppermint extract for a minty twist.
### What to Serve With Oreo Cupcakes
Oreo cupcakes lend themselves well to a variety of accompaniments. Pair them with a tall glass of cold milk for the classic experience. Hot coffee can balance the sweetness, while a scoop of vanilla ice cream can elevate the dessert moment to festive levels. If you want something refreshing, a scoop of raspberry sorbet adds a beautiful tartness that complements the chocolate.
### Nutrition & Health Benefits
While these Oreo cupcakes are rich and indulgent, it’s essential to savor them in moderation. Each cupcake contains a balance of carbohydrates, fat, and some protein from eggs and dairy. The Oreos, while sugary, offer the comforting flavors we crave in desserts. For a closer look at calories and other nutritional details, consult credible sources such as Healthline and USDA guidelines for a better understanding of portion control and healthy snacking .
### Frequently Asked Questions
**1. Can I use a different flavor cake mix?**
Absolutely! Vanilla or Funfetti cake mixes could add a unique twist. Just keep in mind that the flavors will change; chocolate is the classic complement to Oreos.
**2. What if I don’t have crushed Oreos?**
You can use any chocolate cookie or even homemade chocolate crumbles as a substitute, though Oreos provide the iconic taste.
**3. How long do the cupcakes last?**
In an airtight container at room temperature, they should last for 3 days. Refrigerate them for an extended shelf life, up to a week.
**4. Can I make the frosting ahead of time?**
Yes! The frosting can be prepared a day in advance; just give it a quick whisk to re-fluff before spreading on the cupcakes.
**5. Can these cupcakes be made gluten-free?**
Certainly! Use a gluten-free chocolate cake mix and check that the Oreos you choose are gluten-free, which many varieties are.
###
More than just a sweet treat, these Oreo cupcakes are a celebration group cuddling around dessert, a childhood delight meeting modern convenience. The moment you bite into one, you’re enveloped in a symphony of rich chocolate and creamy cookie flavors. So grab your apron and start baking! You won’t just be filling bellies; you’ll be creating memories with every cupcake. If you loved this recipe, leave a comment or tag me on Instagram – I can’t wait to hear how they turned out!


