Prep time: 20 minutes
Cook time: 0 minutes
Total time: 20 minutes
Servings: 12 balls
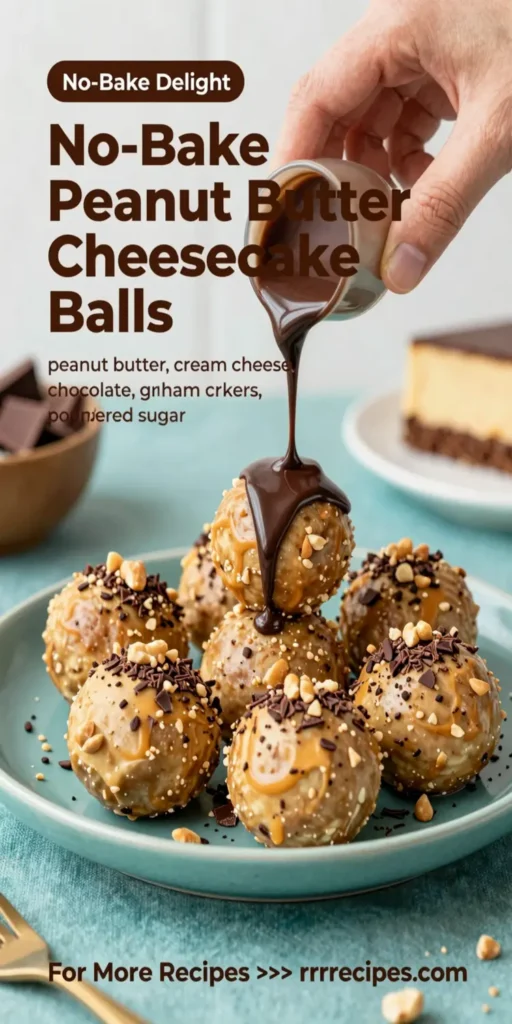
No-Bake Peanut Butter Cheesecake Balls are the perfect treat for any peanut butter lover. These delightful bites combine creamy cheesecake with rich peanut butter, all encased in a chocolate coating. Whether you’re a busy parent looking to whip up a quick dessert or a kitchen beginner experimenting with no-bake recipes, these treats will impress both your taste buds and your loved ones.
What Is No-Bake Peanut Butter Cheesecake Balls Recipe?
This recipe creates deliciously indulgent cheesecake balls without the need for an oven. Using simple ingredients like cream cheese, peanut butter, and graham cracker crumbs, these balls are mixed, chilled, and rolled. They provide a perfect balance between the sweet, creamy filling and the added crunch from chocolate coating, making them the ultimate snack or dessert.
Why You’ll Love This
You’ll adore these No-Bake Peanut Butter Cheesecake Balls for several reasons:
- Quick and Easy: No oven required – just mix, chill, and serve!
- Minimal Ingredients: Made with just a handful of pantry staples.
- Versatile: Perfect for parties, after-school snacks, or meal prep.
- Customizable: Add your favorite toppings or fillings for a personal touch.
Ingredients You’ll Need
Here are the ingredients you’ll need to make these irresistible treats. Each ingredient is vital to achieving the perfect texture and flavor:
- 8 oz cream cheese, softened: Provides the creamy base for the cheesecake center.
- 1 cup peanut butter: Adds a rich, nutty flavor and binds the mixture together.
- 1 cup powdered sugar: Sweetens the mixture, giving it that classic dessert flavor.
- 1 cup graham cracker crumbs: Contributes crunch and replicates a traditional cheesecake crust.
- 1 cup chocolate chips: Used for coating, providing a sweet contrast to the salty peanut butter.
- 1 tsp vanilla extract: Enhances the flavor of the cheesecake mixture.
How to Make
Making No-Bake Peanut Butter Cheesecake Balls is straightforward. Follow these steps for the best results:
- In a mixing bowl, combine the softened cream cheese and peanut butter. Use a hand mixer or fork to beat the mixture until it’s completely smooth and creamy. This ensures that every bite is rich and decadent.
- Gradually add the powdered sugar and vanilla extract to the bowl. Mix until fully incorporated. You’ll notice the texture becoming thicker and more stable, which is essential for rolling the balls later.
- Gently fold in the graham cracker crumbs using a spatula. This step adds a delightful crunch and helps give the mixture structure. Make sure not to overmix, as this could make the mixture too dense.
- Once combined, cover the bowl and refrigerate the mixture for about 30 minutes. Chilling will help firm up the mixture, making it easier to roll into balls without a sticky mess.
- After chilling, use your hands to roll the mixture into balls about 1 inch in diameter. Place them on a baking sheet lined with parchment paper. This prevents sticking and makes cleanup easier.
- Melt the chocolate chips in a microwave-safe bowl in 15-second intervals, stirring between each until smooth. This chocolate coating makes each bite indulgent and adds a lovely shine.
- Dip each ball into the melted chocolate, ensuring it’s fully coated. Use a fork to lift them out and let the excess chocolate drip off. Return the coated balls to the parchment paper and let them set in the fridge for at least 15 minutes to harden.
Variations & Substitutions
You can put your spin on these No-Bake Peanut Butter Cheesecake Balls with the following variations:
Chocolate Peanut Butter Cheesecake Balls: If you’re a chocolate lover, consider mixing in 1/4 cup of cocoa powder into the cream cheese and peanut butter mixture. This will intensify the chocolate flavor and deepen the color. Also, you can sprinkle some crushed chocolate cookies over the chocolate coating for added texture.
Coconut Peanut Butter Cheesecake Balls: For a tropical twist, stir in 1/2 cup of shredded coconut into the mixture. Not only does it add a chewy texture, but it also complements the peanut butter beautifully. You can use white chocolate for coating, which harmonizes well with coconut.
Nut-Free Version: For those with nut allergies, replace peanut butter with sun butter or a seed butter of your choice. This will maintain similar consistency and taste without the risk of allergens. Ensure all other ingredients are also nut-free, especially if you’re serving to someone with dietary restrictions.
Each of these variations offers a unique way to enjoy the classic flavors while keeping the recipe fun and interesting.
Common Mistakes to Avoid
When making No-Bake Peanut Butter Cheesecake Balls, here are some common pitfalls to watch out for:
Using cold cream cheese: Make sure the cream cheese is at room temperature before mixing; otherwise, you may end up with lumps that won’t blend well into the mixture.
Not chilling the mixture: Skipping the refrigeration step can result in sticky, unmanageable dough. Chilling gives a firmer texture, making rolling into balls easier.
Overheating chocolate: Be cautious while melting chocolate; overheating can result in burnt chocolate, which will ruin the coating. Always melt in short intervals and stir frequently.
By avoiding these mistakes, you’ll ensure a successful and delicious batch of No-Bake Peanut Butter Cheesecake Balls every time.
Storage, Freezing & Reheating Tips
To maintain freshness, follow these guidelines for storage:
Storage: Store the cheesecake balls in an airtight container for up to one week in the refrigerator. If they are coated in chocolate, it’s best to separate layers with parchment paper to avoid sticking.
Freezing: You can freeze these balls for up to three months. Make sure to place them in a single layer on a baking sheet first to freeze them individually. Once frozen, transfer them to a freezer-safe bag or container.
Reheating: There’s no need to heat the cheesecake balls, as they are best served cold. Simply take them out of the refrigerator or freezer and enjoy!
These storage tips ensure you can always have a treat handy when you need a sweet pick-me-up or a quick dessert option.
Frequently Asked Questions
Can I make these ahead of time?
Absolutely! You can prepare No-Bake Peanut Butter Cheesecake Balls ahead of time. In fact, they often taste better after chilling for a bit. You can store them in the fridge or freezer depending on when you plan to serve them. Just remember to allow them to come to room temperature for a couple of minutes before serving if they were frozen.
Can I use natural peanut butter?
Yes, you can use natural peanut butter, but it tends to be a little runnier than regular peanut butter. You may want to adjust the amount of graham cracker crumbs to achieve the right consistency for rolling. This version might also have a different flavor profile, offering a more organic taste.
How do I fix a runny mixture?
If your cheesecake mixture turns out to be too runny, simply add more graham cracker crumbs a tablespoon at a time. This will help thicken it and enable you to roll them into balls more easily. Alternatively, if you find them too sticky, chilling them a bit longer can also help.
Are these gluten-free?
You can make these gluten-free by using gluten-free graham cracker crumbs or an alternative like almond flour or gluten-free cookie crumbs. Just check the labels to ensure all your ingredients are certified gluten-free.
Can I add mix-ins?
Definitely! Feel free to add mini chocolate chips, dried fruit, or even crushed nuts to the cheesecake mixture for added texture and flavor. Just keep your total mix-in quantity balanced so that your balls hold together well.
Conclusion:
No-Bake Peanut Butter Cheesecake Balls are a delightful and easy-to-make treat perfect for any occasion. Their rich, creamy center and satisfying crunch from the chocolate coating make them an instant favorite. These treats invite endless variations to fit your taste preferences, and they’re sure to impress everyone who tries them. Enjoy making these little delights and sharing them with family and friends!


