Prep time: 20 minutes
Cook time: 0 minutes
Total time: 20 minutes
Servings: 12 mini cheesecakes
No Bake Christmas Mini Cheesecakes are the perfect festive dessert, especially for those busy times during the holiday season. They require no baking, hence saving you time and effort while creating a delightfully creamy and rich cheesecake that’s sure to impress both family and friends. Imagine a world where decadent desserts are quick and easy to make! The combination of buttery cookie crust, smooth cream cheese, and seasonal flavors creates a delightful treat that is both satisfying and festive.
What Is No Bake Christmas Mini Cheesecakes?
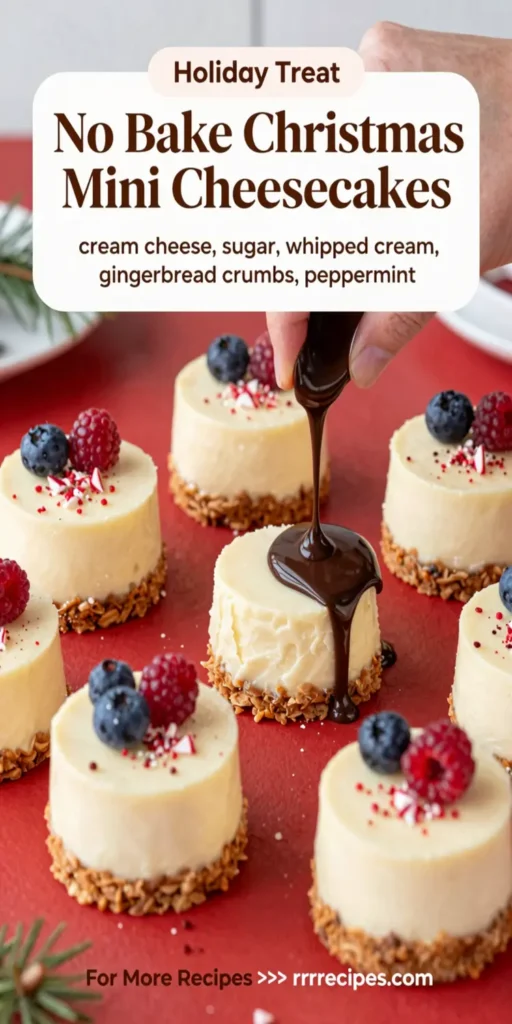
No Bake Christmas Mini Cheesecakes are individual-sized cheesecakes made without an oven. They are typically prepared using a graham cracker crumb crust, combined with a smooth filling made from cream cheese, whipped cream, and sugar. Often, festive flavors like peppermint or gingerbread are included, making them a perfect fit for holiday gatherings. The mini aspect makes them easy to serve and perfect for parties, as they can be eaten in just a few bites. They can also be decorated with seasonal toppings, adding a burst of color and festivity to your dessert table.
Why You’ll Love This
These mini cheesecakes are not only delicious but also incredibly versatile. You can easily adapt the recipe to suit your personal preferences or dietary restrictions. Plus, they require no baking, which is a huge bonus for those who may be intimidated by traditional cheesecake recipes or simply want a quick and easy dessert. Beyond that, their bite-sized portions make them the ideal dessert for gatherings, allowing guests to indulge without feeling too guilty. The visual appeal, creaminess, and seasonal flavors come together to create a dessert that’s irresistible.
Ingredients You’ll Need
- Graham cracker crumbs: 1 cup – This forms the base of your crust, providing that delicious crunchy texture.
- Granulated sugar: 1/4 cup – Used to sweeten the crust and the filling, balancing the flavors.
- Unsalted butter: 1/2 cup (melted) – Helps bind the crust together and adds richness.
- Cream cheese: 16 oz (softened) – The star of the show; it gives cheesecakes their creamy and smooth texture.
- Powdered sugar: 1 cup – Adds sweetness and helps achieve the desired texture in the filling.
- Vanilla extract: 1 tsp – Enhances the overall flavor of the cheesecake.
- Heavy whipping cream: 1 cup – Whipped to soft peaks, it adds lightness and fluffiness to the filling.
- Seasonal toppings: Optional – Whipped cream, crushed candy canes, or festive sprinkles to enhance the decoration.
How to Make
- Prepare the crust: In a medium bowl, combine graham cracker crumbs, granulated sugar, and melted butter. Mix well until combined. The mixture should resemble wet sand and hold together when pressed. Divide the mixture evenly among a muffin pan lined with cupcake liners, pressing down firmly to form a solid crust at the bottom.
- Make the filling: In a large mixing bowl, beat the softened cream cheese with an electric mixer until smooth and creamy. Gradually add powdered sugar and continue mixing until fully incorporated. This should take about 2–3 minutes, ensuring there are no lumps.
- Add vanilla and whipped cream: Stir in the vanilla extract. In a separate bowl, whip the heavy cream until soft peaks form. Gently fold the whipped cream into the cream cheese mixture. The goal is to keep it light and airy, giving your cheesecake a beautiful texture.
- Fill the crusts: Using a piping bag or a spoon, equally distribute the cream cheese filling over the prepared crusts in the muffin tins. Smooth the tops for an even finish, and then refrigerate for at least 4 hours or until set. This chilling step is crucial for achieving the right texture!
- Decorate and serve: Once set, remove the cheesecakes from the muffin pan. Decorate with whipped cream and seasonal toppings such as crushed candy canes or holiday sprinkles just before serving. Enjoy your delightful mini cheesecakes!
Variations & Substitutions
Peppermint Bark Mini Cheesecakes: For a refreshing twist, try adding crushed peppermint candies to the filling. Substitute half of the vanilla extract with peppermint extract for that signature holiday flavor. Top with chocolate shavings for a festive touch.
Chocolate Hazelnut Mini Cheesecakes: Replace half of the cream cheese with chocolate hazelnut spread. This will give the cheesecakes a rich, chocolatey flavor that is just heavenly. Garnish with whole hazelnuts or drizzles of chocolate syrup.
Fruit Topped Mini Cheesecakes: In place of the standard toppings, consider using fresh fruit like strawberries, blueberries, or raspberries. Not only does this provide a refreshing contrast, but it also adds an appealing color to your desserts. A fruit compote could also work wonders!
Dairy-Free Option: Substitute the cream cheese with a plant-based alternative along with lactose-free whipping cream. This allows everyone to enjoy these indulgent desserts during the holidays without dietary restrictions.
Common Mistakes to Avoid
One common mistake is not letting the cream cheese soften before mixing. Using cold cream cheese can lead to a lumpy texture. Always allow it to sit at room temperature for at least an hour. Another mistake is skipping refrigeration; *this is crucial* for setting the cheesecakes properly, ensuring they maintain their shape. Over-mixing the filling can incorporate too much air, leading to cracks once the cheesecakes are set. Finally, when filling the cups, avoid overfilling, as they may overflow during the chilling process.
Storage, Freezing & Reheating Tips
These cheesecakes can be stored in the refrigerator for up to 5 days. Make sure to cover them securely with plastic wrap to prevent them from drying out or absorbing odors from other foods. For long-term storage, they can be frozen for up to 2 months. Wrap each mini cheesecake individually in plastic wrap and then place them in an airtight container. To enjoy frozen cheesecakes, transfer them to the refrigerator to thaw overnight before serving. Reheating is not applicable since these are no-bake desserts, but if you notice any texture changes after freezing, simply give them a quick whip with a mixer to restore their fluffiness.
Frequently Asked Questions
Can I use low-fat cream cheese for this recipe? Yes, you can use low-fat cream cheese, but the texture may be slightly different. Low-fat cream cheeses typically contain more moisture, which may make your filling a bit softer. You may want to adjust the amount of powdered sugar to compensate for the additional moisture.
How can I make these mini cheesecakes gluten-free? To create a gluten-free version, simply use gluten-free graham cracker crumbs. Ensure all other ingredients are labeled gluten-free as certain brands of cream cheese and whipped cream can have traces of gluten.
How long do these cheesecakes need to set? Ideally, these cheesecakes should set in the refrigerator for at least 4 hours for the best results. However, if you’re pressed for time, you can check after 2 hours, but the texture might be softer.
Can I customize the flavors further? Absolutely! You can experiment with any seasonal flavors. Add spices like cinnamon or nutmeg for a warmer profile or even different extracts, such as almond or coconut, for a unique taste. The possibilities for flavor customization are nearly endless.
What if I don’t have a muffin tin? If you don’t have a muffin tin, you can also use silicone molds or any small dessert cups. Just ensure they are lined properly for easy removal later!
Conclusion: These No Bake Christmas Mini Cheesecakes are not only a fantastic dessert option but are also a fun way to bring everyone together during the holidays. Easy to prepare and customizable, they’ll surely become a favorite in your holiday repertoire. The creamy texture combined with the joyous spirit of the season makes each bite memorable. So, gather your loved ones, prepare these delightful treats, and enjoy the festivities! For similar recipes, [Read also: Easy Dessert Recipes for Beginners].


