Prep time: 15 minutes
Cook time: 0 minutes
Total time: 15 minutes
Servings: 6
No Bake Cherry Cheesecake Cups for Summer Parties is the perfect dessert to whip up when the temperature rises and you want to impress your family and friends. This delightful treat combines a creamy, rich cheesecake filling with the tartness of fresh cherries, all served in individual cups for a fun and easy presentation. With minimal effort and no baking required, these cups are both a time-saver and a crowd-pleaser, making them ideal for summer gatherings like birthday parties, barbecues, and picnics.
What Is No Bake Cherry Cheesecake Cups for Summer Parties?
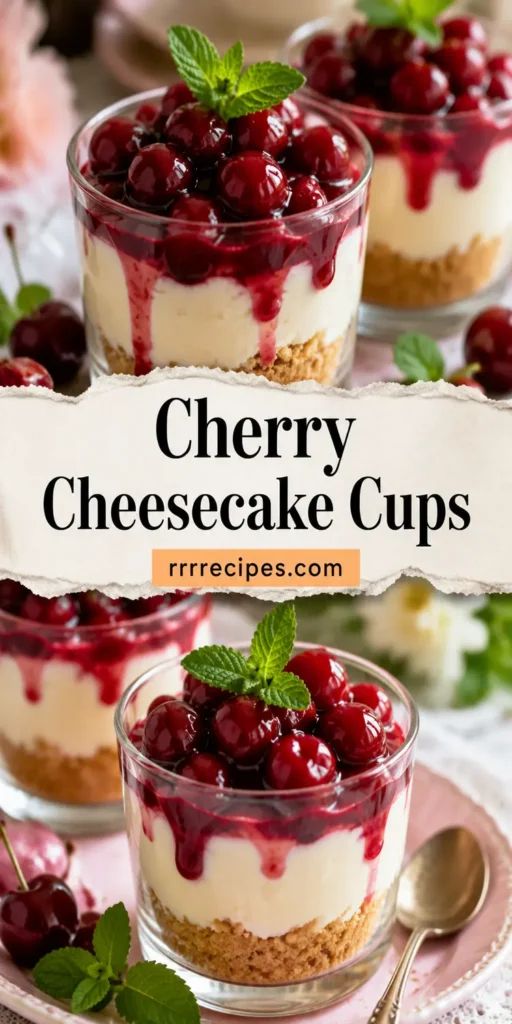
No Bake Cherry Cheesecake Cups encapsulate the classic flavor of cheesecake but in a simplified, individual portion form. The base features a crushed graham cracker crust that provides a satisfying crunch, while the cheesecake layer is creamy and smooth, made with cream cheese and whipped cream. The cherry topping adds a pop of color and an explosion of flavor, elevating the dish to a showstopper that requires no oven time. This dessert not only looks appealing but also allows you to spend more time enjoying the party rather than being confined to the kitchen.
Why You’ll Love This
This dessert is not only quick and simple to prepare, but it also caters to various dietary needs. The No Bake Cherry Cheesecake Cups are great for busy parents who want to create something special without spending hours in the kitchen. As a perfect choice for meal prep, you can make these cups ahead of time, allowing them to chill in the refrigerator until you’re ready to serve them. Additionally, by using seasonal cherries, you’ll ensure that your dessert is fresh and flavorful.
Ingredients You’ll Need
- Graham cracker crumbs: 1 cup – This serves as the crust, providing both texture and a slightly sweet flavor. You can crush your own crackers or buy pre-crushed ones for convenience.
- Granulated sugar: 1/4 cup – This sweetens the crust and the filling, balancing the tartness of the cherries.
- Unsalted butter: 1/2 cup (melted) – This helps bind the crust together and adds richness.
- Cream cheese: 8 ounces (softened) – The main ingredient for the cheesecake layer, providing creaminess and flavor.
- Powdered sugar: 1/2 cup – This sweetens the cheesecake filling without the graininess of granulated sugar.
- Vanilla extract: 1 teaspoon – Adds a depth of flavor to the cheesecake.
- Heavy whipping cream: 1 cup – Whipped to soft peaks for a fluffy texture in the filling.
- Fresh cherries: 2 cups (pitted and halved) – They provide a vibrant topping that balances the creamy cheesecake.
- Cherry juice: 1/4 cup – Adds sweetness and helps the cherries maintain their moisture.

How to Make
- Begin by preparing the crust. In a medium-sized bowl, combine the graham cracker crumbs, granulated sugar, and melted butter. Use a fork to mix until everything is thoroughly combined and resembles wet sand. Press this mixture firmly into the bottom of individual dessert cups or glasses to form an even layer.
- Next, make the cheesecake filling. In a large mixing bowl, beat the softened cream cheese with an electric mixer until it is smooth and creamy. Gradually add in the powdered sugar and continue to mix until well incorporated. Then, add the vanilla extract and mix again to combine.
- In another bowl, whip the heavy whipping cream until soft peaks form. This process can take a few minutes, so be patient. Gently fold the whipped cream into the cream cheese mixture in stages, ensuring you don’t deflate the cream too much. Aim for a light, fluffy texture.
- Once your filling is well combined, scoop it into the prepared crust cups, filling each one to the top. Use a spatula to smooth the surface for an aesthetically pleasing look.
- Now, prepare the cherry topping. In a separate bowl, mix the fresh cherries with cherry juice. Allow them to sit for a few minutes to soak in the flavors. Then, spoon the cherry mixture generously over each cheesecake cup.
- Cover the cups with plastic wrap or lids, and refrigerate them for at least 2 hours to allow the flavors to meld and the filling to set up. This step ensures a better texture and taste.
Variations & Substitutions
Chocolate Cherry Cheesecake Cups: For chocolate lovers, consider mixing in some melted chocolate with the cheesecake filling or using chocolate graham crackers for the crust. You can also sprinkle some chocolate shavings on top of the cherries for added richness.
Berry Cheesecake Cups: If cherries aren’t in season, switch up the topping with other berries such as strawberries, blueberries, or raspberries. Simply toss the berries with a bit of sugar and lemon juice for an extra zing before adding them on top of the cheesecake filling.
Vegan No Bake Cheesecake Cups: Replace cream cheese with a cashew cream or coconut yogurt, and use maple syrup instead of sugar. For the crust, blend nuts instead of graham crackers and press them into the cups. This option is perfect for those following a plant-based diet.
Mini Cheesecake Bites: Instead of using cups, use a mini muffin tin lined with paper liners. This will give you bite-sized cheesecake treats that are perfect for parties and gatherings. Adjust the baking time accordingly, keeping in mind the smaller size.
Common Mistakes to Avoid
Make sure the cream cheese is fully softened before mixing; otherwise, you may end up with lumps in your filling. If it’s too cold, it won’t blend smoothly. Always let it sit at room temperature for at least an hour before use.
When whipping the heavy cream, be careful not to over-whip it, as this can turn it into butter. Whip until you achieve soft peaks; this will give your cheesecake the right texture.
If you notice the cherry topping is too watery, avoid adding too much cherry juice directly to the cherries. Adjust the amount according to taste, keeping in mind that you want a vibrant flavor without a soggy topping.
Storage, Freezing & Reheating Tips
To store leftover No Bake Cherry Cheesecake Cups, seal them tightly with plastic wrap or transfer them to an airtight container. They can be kept in the refrigerator for up to 3 days. If you plan to make them in advance, it’s best to add the cherry topping just before serving to maintain the freshest taste.
If you wish to freeze these cups, omit the cherry topping before freezing. Wrap each cheesecaker cup tightly and store them in a freezer-safe container, where they will last for up to 2 months. When ready to serve, thaw in the refrigerator overnight and add the cherry topping before serving.
Reheating is not required for this dessert as it is best served chilled. If you find the filling is too solid after freezing, let it sit at room temperature for about 10 minutes to soften before serving.
Frequently Asked Questions
Can I make these cheesecake cups in advance? Yes, these No Bake Cherry Cheesecake Cups can be made a day ahead of time. Just remember to add the cherry topping shortly before serving to keep them fresh and visually appealing.
How long can I keep leftovers? Leftover cheesecake cups can be stored in the refrigerator for up to 3 days. Ensure they are sealed properly to maintain freshness. Freezing is also an option, but omit the cherry topping until after thawing and just before serving.
Can I use frozen cherries instead of fresh? Absolutely! Frozen cherries can be substituted in this recipe. Just remember to thaw and drain any excess juice before adding them on top to avoid a watery topping.
Is there a gluten-free option for the crust? Definitely! You can replace the graham cracker crumbs with gluten-free cereal crumbs or crushed gluten-free cookies for the crust. Ensure that all other ingredients are also gluten-free if necessary.
What can I use instead of heavy cream? If you’re looking for a lighter alternative, you can use whipped coconut cream. Just make sure it is chilled and whipped until soft peaks form, similar to regular heavy cream.
Conclusion: These No Bake Cherry Cheesecake Cups are bound to become a new favorite at your summer gatherings. With their effortless preparation, delightful flavors, and customizable options, you’ll not only impress your guests but create memorable moments spent together. No matter the occasion, these dessert cups are sure to add a touch of joy to any event.


