Prep time: 20 minutes
Cook time: 20 minutes
Total time: 40 minutes
Servings: 12 cupcakes
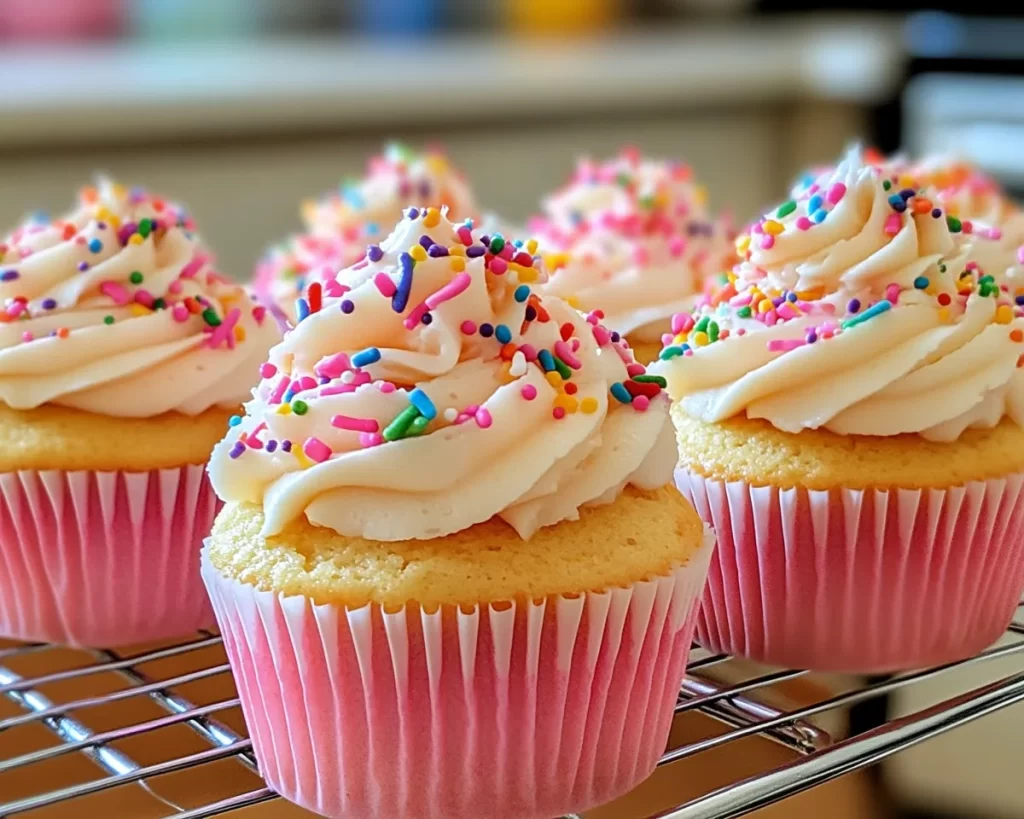
There’s something incredibly special about homemade cupcakes that evoke nostalgia. Whether it’s the sweet aroma wafting through your kitchen or the joy of sharing them with loved ones, a batch of Mother’s Day Vanilla Cupcakes with Buttercream can bring joy and warmth to your celebration. These cupcakes aren’t just any ordinary treat; they represent love, care, and the effort put into creating something special for those you cherish. In this recipe, you will uncover how to create moist, tender vanilla cupcakes topped with creamy, dreamy buttercream frosting.
What’s remarkable about these Mother’s Day Vanilla Cupcakes is their simplicity paired with delightful flavors. You may love the soft crumb texture of the cupcakes alongside the rich, buttery sweetness of the frosting. By the end of this article, you will be equipped not only with a fantastic recipe but also with tips, variations, and answers to common questions to ensure your cupcakes are a hit.
What Is Mother’s Day Vanilla Cupcakes with Buttercream?
Mother’s Day Vanilla Cupcakes with Buttercream are delightful individual cakes that embody the essence of celebration. Originating from a classic baking tradition, cupcakes have become a beloved dessert for all occasions, especially for special events like Mother’s Day. These cupcakes are characterized by their light and fluffy texture, thanks to the well-balanced ratio of flour, sugar, eggs, and refined flavors. The flavor profile is primarily dominated by a rich vanilla essence, giving the cupcakes a warm, inviting taste that complements various frosting options.
The beauty of these cupcakes lies not only in their flavor but also in their versatility. The components are straightforward yet allow for creativity. The soft and airy texture of the cupcake serves as a perfect canvas for the sweet, luscious buttercream that can easily be customized with various colors and flavors to suit the occasion. In essence, Mother’s Day Vanilla Cupcakes are more than just a dessert; they symbolize love and are a heartfelt way to celebrate the wonderful mothers in our lives.
Why You’ll Love This
You will adore this recipe for several reasons. First and foremost, the taste is heavenly; the combination of soft vanilla cake with creamy buttercream will tantalize your taste buds. Making these cupcakes is also surprisingly easy, so even if you are a novice in the kitchen, you’ll find this recipe approachable and simple. The affordability of essential ingredients means that you won’t break the bank while crafting these delightful desserts, and they can be adapted to suit various dietary needs.
Common misconceptions about baking often include the notion that you need to be an expert to create something delicious. However, this recipe showcases how even beginner bakers can succeed with the right guidance. For instance, using room-temperature ingredients aids in achieving a well-mixed batter, which is essential for light, fluffy cupcakes. You will learn to spot common pitfalls and ways to ensure your cupcakes are moist and flavorful every time.
Ingredients You’ll Need
- All-purpose flour: This serves as the base of your cupcakes, providing structure. You can substitute it with cake flour for a lighter texture.
- Baking powder: A leavening agent crucial for helping your cupcakes rise. Double-check its freshness to ensure proper lift.
- Salt: This ingredient enhances the overall flavor. A pinch can significantly elevate the taste.
- Granulated sugar: Adds sweetness and moisture. You may substitute it with coconut sugar for a different flavor profile.
- Unsalted butter: This creates a rich, creamy texture and flavor. Make sure it’s at room temperature for easy mixing.
- Eggs: They provide structure and stability. Using large eggs is advisable for consistent results.
- Vanilla extract: A key flavoring agent that gives the cupcakes their signature aroma. Pure vanilla extract is preferable.
- Milk: It adds moisture to the batter. Feel free to use almond or oat milk if you’d like a dairy-free version.
Each ingredient plays an essential role in crafting the cupcakes’ delightful flavors and textures. By understanding their functions, you can make informed substitutions if necessary, tailoring the recipe to fit your personal preferences or dietary requirements.
How to Make
- Preheat your oven: Start by preheating your oven to 350°F (175°C). This ensures that your cupcakes bake evenly and rise properly. Line a muffin tin with paper cupcake liners to prevent the cake from sticking.
- Mix dry ingredients: In a medium bowl, combine the all-purpose flour, baking powder, and salt. Whisk these ingredients together until they are well blended. This step is essential because it prevents the baking powder and salt from clumping, ensuring an even rise throughout your cupcakes.
- Cream the butter and sugar: In a large mixing bowl, using either an electric mixer or a whisk, cream the unsalted butter and granulated sugar together until the mixture is light and fluffy. This usually takes approximately 3-5 minutes. Properly creamed butter and sugar are crucial for achieving a delicate texture.
- Add eggs and vanilla: Next, add the eggs one at a time to the butter-sugar mixture, mixing well after each addition. Stir in the vanilla extract. Incorporating the eggs individually helps maintain the mixture’s emulsification, ensuring a consistent batter.
- Combine wet and dry ingredients: Gradually add the dry ingredients to the wet ingredients along with the milk. Mix until just combined; be careful not to overmix. Overmixing can lead to cupcakes that are dense instead of light and fluffy. Aim for a smooth, thick batter without visible flour.
- Fill the liners: Using a scoop or two spoons, carefully fill the cupcake liners about two-thirds full with batter. This allows space for the cupcakes to rise without overflow. Ensure that they are evenly filled for consistent baking.
- Bake: Place the muffin tin in the preheated oven and bake for 15-20 minutes. You’ll know they’re done when a toothpick inserted in the center comes out clean. Keep an eye on them to prevent over-baking, as this can lead to dry cupcakes.
- Cool: Once baked, remove the cupcakes from the oven and let them cool in the pan for about 5 minutes before transferring them to a wire rack. It’s important to cool them completely before frosting, as warm cupcakes can melt the frosting.
Each step is designed to guide you toward making perfect Mother’s Day Vanilla Cupcakes that will impress your family and friends. Remember, baking is as much about the journey as it is about the final product, so enjoy the process!
Variations & Substitutions
Chocolate Vanilla Cupcakes: If you’re a chocolate lover, why not switch things up? Replace a quarter of the flour with cocoa powder to create a rich chocolate flavor while maintaining the classic vanilla notes. This variation is perfect for those who can’t resist a double treat and adds an exciting twist to the original recipe.
Gluten-Free Cupcakes: To cater to gluten-free dietary needs, substitute regular flour with a gluten-free all-purpose flour blend. Ensure the blend includes xanthan gum to help mimic the structure that gluten provides. These cupcakes will still turn out light and fluffy, allowing everyone to indulge without worry.
Dairy-Free Buttercream: Opt for a dairy-free buttercream using vegan butter and coconut cream. Simply blend together the vegan butter and powdered sugar, then add a bit of coconut cream to achieve the desired consistency. This variation ensures that everyone can enjoy the delicious frosting without concern for dairy allergies.
Flavorful Frosting Options: Instead of traditional vanilla buttercream, consider experimenting with other flavors. Adding lemon zest for a zesty buttercream or mixing in crushed berries for a fruity twist can elevate your cupcakes. This way, you can personalize the flavors to suit any preference or occasion.
Common Mistakes to Avoid
Baking can occasionally feel like a science experiment, and sometimes things don’t go as planned. Here are common mistakes you might encounter while preparing Mother’s Day Vanilla Cupcakes and tips on how to avoid them.
One of the most critical pitfalls is overmixing the batter. Overmixing can cause the gluten in the flour to develop too much, resulting in dense, chewy cupcakes rather than light and fluffy ones. To mitigate this, mix until the ingredients are just combined and no visible flour remains, ensuring a soft texture.
Another common error is not letting your ingredients come to room temperature. Cold eggs and butter won’t emulsify properly, leading to a lumpy batter. For best results, remove these ingredients from the refrigerator at least 30 minutes before you start baking.
It’s also vital to keep an eye on the oven temperature. Baking at too high a temperature may cause the cupcakes to rise too quickly and then collapse, leading to a gummy texture. Always use an oven thermometer to confirm your oven’s true temperature, especially if it’s older.
Lastly, many bakers underestimate the importance of cooling. If you frost warm cupcakes, the frosting may melt, leading to a messy, unattractive dessert. Allow your cupcakes to cool entirely on a wire rack to maintain their shape and frosting integrity.
Storage, Freezing & Reheating Tips
Proper storage can significantly extend the lifespan and quality of your Mother’s Day Vanilla Cupcakes. If you have leftover cupcakes, store them in an airtight container at room temperature for up to three days. If they are frosted, ensure you store them in a cool location to maintain the integrity of the frosting.
For longer storage, consider freezing the cupcakes. It’s best to freeze them without frosting. Wrap each cupcake tightly in plastic wrap and then place them in a freezer-safe bag or container. They can be frozen for up to three months. When you’re ready to enjoy them, let them thaw at room temperature for about an hour, followed by frosting them fresh.
If you have already frosted your cupcakes but still want to save them, you can also freeze them. Place the cupcakes on a baking sheet and freeze them uncovered for a couple of hours until the frosting sets. Then, wrap them in plastic wrap and store them in a freezer-safe container for up to a month. To thaw, leave them in the refrigerator overnight.
Always keep in mind the importance of food safety. Ensuring that your cupcakes are stored properly will help prevent contamination and maintain their quality and safety for consumption.
Frequently Asked Questions
Can I use a different type of flour for this recipe?
Absolutely! You can substitute all-purpose flour with cake flour for a finer texture, or even a gluten-free blend if needed. Just ensure any substitutes have the right binding agents, like xanthan gum, to replicate the texture.
How can I achieve a deeper vanilla flavor?
To enhance the flavor, consider using a good quality pure vanilla extract or a combination of vanilla extract and vanilla bean paste. This will give your cupcakes a more pronounced vanilla profile, elevating their taste.
What can I do if my cupcakes are too dry?
If you find your cupcakes are dry, it may be due to overbaking. In the future, check for doneness a minute or two earlier. You can fix dry cupcakes by adding a simple syrup (equal parts sugar and water) brushed on top to give some moisture back.
Can I make mini cupcakes with this recipe?
Yes! You can use the same batter to make mini cupcakes. Fill the mini liners about halfway and reduce the baking time to around 10-12 minutes, keeping a close eye to ensure they don’t overbake.
How should I frost my cupcakes for a professional look?
Using a piping bag with various tips can create beautiful swirls and designs. If you don’t have a piping bag, a simple knife can also spread frosting in an appealing way. Just ensure the frosting is at the right consistency for easy spreading.
Conclusion:
This recipe for Mother’s Day Vanilla Cupcakes with Buttercream encapsulates everything you love about baking: delicious flavors, delightful experiences, and joyful gatherings. These cupcakes are a wonderful treat for any special occasion, and their simplicity means you can focus on the fun aspects of baking. I encourage you to customize this recipe, try different variations, and share your creations with family and friends. Baking is an experience meant to be enjoyed, so roll up your sleeves, unleash your creativity, and savor the sweet results!