Prep time: 30 minutes
Cook time: 25 minutes
Total time: 1 hour 10 minutes
Servings: 12
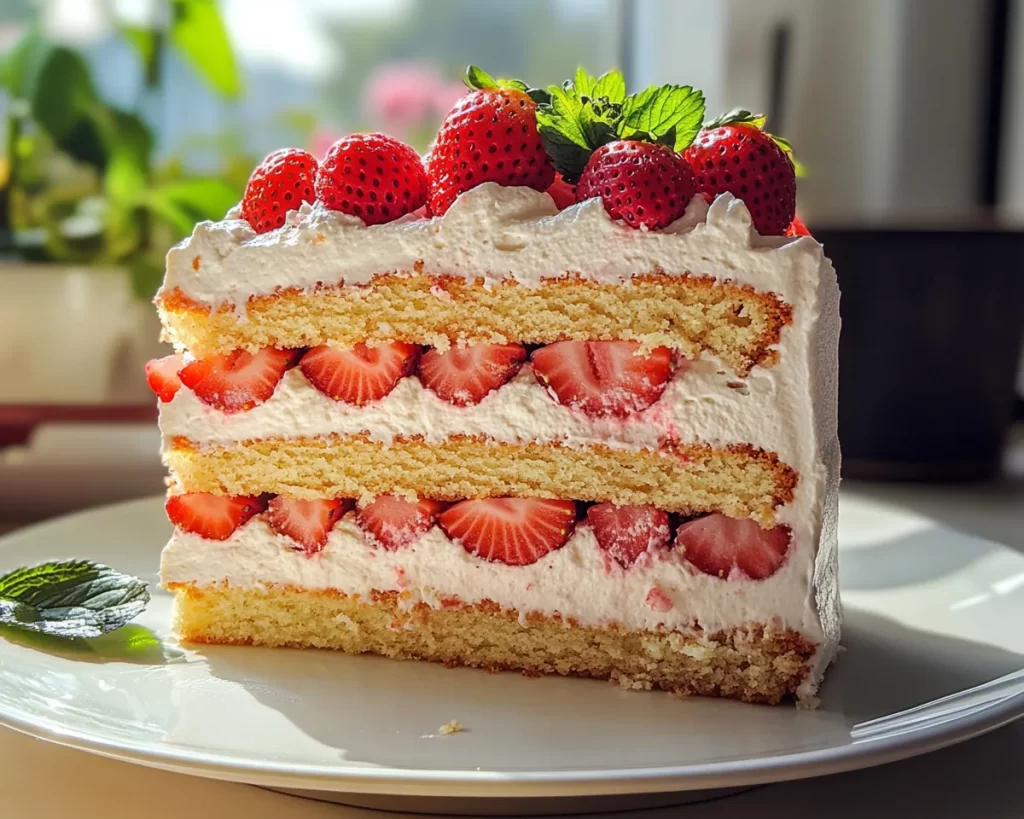
There’s something undeniably charming about a beautifully layered cake adorned with fresh strawberries. The Mother’s Day Strawberry Layer Cake isn’t just a delightful dessert; it’s an emotional hug on a plate, connecting you to cherished memories of celebrating the incredible women in your life. Imagine a moist, fluffy vanilla cake layered with velvety strawberry cream and topped with luscious whipped cream. The sweetness of fresh strawberries paired with the rich flavor of cake makes this dessert a standout for any occasion, especially Mother’s Day.
This recipe is special because it combines the classic flavors of vanilla and strawberry while being surprisingly easy to prepare. You’ll learn how to achieve the perfect cake texture, whip luscious cream, and layer your creations like a pro. So whether you’re a beginner in the kitchen or an experienced baker looking for a lovely spring dessert, this recipe has got you covered.
What Is Mother’s Day Strawberry Layer Cake?
The Mother’s Day Strawberry Layer Cake is a stunning multi-layer cake that celebrates one of spring’s most beloved fruits: strawberries. Originating from a combination of classic American baking traditions, this dessert offers a delightful contrast between fluffy cake and creamy layers. The cake is typically made with a base of vanilla-flavored sponge or butter cake, which is known for its light texture and buttery essence. Each layer is generously filled with a creamy strawberry filling that is often enhanced with fresh fruit, giving it a refreshing and vibrant taste that embodies the spirit of spring.
The flavor profile is a harmonious blend of sweet and slightly tangy, balancing perfectly with the inherent richness of the cake. As you slice through the layers, you uncover the beautiful pink hues of the strawberry cream, making it not just delicious but also visually appetizing. Whether you’re serving this cake at a spring gathering, a birthday party, or a special Mother’s Day celebration, it promises to be the highlight of the dessert table.
Why You’ll Love This
This cake stands out for several compelling reasons. First, it offers a **wonderful combination of flavors and textures**. The light, fluffy cake complements the creamy, luscious filling, creating a dessert that is both satisfying and refreshing. The strawberries add a seasonal touch that’s perfect for springtime festivities.
Another reason you’ll love this recipe is its **affordability** and ease of preparation. Despite its elegant appearance, the cake is straightforward enough for beginners while also allowing more experienced bakers to customize and showcase their skills. Unlike more complicated pastries, this cake requires minimal techniques, making it a great choice for home cooks who might be intimidated by baking.
Common misconceptions include the belief that fancy cakes are always labor-intensive. However, this recipe simplifies the process without sacrificing flavor or quality. It serves as a perfect reminder that you don’t have to be a professional pastry chef to create something that looks and tastes impressive.
Ingredients You’ll Need
- All-purpose flour: The backbone of your cake. Provides structure and stability. You can substitute with a gluten-free blend if necessary.
- Granulated sugar: Adds sweetness. Adjust according to your taste; consider using coconut sugar for a healthier option.
- Baking powder: The leavening agent that helps the cake rise. Ensure it’s fresh for the best texture.
- Salt: Balances the sweetness and enhances flavor. Don’t skip it; even a little makes a significant difference.
- Unsalted butter: Adds richness. You can use vegetable oil as a substitute if you’re aiming for a light cake.
- Eggs: Provide moisture and structure. If you’re vegan or allergic, try flax eggs as a replacement.
- Milk: Keeps the cake moist. You can opt for almond milk or oat milk for a dairy-free version.
- Vanilla extract: Enhances flavor. Fresh vanilla beans can offer a more potent flavor if you have them on hand.
- Fresh strawberries: The star ingredient! Choose ripe, sweet strawberries for the best flavor.
- Heavy whipping cream: Essential for the frosting. If you want an alternative, consider using coconut cream for a dairy-free frosting.
- Confectioners’ sugar: For sweetening the whipped cream and making it stable. Adjust to your desired sweetness.
How to Make
- Preheat your oven to 350°F (175°C). This ensures even cooking and helps your cake rise beautifully. Prepare three 9-inch round cake pans by greasing them and lining the bottoms with parchment paper; this prevents sticking and makes for easy removal.
- In a large mixing bowl, combine the all-purpose flour, granulated sugar, baking powder, and salt. Mix with a whisk until thoroughly combined; this aerates the dry ingredients, which helps create a light and fluffy cake.
- Add the unsalted butter to the dry mixture and mix on medium speed until it resembles coarse crumbs. This step is crucial for incorporating air into the butter, resulting in a lighter cake texture.
- In a separate bowl, whisk together the eggs, milk, and vanilla extract. Once combined, gradually add this wet mixture to the dry ingredients. Mix until just combined, being careful not to over-mix. Over-mixing can lead to a dense cake, and we want a light and airy finish.
- Divide the batter evenly among the three prepared cake pans. Use a spatula to smooth the tops. Bake in your preheated oven for about 25–30 minutes or until a toothpick inserted into the center comes out clean. You should see a light golden-brown color.
- While the cakes are baking, prepare the strawberry filling. In a medium bowl, mash a cup of fresh strawberries with a fork. Whip together the heavy whipping cream and confectioners’ sugar until soft peaks form, then gently fold in the mashed strawberries. This will create a delightful filling that has the essence of summer.
- Once the cakes are baking and fully cooled, carefully remove them from the pans and set them on wire racks to cool completely. This prevents them from becoming soggy.
- To assemble the cake, place one layer on a serving plate. Spread a generous layer of the strawberry filling on top, allowing it to slightly spill over the edges for a beautiful presentation. Repeat with the second layer, then top with the final cake layer.
- For the frosting, whip the remaining cream until soft peaks form and then frost the top and sides of the cake with the remaining whipped cream. For a festive touch, you can top it with whole strawberries and a dusting of confectioners’ sugar.
- Chill the cake in the fridge for at least 30 minutes before serving. This will firm up the layers and make cutting easier. Enjoy each slice as the flavors meld beautifully together!
Variations & Substitutions
Chocolate Strawberry Layer Cake: You can easily elevate this recipe by replacing part of the all-purpose flour with cocoa powder to introduce a rich chocolate flavor. This variation is perfect for chocolate lovers, offering a delicious contrast to the sweetness of the strawberries. Make sure to balance the sweetness by adjusting sugar levels; chocolate can often make desserts taste sweeter.
Gluten-Free Layer Cake: If you or someone in your family has gluten intolerances, substitute the all-purpose flour with a gluten-free blend, ensuring it contains a binding agent like xanthan gum. This will help maintain the cake’s moisture and texture. Additionally, be sure to check that all other ingredients, like baking powder, are gluten-free.
Dairy-Free Version: For a dairy-free cake, swap out the unsalted butter for coconut oil or a dairy-free margarine, and replace regular milk with almond milk or coconut milk. When creating the frosting, use coconut cream for a lovely whipped topping that still keeps the luscious texture everyone loves.
Seasonal Fruit Layer Cake: While fresh strawberries are the star here, you can experiment by incorporating other seasonal fruits. Raspberries, blueberries, or even peaches can add a delightful twist to the flavor and appearance of the cake. Mix and match according to what is in season to create combinations that are both visually appealing and delicious!
Common Mistakes to Avoid
One common mistake is **overmixing** the batter, which can lead to a dense cake rather than the light, fluffy texture we desire. Always remember to mix only until ingredients are combined—this leaves the air pockets needed for a soft crumb.
Another mistake often made by bakers is **insufficient baking time.** Every oven is different, so it’s important to keep a close eye on your cakes as they bake. Use the toothpick test—when inserted, it should come out clean or with a few moist crumbs. If you find your cakes are still wet when testing, return them to the oven for a few more minutes, but watch closely to avoid over-baking.
**Not allowing the cakes to cool properly** before frosting them can lead to a melting mess. Give them time to air cool, and if necessary, place them in the refrigerator for a bit to firm up before layering.
Storage, Freezing & Reheating Tips
Storing your Mother’s Day Strawberry Layer Cake is important for maintaining its freshness. If you have any leftovers, cover them tightly with plastic wrap or store them in an airtight container to prevent drying out. You can keep the cake in the refrigerator for up to 3-5 days, but it’s best enjoyed within the first few days for peak satisfaction.
If you want to prepare the cake ahead of time, you can freeze the layers individually. Wrap them tightly in plastic wrap and aluminum foil, labeling them with the date. When ready to serve, simply thaw them overnight in the fridge.
Reheating is generally not recommended, as it can alter textures and flavors. Instead, enjoy the cake cold or at room temperature to relish the fresh strawberry flavor.
Frequently Asked Questions
Can I use frozen strawberries instead of fresh?
Certainly! You can use frozen strawberries, but make sure to thaw and drain them well to avoid excess moisture in your filling. Fresh strawberries give a crisper texture and taste, but frozen can work in a pinch.
How can I make the cake more festive?
You can embellish your cake with edible flowers or a colorful fruit arrangement on top. Adding a drizzle of chocolate sauce or a sprinkle of pastel-colored sprinkles can also elevate its appearance, making it perfect for special occasions.
Can I make this cake in advance?
Absolutely! You can bake the layers a day or two ahead and store them in the fridge. Frost the cake right before serving to ensure that the whipped cream stays fresh and fluffy.
What do I do if my cake layers have domed tops?
If you notice your cake layers have domed tops, simply level them off with a serrated knife once they are completely cool. This step will help create even layers for your cake, providing a stable base for stacking and frosting.
How should I serve this cake for best results?
Serve the cake chilled for a refreshing delight, especially on warm days. For a special touch, accompany it with a scoop of vanilla ice cream on the side to complement the flavors beautifully.
Conclusion:
This Mother’s Day Strawberry Layer Cake encapsulates the essence of love and celebration in every bite. With its beautiful layers and intoxicating flavors, this cake is bound to impress anyone you serve it to. Don’t hesitate to customize the recipe to fit your taste or dietary needs, and make it truly your own. I encourage you to gather your loved ones, create this moist and delightful dessert, and, most importantly, share a moment of joy that will be remembered for years to come. Happy baking!