Prep time: 30 minutes
Cook time: 10 minutes
Total time: 40 minutes
Servings: 24 truffles
Indulging in a rich, velvety chocolate truffle can instantly transport you to a world of sweetness and satisfaction. These decadent treats, with a glossy outer shell and a creamy, melt-in-your-mouth center, are perfect for celebrating life’s special moments, and what better occasion is there than Mother’s Day? The love that goes into making these truffles reflects the affection we hold for our mothers. This recipe is not only about crafting a delightful dessert but also about creating memories and moments of joy with loved ones.
The best part about making Mother’s Day Chocolate Truffles is that it’s surprisingly simple yet impressive enough to leave a lasting impression. In this article, you will learn how to create decadent chocolate truffles from scratch, with essential tips to ensure they turn out perfectly every time. You’ll discover variations that cater to different tastes, storage tips to prolong freshness, and answers to commonly asked questions, ensuring your chocolate-making journey is both successful and enjoyable.
What Is Mother’s Day Chocolate Truffles?
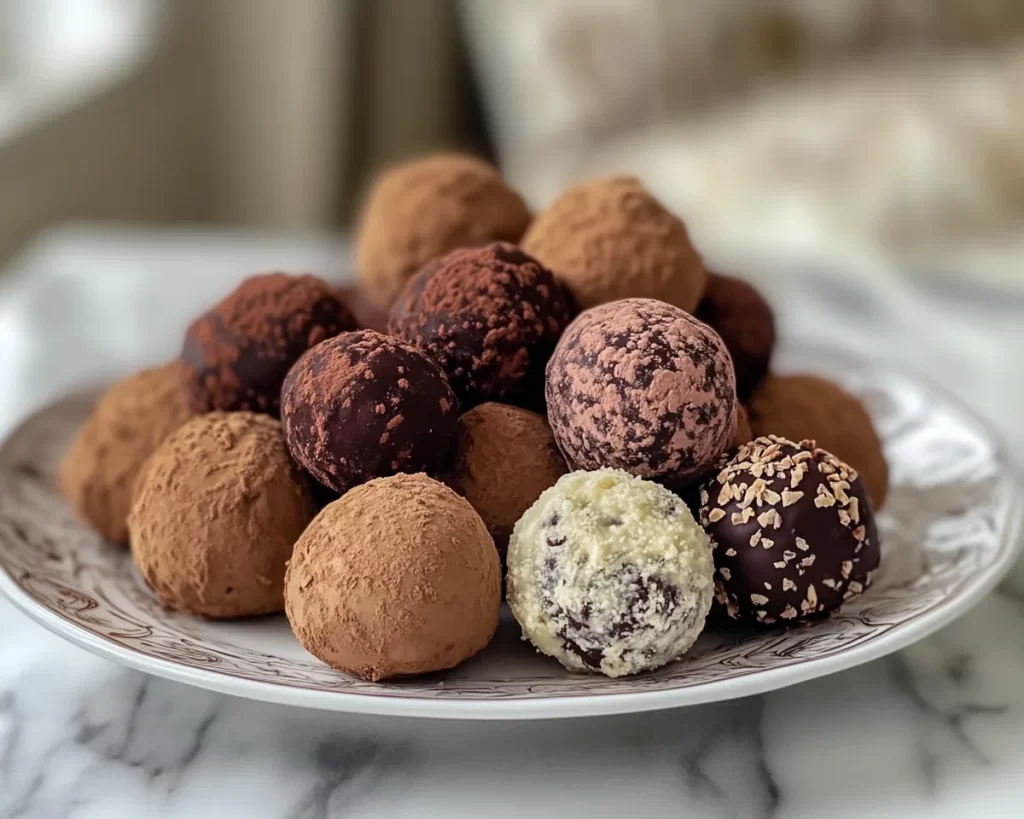
Mother’s Day Chocolate Truffles are delightful confections that consist of a rich chocolate ganache center coated in a dusting of cocoa powder, nuts, or even a silky layer of tempered chocolate. Originating from Europe, truffles have become a beloved dessert across the globe for their luxurious texture and flavor. The term “truffle” is derived from the French word for the underground fungus of the same name, as these chocolates often resemble the shape and color of the rare delicacy.
These truffles embody a smooth and creamy consistency that can be achieved using just a few essential ingredients, including heavy cream and chocolate. The contrast between the fudgy center and the crunchy coating creates a delightful textural experience, making each bite a little piece of heaven. Each truffle can be easily customized with different flavorings or toppings, making them versatile for any occasion. Whether it’s a family gathering, a friend’s birthday, or a loving gesture for your mother, these chocolate truffles will be the highlight of any celebration.
Why You’ll Love This
One of the many reasons you’ll adore this Mother’s Day Chocolate Truffles recipe is the balance of flavors—rich chocolate paired with subtle hints of vanilla creates a delightful experience that caters to various palates. Additionally, the ease of preparation makes this recipe accessible for everyone, from novice to experienced bakers. The satisfaction of crafting homemade chocolates is an unparalleled joy, especially when shared with those you care about.
Moreover, these truffles are highly cost-effective compared to purchasing gourmet chocolates from stores. With just a handful of ingredients, you can whip up a batch at a fraction of the price. Plus, they are adaptable; you can add your favorite liqueur or extract to cater to your mother’s taste. Not to mention, making chocolates at home allows you to control the quality of ingredients, making them suitable for those who may require dietary adjustments.
However, a common misconception is that making truffles is a complicated process. On the contrary, once you understand the basic steps, these truffles can be your go-to homemade gift for any special occasion. With this recipe, you’ll overcome any fears of confection-making and arm yourself with the knowledge and skills to replicate these delightful chocolates with ease.
Ingredients You’ll Need
- Good quality dark chocolate (minimum 60% cocoa): This is the backbone of your truffles. The better the chocolate, the richer and more flavorful your truffles will be. You can substitute with milk chocolate or white chocolate, but remember that it will alter the flavor profile significantly.
- Heavy cream: A critical ingredient that helps create the smooth ganache. You can use a non-dairy cream alternative if necessary, but the texture might vary.
- Unsalted butter: Adding butter enhances the creaminess and gives the truffles a glossy finish. It’s essential for achieving a luxurious texture.
- Vanilla extract: A touch of vanilla rounds out the flavors beautifully. Feel free to substitute with other extracts like almond or hazelnut for a different twist.
- Cocoa powder: For dusting your truffles. Make sure to use a high-quality cocoa for the best results. You can also replace it with finely chopped nuts or coconut if you’re looking for variations in texture.
How to Make
- Chop the chocolate: Start by finely chopping your chocolate and placing it in a heatproof bowl. The smaller the pieces, the easier it will melt, which is crucial for a smooth ganache. This ensures that there are no lumps in your truffle mixture.
- Heat the cream: Pour the heavy cream into a saucepan and place it over medium heat. Bring it to a gentle simmer. You don’t want it to boil, as boiling cream can lead to a curdled texture. Keep an eye on it as it heats to ensure a smooth mixture.
- Combine and stir: Once the cream reaches a simmer, pour it over the chopped chocolate. Allow it to sit for a couple of minutes; this lets the chocolate soften. After waiting, stir gently with a spatula until the mixture is fully combined and smooth. Add the butter and vanilla extract here, stirring until fully incorporated.
- Chill the ganache: Cover the bowl with plastic wrap and place it in the refrigerator for about 1-2 hours until it is firm enough to handle. This step is vital to ensure you can form neat truffles.
- Form the truffles: Once the ganache is set, use a small cookie scoop or your hands to form balls. Each truffle should be about the size of a walnut. If your hands get too sticky, you can wear gloves or lightly dust them with cocoa powder to help.
- Coat the truffles: Roll each ball in cocoa powder, nuts, or finely shredded coconut to coat. Ensure they’re evenly covered for an appealing presentation. You can also dip them in tempered chocolate for a shiny finish if desired.
- Chill again: After coating, place the truffles back in the fridge for about 30 minutes to set properly. This helps the coating adhere and ensures a solid texture when bitten into.
- Serve and enjoy: Finally, once set, present your beautiful chocolate truffles on a decorative plate or in a gift box. They can be enjoyed immediately or stored for later.
Variations & Substitutions
Flavored Truffles: If you’re looking to add a twist to the classic truffle, consider infusing the cream with flavors before combining it with chocolate. Adding a few sprigs of fresh mint or a tablespoon of espresso powder can elevate the taste significantly. Also, flavored liqueurs like rum, whiskey, or hazelnut can bring a festive touch to each bite. Just be cautious with the quantity, as too much liquid can affect the ganache texture.
Nut-Free Option: For those with nut allergies, you can replace any nut toppings with seeds or grains. Consider using toasted pumpkin seeds for a crunchy texture or sesame seeds for a nutty flavor without the allergens. This allows everyone to enjoy the truffles, no matter their dietary restrictions while still keeping the essence of the original recipe intact.
Vegan Truffles: To cater to a vegan diet, you can replace the heavy cream with coconut cream and use dairy-free chocolate. Ensure that the chocolate you select is labeled vegan, as many contain milk. The sweetness from the coconut cream adds a different flavor, but it will maintain a similar creamy texture. Hiding a hint of coconut in your chocolate truffles could be a delightful surprise for the taste buds.
Seasonal Variations: For special occasions like Christmas or Easter, think about adding flavors like orange zest, peppermint extract, or even spices such as cinnamon and nutmeg. These seasonal ingredients can really set your truffles apart and make them a perfect treat for holiday gatherings. Just balance the flavors—too much spice can overpower the delicate chocolate goodness.
Common Mistakes to Avoid
One of the frequent pitfalls when making truffles is overheating the chocolate or cream. If either ingredient gets too hot, it can separate or become grainy, ruining the smooth texture essential for truffles. To prevent this, always heat slowly and monitor closely. If your ganache doesn’t come together smoothly, don’t panic; you can try adding a bit more warm cream and stirring gently.
Another mistake is not allowing the ganache to cool sufficiently. Rushing this step can lead to truffles that are too soft to handle. If you find your truffles falling apart while rolling, it might be best to return them to the fridge for a bit longer.
Also, not coating your hands or tools properly can lead to messy truffle-making experiences. A light dusting of cocoa powder on your hands can make the process smoother. Lastly, consider not cooling the truffles sufficiently after coating. Truffles must be set properly to maintain their shape and ensure the coating sticks well.
Storage, Freezing & Reheating Tips
To store your Mother’s Day Chocolate Truffles, place them in an airtight container and keep them in the refrigerator. They can last up to two weeks when stored correctly. If you anticipate keeping them longer, freezing them is an excellent option. To freeze, arrange the truffles in a single layer on a baking sheet and freeze until solid. Then transfer them to an airtight container or freezer bag, where they can safely stay for up to three months.
When you’re ready to enjoy some frozen truffles, it’s best to remove them from the freezer and let them thaw in the refrigerator for a few hours or overnight. This gradual thawing helps maintain the perfect texture without making them too soft or gooey. Always remember to check for any freezer burn, which can alter the taste and texture, ensuring the truffles remain as delightful as the day they were made.
To ensure food safety, be cautious with storing leftovers or sharing them. If you’re using a variety of coatings or flavors, label the containers to avoid any mix-ups, especially for those with dietary restrictions.
Frequently Asked Questions
Can you use chocolate chips instead of bar chocolate for truffles?
Yes, you can use chocolate chips, but be aware that they often contain stabilizers and may not melt as smoothly as bar chocolate. For the best truffle texture, opt for high-quality chocolate bars whenever possible.
How do I achieve a perfect shiny coating?
For a glossy finish on your truffles, consider dipping them in tempered chocolate. Proper tempering involves melting chocolate to specific temperatures and cooling it down gradually; this creates a beautiful shine.
Can I make truffles with flavored chocolate?
Absolutely! Using flavored chocolate, like orange or mint, can add a delightful dimension to your truffles. Just ensure that the flavor complements the other ingredients you are using.
What can I do if my ganache is too runny?
If your ganache is too runny, allow it to chill longer in the refrigerator. You can also add additional melted chocolate to firm it up—just remember to keep the ratio balanced so your truffles don’t lose their intended flavor.
Is it necessary to chill the truffles after shaping?
Yes, chilling the truffles is essential to help them hold their shape and ensure a nice, firm texture. It also helps the coating adhere properly, making them more enjoyable to eat.
Conclusion:
Mother’s Day Chocolate Truffles are a celebration of flavor, love, and craftsmanship. They embody the spirit of home cooking, allowing you to share a piece of your heart with those you cherish. With a relatively short preparation time and endless possibilities for customization, these truffles are sure to become a cherished recipe in your repertoire. Don’t shy away from trying different flavors or variations—personalizing these delights is part of what makes them special. Whether you give them as gifts, serve them at a gathering, or enjoy them as a treat for yourself, they offer a touch of sweetness to any occasion. So gather your ingredients, channel your inner chocolatier, and let the celebration of flavor begin!