Prep time: 20 minutes
Cook time: 1 hour
Total time: 1 hour 20 minutes
Servings: 8
There’s something truly magical about pavlova, especially when it takes center stage for a special occasion like Mother’s Day. The crisp exterior, soft and marshmallow-like interior, and vibrant, luscious berries create a dessert that not only dazzles the eyes but also delights the palate. There’s a nostalgic quality to this recipe, reminding many of family gatherings where sweetness fills the air and joy is shared. It’s not just a dessert; it’s a labor of love that brings everyone together.
This Mother’s Day Berry Pavlova recipe doesn’t just satisfy your sweet cravings; it also allows for creative expression. You’ll discover how to make a pavlova that’s elegant yet simple, ideal for both seasoned bakers and those just starting their culinary journey. Prepare to be amazed as we explore the essential steps, tips for success, and variations that can take this stunning dessert to the next level. You’ll learn how to create something special without the fuss, leaving you plenty of time to celebrate your loved ones.
What Is Mother’s Day Berry Pavlova?
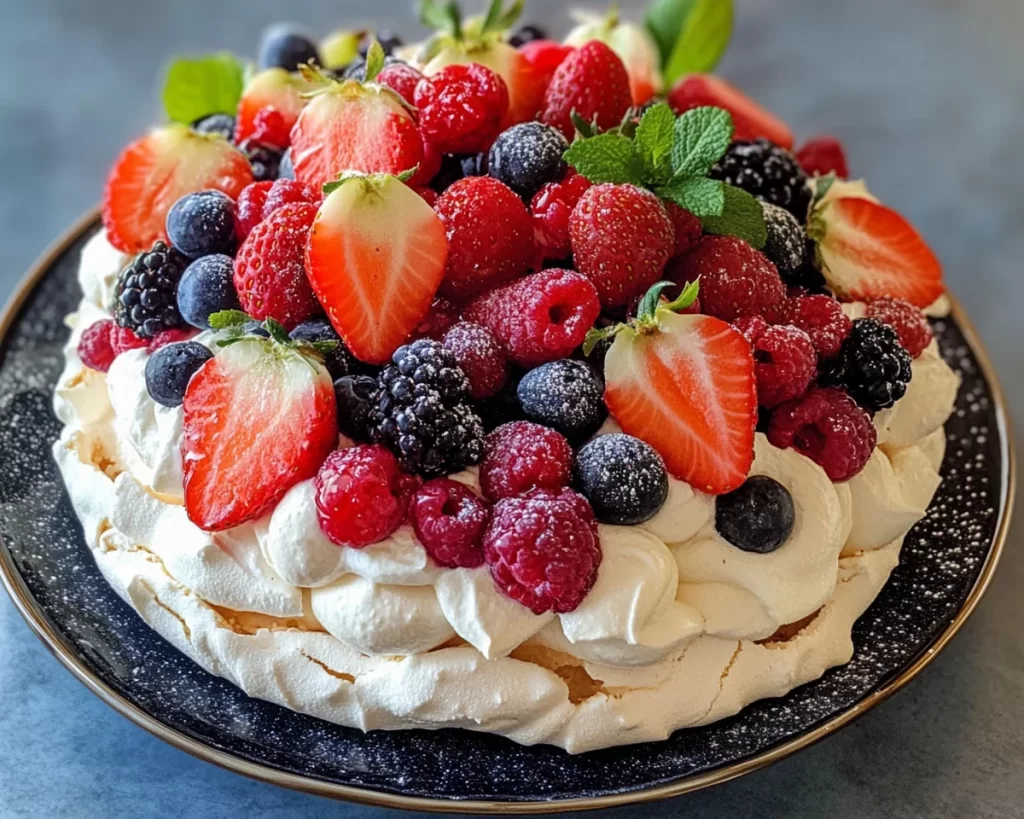
Mother’s Day Berry Pavlova is a classic meringue dessert that hails from Australia and New Zealand. Named after the famous Russian ballerina Anna Pavlova, this dessert embodies a delightful combination of contrasts. The base is crafted from whipped egg whites and sugar, creating a light and airy texture that marries beautifully with creamy toppings. A pavlova is typically crisp on the outside and soft on the inside, forming a cloud-like masterpiece that beckons your fork.
The real star of this pavlova is the topping, which typically consists of fresh berries—like strawberries, raspberries, and blueberries—combined with a rich cream. The sweet, slightly tart profile of the berries complements the meringue’s sweetness, creating an irresistible balance. Each bite offers a delightful crunch, followed by a soft, velvety texture, leaving you reaching for more. This dessert is not only visually stunning, but it also packs a flavor punch that represents the celebration it’s meant for.
Why You’ll Love This
There are countless reasons to adore this Mother’s Day Berry Pavlova. First and foremost, the taste is simply unbeatable. The dynamic combination of flavors and textures is perfect for satisfying your sweet tooth while maintaining a light-hearted feel; it’s a dessert that doesn’t weigh you down. The creamy, rich topping of whipped cream pairs effortlessly with the bright zest of fresh berries, creating a party for your taste buds.
In addition to its delightful flavor, this recipe is incredibly easy to make. Even if you’re new to baking, the step-by-step instructions demystify the process, making it accessible for beginners and seasoned cook alike. Plus, this dessert is budget-friendly, requiring relatively inexpensive ingredients that you may already have in your pantry. The versatility of pavlova also allows you to adapt it for different dietary preferences and occasions, meaning you can serve it any time of the year, making it a versatile dessert to keep in your recipe collection.
One common misconception is that pavlova can be finicky or hard to master, but with the right guidance, you’ll find it’s quite manageable. Avoiding common pitfalls will help you create a pavlova that not only impresses but also showcases your baking prowess.
Ingredients You’ll Need
- Egg whites – The foundation of pavlova, egg whites are responsible for creating that airy texture. Fresh is best; you can substitute with pasteurized egg whites if concerned about safety.
- Granulated sugar – This sweetener stabilizes the meringue and adds the necessary sweetness. For a softer texture, consider using superfine sugar.
- White vinegar – Acts as an acid to help stabilize the egg whites. If you’re out, you can substitute with lemon juice.
- Cornstarch – This helps give the pavlova its characteristic chewy center. You can omit if absolutely necessary, but it adds to the texture.
- Heavy whipping cream – Essential for the creamy topping. If you’re looking for a lighter alternative, use coconut cream.
- Fresh berries – A mixture of strawberries, blueberries, and raspberries create vibrant color and taste. Feel free to mix in kiwi or passionfruit for additional flavors.
- Powdered sugar – Used to sweeten the whipped cream and give it a silky texture.
How to Make
- Preheat the oven: Start by preheating your oven to 250°F (120°C). This low temperature is vital to gently dry the meringue without browning it. Line a baking sheet with parchment paper, and if you want, you can trace a circle to guide your meringue later.
- Whip the egg whites: In a large mixing bowl, add your egg whites. Ensure the bowl is clean and dry, as any fat or residue can hinder the whipping process. Begin beating the egg whites on low speed, gradually increasing to medium until soft peaks form. This step is crucial for achieving that lightness.
- Add sugar gradually: Once you’ve achieved soft peaks, gradually add the granulated sugar, one tablespoon at a time. Continue beating on medium-high speed until the mixture becomes glossy and stiff peaks form. This process usually takes about 5-7 minutes. Remember, the sugar needs to dissolve fully for a smooth meringue.
- Incorporate the stabilizers: Add the cornstarch, vinegar, and a pinch of salt to the whipped egg whites. Gently fold these ingredients in using a spatula. It’s essential to be gentle here; you want to retain as much air as possible to ensure a fluffy pavlova.
- Shape the meringue: Spoon the meringue onto the prepared baking sheet, using the traced circle as a guideline. You can create a slight dip in the center if you want to accommodate the toppings later. Use a spatula to shape it into a cloud-like form, giving it some texture on the surface for visual appeal.
- Bake: Place the meringue in the oven and bake for approximately 60-75 minutes. You want the pavlova to be firm to the touch and easily peel away from the parchment. The inside should remain soft, so avoid overbaking. Turn off the oven, crack the door slightly, and let the meringue cool completely in the oven. This helps prevent cracking.
- Whip the cream: Once the pavlova has cooled, it’s time to prepare the topping. In a separate bowl, whip the heavy cream with powdered sugar until medium peaks form. The sweetness of the cream should balance the tartness of the berries.
- Assemble: Gently spoon the whipped cream atop the cooled pavlova, spreading it evenly across the surface. Finally, arrange the fresh berries on top. Feel free to be creative; you can pile them high for a show-stopping effect!
Variations & Substitutions
Cocoa Pavlova: For a chocolate twist, add a couple of tablespoons of cocoa powder when incorporating the cornstarch. This will give the meringue a lovely chocolate flavor that pairs beautifully with the berries. It’s perfect for chocolate lovers looking for a new dessert experience.
Fruit Variations: While this recipe uses berries, you can easily swap in other seasonal fruits like mango, kiwi, or even poached pears. Just ensure the fruits are ripe and fresh, as their natural sugars will enhance the overall flavor profile of the pavlova.
Dairy-Free Option: If you’re adhering to a dairy-free diet, you can substitute the heavy cream with coconut cream or a dairy-free whipped topping. This maintains the creaminess while allowing those with dairy sensitivities to enjoy this treat. Be sure to chill the coconut cream overnight for the best results.
Flavor Infusions: Consider infusing the whipped cream with vanilla extract or a splash of almond extract for an added depth of flavor. Simply mix it in while whipping the cream. This subtle twist can elevate the pavlova and make it even more irresistible.
Mini Pavlovas: Create individual pavlovas by spooning smaller meringue nests onto the baking sheet instead of one large one. This makes them perfect for portion control and allows guests to customize their toppings. It’s a fun way to serve at gatherings!
Common Mistakes to Avoid
One common mistake many make is under-whipping the egg whites. Make sure to achieve **stiff peaks**, which are crucial for stability. If the meringue does not hold its shape, it may collapse during baking. Follow the sugar addition process carefully; adding it too quickly can lead to grainy meringue.
Another important tip is to watch your baking time. Leaving the pavlova in the oven too long can cause it to dry out or crack. Remember that the inside should remain soft; a perfectly baked pavlova has a soft, marshmallow-like center. Always cool the meringue in the oven to prevent cracks from sudden temperature shifts.
Ensure all your kitchen tools are free from grease and water. Even a small amount of fat on the mixing bowl can cause your meringue to fail. Lastly, do not assemble the pavlova too early. Wait until just before serving to add the cream and berries to maintain crispness.
Storage, Freezing & Reheating Tips
Pavlova is best enjoyed fresh, but if you have leftovers, you’ll want to store them carefully. Keep the meringue in an airtight container at room temperature for up to two days. Avoid refrigerating it, as the humidity can cause it to become sticky.
If you wish to prepare the meringue in advance, it can be made a day or two before serving. Just ensure it’s kept sealed away from any moisture. You should add the cream and berries right before serving to preserve texture and taste.
Pavlova is not recommended for freezing; the texture is likely to suffer. If you have to freeze components, you could freeze whipped cream separately, but understand that it may not be as stable upon thawing. When you’re ready for a serving, simply thaw in the fridge and whip again if needed, but ideally, enjoy the pavlova fresh and enjoy the delightful contrast of textures.
Frequently Asked Questions
Can you make pavlova a day in advance?
Yes, you can prepare the meringue a day ahead and store it in an airtight container at room temperature. However, assemble your pavlova with cream and berries just before serving to maintain the best texture and flavor.
Why did my pavlova crack?
Pavlova can crack due to sudden temperature changes or if it was overbaked. To avoid this, let it cool gradually in the oven and monitor the baking time closely. A well-cooked pavlova should have a soft texture inside but remain firm on the outside.
Can I use powdered sugar instead of granulated sugar?
It is best to use granulated sugar to create the meringue, as powdered sugar can affect the structure. However, you can use powdered sugar for sweetening the whipped cream.
What type of berries work best on pavlova?
Fruits like strawberries, blueberries, raspberries, and blackberries are ideal due to their natural sweetness and vibrant colors. You can also mix in flavors like kiwi or passion fruit for variety.
How do I know when my pavlova is done baking?
Your pavlova is done when it feels firm to the touch or easily lifts away from the parchment. The exterior should be dry and crisp, while the inside remains soft. If you check it and it’s still sticky, return it to the oven for a few more minutes.
Conclusion:
This Mother’s Day Berry Pavlova has it all—delicate, airy sweetness, vibrant berries, and a creaminess that ties it all together. It’s a dessert that captures the essence of spring and the joy of gatherings. Whether you’re celebrating with family or simply treating yourself, this pavlova is sure to impress and delight. Don’t hesitate to serve it at your next gathering or customize it to fit your taste. Give it a try, share your creation, and relish in the compliments that are sure to come your way!