TITLE:
Crusty Mini Baguettes That Look Professional Right In Your Own Kitchen
META TITLE:
Crusty Mini Baguettes Recipe
META DESCRIPTION:
Learn to make Crusty Mini Baguettes that look professional right in your kitchen with this easy step-by-step guide. Perfect for any meal!
INTRODUCTION:
There’s something truly magical about the aroma of fresh bread wafting through your kitchen, evoking memories of delightful bakeries and family gatherings. Imagine pulling out a tray of golden beautiful CRUSTY MINI BAGUETTES from your oven, their perfectly scored tops allowing steam to escape, gently crackling as they cool. These mini baguettes embody warmth, companionship, and homemade goodness. The crunchy crust encases a soft, airy interior that will make your family and friends swoon with joy. The best part? You don’t need a professional bakery setup to achieve this stunning bread at home!
SEPARATOR
WHAT IS CRUSTY MINI BAGUETTES?:
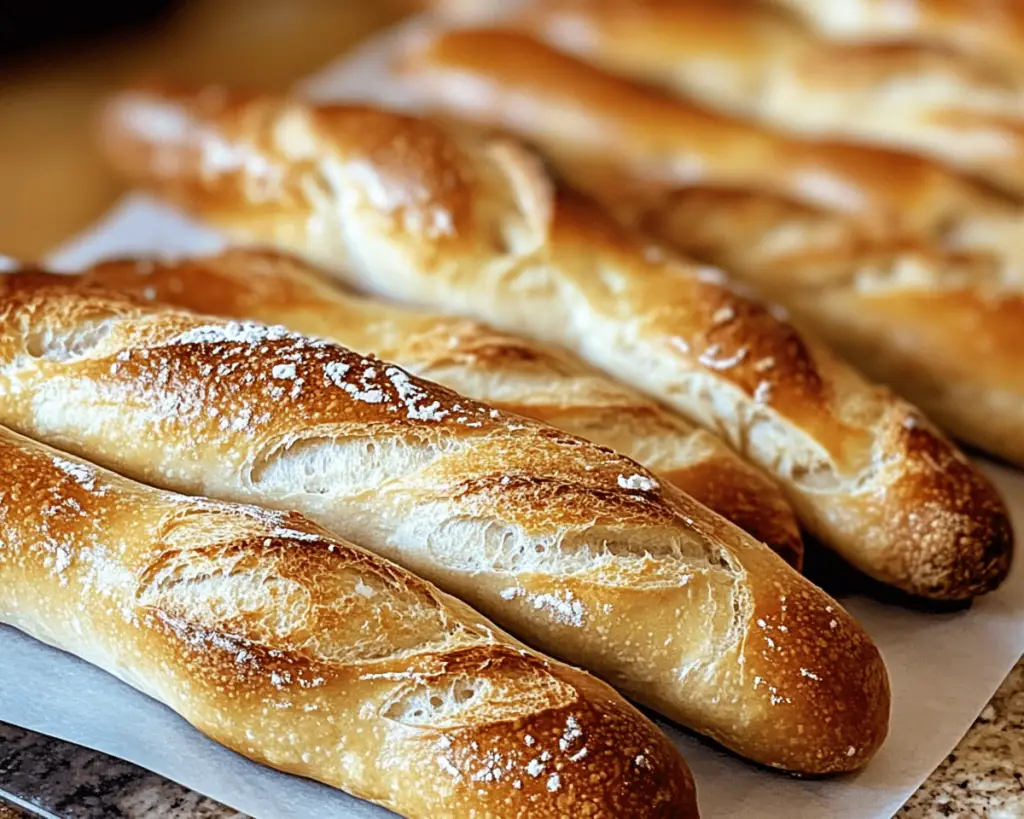
CRUSTY MINI BAGUETTES are small versions of the classic French baguette, characterized by their thin, crusty outer layer and soft, chewy interior. Originating from France, the baguette has become a staple in homes and bakeries around the world. Made from simple ingredients like flour, water, yeast, and salt, these delightful bread rolls showcase the beauty of artisan baking in a digestible size perfect for meals and snacking alike.
The texture of a well-baked mini baguette is a harmony of contrasts. The exterior is crisp and golden, achieved through steam in the oven that creates a magnificent crust while protecting the soft, pillowy bread inside. Their taut form and characteristic slashes unveil the craftsmanship behind each loaf, making them not just bread but an art form.
At gatherings, CRUSTY MINI BAGUETTES shine, easily filling plates with an inviting aroma and exceptional taste. Their versatility makes them a family favorite, suitable for pairing with soups, sandwiches, or simply enjoyed with some fine butter.
BONUS TIP: Try adding herbs or even cheese directly into the dough for unique flavor profiles!
WHY YOU WILL LOVE THIS CRUSTY MINI BAGUETTES:
– Simple ingredient list yet yields impressive results.
– Ideal for family gatherings or casual dinners.
– Crunchy exterior and soft inside, a textural delight.
– Versatile; serve with anything from soup to cheese.
– Perfect for meal prep and freezing for later use.
EXTRA IDEA: Use leftover baguettes for delicious bruschetta or crostini!
INGREDIENTS YOU WILL NEED:
– 3 cups ALL-PURPOSE FLOUR: This gives a sturdy structure while keeping the texture light.
– 1 1/4 cups WATER: Helps hydrate the dough, creating that soft, chewy interior.
– 1 packet ACTIVE DRY YEAST (2 1/4 tsp): The magical ingredient that makes your dough rise beautifully.
– 1 1/2 tsp SALT: Enhances flavor and strengthens the gluten structure.
– 1 tsp SUGAR: Aids yeast activation and adds subtle sweetness to the bread.
– Simple ingredients, yet they yield bakery-quality results when prepared correctly!
– Ensure the water is warm, not hot, to activate the yeast properly.
————————-
| Ingredient | Measurement |
|————————-|——————|
| ALL-PURPOSE FLOUR | 3 cups |
| WATER | 1 1/4 cups |
| ACTIVE DRY YEAST | 1 packet (2 1/4 tsp) |
| SALT | 1 1/2 tsp |
| SUGAR | 1 tsp |
————————-
STEP-BY-STEP INSTRUCTIONS:
1. **Prepare the Dough**
In a large mixing bowl, combine the warm WATER (about 110°F) and SUGAR, stirring until the sugar is dissolved. Then, sprinkle in the ACTIVE DRY YEAST, letting it sit for about 5-10 minutes until frothy. This step ensures the yeast is alive and ready to aid in leavening your dough.
Pro Tip: If your yeast doesn’t foam, it may be expired. Start over with fresh yeast.
2. **Mix the Dry Ingredients**
In another bowl, whisk together the ALL-PURPOSE FLOUR and SALT. Make a well in the center and pour in the yeast mixture. With a wooden spoon or your hands, mix until the dough begins to pull away from the sides of the bowl. It should be sticky but manageable.
Pro Tip: Avoid adding extra flour; stickiness is desirable for a light texture.
3. **Knead the Dough**
Transfer the dough onto a floured surface and knead it for about 10 minutes until it becomes smooth and elastic. It can be a workout, but that’s where the magic happens! As you knead, the gluten develops, which is crucial for that chewy texture we crave in mini baguettes.
Pro Tip: You can also use a stand mixer fitted with a dough hook for this step.
4. **First Rise**
Form the dough into a ball and place it in a greased bowl, covering it with a damp cloth. Allow it to rise in a warm area for 1-2 hours or until it has doubled in size. This fermentation process deepens the flavor and prepares the dough for shaping.
Pro Tip: For a faster rise, preheat your oven to a low temperature (about 170°F) for a couple of minutes and then turn it off before placing the dough inside.
5. **Shape your Baguettes**
After the dough has risen, punch it down to release the air. Divide it into 4 equal portions. Shape each piece into small baguettes, about 6-8 inches long. Lay them on a floured surface or a baguette pan, ensuring space between them to allow for a final rise.
Pro Tip: Taper the ends of the baguettes slightly for a beautiful aesthetic.
6. **Second Rise**
Cover the shaped dough with a cloth and let them rise again for about 30-45 minutes, until puffy and slightly increased in size. This helps the small baguettes become light and airy upon baking.
Pro Tip: If possible, place them in a turned-off oven with a pan of hot water below; this provides ideal humidity.
7. **Preheat the Oven**
While the dough is on its final rise, preheat your oven to 450°F (230°C) and place a baking stone or an inverted baking tray inside to heat. This provides the necessary heat for a crispy crust.
Pro Tip: Spray a little water inside the oven just before placing the baguettes in for a steamy environment.
8. **Score and Bake**
Using a sharp knife or a bread lame, score the top of each baguette diagonally several times. This allows for proper expansion during baking. Carefully transfer the baguettes to the hot baking stone or tray and bake for 20-25 minutes. The baguettes should be golden brown with a hollow sound when tapped on the bottom.
Pro Tip: Rotate the baguettes halfway through baking for even browning.
9. **Cool and Enjoy**
Upon removing the baguettes from the oven, let them cool on a wire rack for at least 20 minutes before slicing. This cooling period allows the steam to escape ensuring crispy crusts.
Pro Tip: If you can resist the temptation, let them cool completely for better slicing.
ADVANCED TECHNIQUE: For a more authentic flavor, consider using a poolish, a pre-ferment made of equal weights of flour and water combined with a tiny pinch of yeast, left overnight to ferment before mixing into your final dough.
CHEF TIPS, VARIATIONS, AND SUBSTITUTIONS:
– Use bread flour instead of all-purpose flour for a chewier texture.
– Add 1/4 cup of minced herbs or spices (like garlic or rosemary) into the dough for added flavor.
– For a sweeter twist, incorporate cheese, like cheddar or feta, during the final kneading process.
– If you’re gluten-free, swap the all-purpose flour with a gluten-free flour blend formulated for bread.
– Want a quicker version? Use store-bought pizza dough as a base instead.
EXTRA VARIATION: Try adding sautéed olives or sun-dried tomatoes for Mediterranean flair!
WHAT TO SERVE WITH CRUSTY MINI BAGUETTES:
– Creamy soups like tomato bisque: Their acidity pairs well with the bread’s texture.
– Rich stews: The crusty exterior is perfect for soaking up delectable sauces.
– Charcuterie boards: A mini baguette is ideal for building delicious sandwiches.
– Herb dips: This bread complements any flavorful dip, enriching your appetizer game.
MORE INSPIRATION: Try these with your favorite spiced butter or flavored oils for an elevated experience!
STORAGE AND MEAL PREP TIPS:
To maintain the crusty exterior, allow the baked mini baguettes to cool completely, then store them in a paper bag at room temperature for up to 2 days. Avoid plastic bags, as they can make the crust soft. For longer storage, consider freezing them. Place completely cooled baguettes in a freezer-safe bag, and they will freeze well for up to 2 months. Reheat in the oven at 350°F for about 10 minutes until warmed through.
MEAL PREP BONUS: Make a double batch and freeze for quick meals!
NUTRITION HIGHLIGHTS:
CRUSTY MINI BAGUETTES are a source of carbohydrates, providing energy for your day. The inclusion of whole grain flours offers added fibers, supporting digestive health. The low-fat nature of this bread makes it suitable for various diets. Additionally, yeast fermentation helps produce B vitamins, making it a wholesome choice. To read more about the health benefits of bread, check sources like Healthline and USDA guidelines.
NUTRITION INSIGHT: Always enjoy in moderation as part of a balanced diet!
FREQUENTLY ASKED QUESTIONS:
– **Can I use whole wheat flour for these baguettes?**
Yes, but it might result in a denser bread. I recommend a mix of all-purpose and whole wheat flour for better texture.
– **How do I know when my baguettes are done baking?**
They should be a golden brown color, and when tapped, they will sound hollow.
– **Can I make these baguettes ahead of time?**
Absolutely! You can prepare the dough up to the first rise and then refrigerate it overnight. Allow it to come to room temperature before shaping.
– **What kind of oven should I use?**
A conventional oven works perfectly, but if you have a baking stone or steam oven, they will enhance your baguette-making experience.
– **How do I reheat the baguettes properly?**
To maintain the crust, reheat them in the oven rather than the microwave. Wrap them in foil to keep them moist, and bake at 350°F for about 10-15 minutes.
VARIANTS SECTION:
– **Garlic butter mini baguettes:** Add minced garlic and melted butter to the dough.
– **Cheese-stuffed baguettes:** Roll out the dough and fill it with your choice of cheese before forming.
– **Olive oil and rosemary:** Incorporate olive oil and fresh rosemary into the dough for a rich flavor.
– **Sun-dried tomato and basil:** A delicious combination that adds a summery flavor.
– **Cinnamon raisin mini baguettes:** Ideal for a sweet twist, add cinnamon and raisins into the dough.
– **Herbed focaccia baguettes:** Infuse the dough with Italian herbs for a versatile dinner bread.
– **Pumpkin spice baguettes:** Perfect for fall, add pumpkin puree, cinnamon, and nutmeg for flavor.
CONCLUSION:
Crafting CRUSTY MINI BAGUETTES in your kitchen is not only possible but also incredibly rewarding. With a few good ingredients and some love, you can achieve bakery-quality bread that will delight your family and friends alike. The aroma, taste, and texture are bound to elevate your dining experiences and make every meal feel special. Try this Crusty Mini Baguettes tonight — your kitchen will smell amazing, and everyone will ask for seconds.


