# Butterfinger Caramel Bars That Taste Amazing With No Baking Needed
## Meta Title
No-Bake Butterfinger Caramel Bars Recipe
## Meta Description
Delight in these no-bake Butterfinger Caramel Bars, a sweet treat featuring chocolate, caramel, and crispy layers that will elevate any dessert table.
## Introduction
Imagine biting into an exquisite layer of creamy caramel topped with a heavenly layer of chocolate, all resting atop a crunchy, buttery crust that practically melts in your mouth. The delightful combination of textures and flavors present in these NO-BAKE BUTTERFINGER CARAMEL BARS evokes a sense of nostalgia, reminiscent of childhood treats and sweet indulgences. Perfect for gatherings, parties, or simply when the craving strikes, this recipe requires no baking, while still delivering a show-stopping dessert. In this article, you’ll learn how to create these incredible bars from scratch, with tips and tricks to elevate each bite.
—
## What Are Butterfinger Caramel Bars?
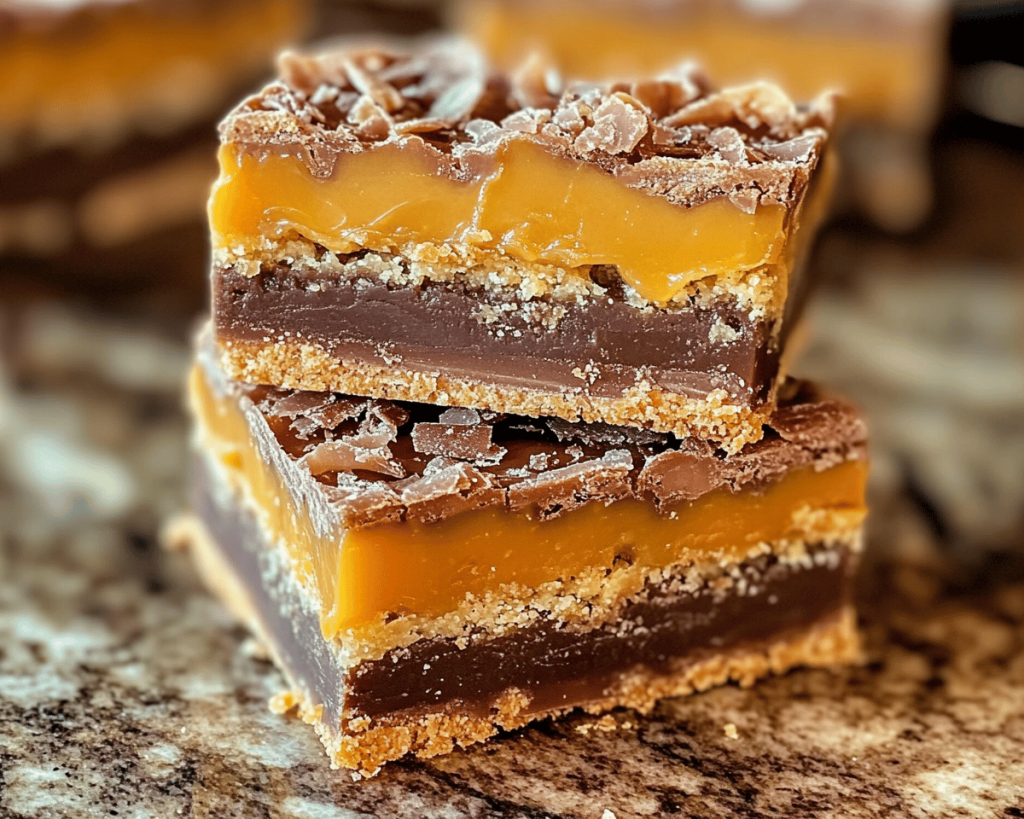
BUTTERFINGER CARAMEL BARS are a dessert that brings together inspired elements from various confectioneries, creating a unique, deliciously rich treat that satisfies any sweet-tooth craving. The bar showcases a decadent combination of buttery shortbread, luscious caramel, and crunchy chocolate topped with pieces of that iconic Butterfinger candy.
### Culinary Background
Originating from the desire to expand the scope of traditional fudge recipes, no-bake desserts have gained immense popularity for their simplicity and convenience. Incorporating classic candy bars elevates the dessert experience with familiar flavors and textures, while still being approachable for novice cooks.
### Cultural Significance
The cheerful blend of flavors in BUTTERFINGER CARAMEL BARS transcends cultural borders, uniting people over shared tastes and memories. This recipe serves as a sweet reminder of family gatherings, movie nights, and celebrations full of love and laughter.
### Key Flavors
The key flavors in these bars are:
– **Creamy Milk Chocolate**: Provides smoothness and sweetness
– **Buttery Caramel**: Imparts richness and a gooey texture
– **Crunchy Butterfinger**: Offers a satisfying, crispy contrast
### Texture and Sensory Profile
Vibrant layers characterize these bars: the bottom features a crumbly, rich base, followed by a creamy caramel center that begs to be savored, topped off with a smooth chocolate layer and Crunchy Butterfinger bits that give it that signature crunch!
### Why It’s Beloved
These NO-BAKE BUTTERFINGER CARAMEL BARS have gained popularity due to their delightful flavor profile and effortless preparation. They require no specialized equipment, and their sensory pleasure is hard to resist, making them a beloved recipe for all ages.
**Bonus Tip:** Drizzle some additional melted chocolate on top for an extra decadent touch!
—
## Why You Will Love These Butterfinger Caramel Bars
– **No Baking Required**: Enjoy quick preparation without the hassle of turning on an oven.
– **Flavor Explosion**: Each bite delights your senses with layers of chocolate, caramel, and crunchy texture.
– **Perfect for Any Occasion**: Great for parties, picnics, or simply enjoying at home.
– **Easy to Customize**: Add your favorite nuts or other candies to make them unique.
– **Quick to Make**: Whip these up in under an hour from start to finish, including chilling time!
– **Kid-Friendly Fun**: This recipe is a great way to involve children in the kitchen.
– **Decadent yet Affordable**: Use simple ingredients to create a treat that feels gourmet without breaking the bank.
**Extra Idea:** Cut them into smaller squares for bite-sized delights at your next celebration!
—
## Ingredients You Will Need
1. **Graham Cracker Crumbs (1 ½ cups)**: Choose finely crushed crumbs for a smoother texture.
2. **Unsalted Butter (½ cup, melted)**: The butter adds richness; be sure to use unsalted to maintain proper flavor balance.
3. **Powdered Sugar (1 cup)**: For sweetness and a melt-in-your-mouth texture.
4. **Creamy Peanut Butter (1 cup)**: Use a high-quality, no-stir peanut butter for the best consistency.
5. **Caramel Sauce (1 cup)**: Use store-bought or homemade; both work beautifully.
6. **Milk Chocolate Chips (1 ½ cups)**: Choose semi-sweet or milk chocolate, depending on your preference.
7. **Butterfinger Bars (2-3 bars, chopped)**: For that signature crunch, make sure to chop them coarsely.
**Ingredient Alternatives Table**
| Ingredient | Alternative |
|———————–|——————————-|
| Graham Cracker Crumbs | Almond flour, Digestive biscuits |
| Unsalted Butter | Coconut oil, Vegan butter |
| Powdered Sugar | Agave nectar, Coconut sugar |
| Creamy Peanut Butter | Sunflower seed butter |
| Caramel Sauce | Dulce de leche |
| Milk Chocolate Chips | Dark chocolate chips |
| Butterfinger Bars | Crunch bars, Reese’s Pieces |
—
## How to Make Butterfinger Caramel Bars Step by Step
1. **Prepare the Crust**: In a medium bowl, combine the GRAHAM CRACKER CRUMBS and melted UNSALTED BUTTER. Press this mixture firmly into the bottom of a greased 9×9-inch pan. Ensure it’s evenly distributed for a solid base. *Pro Tip*: Use a measuring cup to evenly pack the crust for stability.
2. **Mix the Filling**: In the same bowl, mix the POWDERED SUGAR and CREAMY PEANUT BUTTER until smooth. This creaminess will blend beautifully with the layers above. *Pro Tip*: Microwave the peanut butter for 20 seconds to make it easier to mix.
3. **Layer the Caramel**: Spread the CARAMEL SAUCE atop the peanut butter mixture. Let it sit for a few minutes to allow the layers to meld together. *Pro Tip*: Slightly warm the caramel to make it easier to spread evenly.
4. **Melt the Chocolate**: In a microwave-safe bowl, melt the MILK CHOCOLATE CHIPS, stirring every 15 seconds until smooth. *Pro Tip*: Add a teaspoon of coconut oil to the chocolate for a shinier finish.
5. **Assemble the Bars**: Pour the melted chocolate over the caramel layer and evenly spread it out with a spatula. Additionally, sprinkle chopped BUTTERFINGER BAR pieces over the chocolate while it’s still warm to ensure a good adhesion. *Pro Tip*: Press the Butterfinger bits gently into the chocolate for a beautiful finish.
6. **Chill**: Place the assembled bars in the refrigerator for at least 2 hours to set completely. Once firm, slice them into squares using a sharp knife. *Advanced Technique*: For cleaner cuts, warm the knife under hot water, dry, and then slice.
—
## Chef Tips, Variations, and Substitutions
– **Vegan Variations**: Substitute with dairy-free chocolate and nut butters to create a vegan-friendly version.
– **Gluten-Free Adaptations**: Use gluten-free graham crackers or almond flour instead of traditional graham cracker crumbs.
– **Flavor Additions**: Consider adding a dash of sea salt atop the chocolate layer for a delightful sweet-savory contrast.
– **Technique Improvements**: Whipping the peanut butter mix for an additional minute can infuse more air, giving it a fluffier texture.
– **Texture Adjustments**: For a crunchier layer, add chopped nuts, such as pecans or almonds, into the crust.
– **Time-Saving Strategies**: Use store-bought caramel sauce to streamline the preparation process effortlessly.
**Extra Variation:** Try swapping the Butterfinger bars with another crunchy candy bar like Twix or Snickers for different flavor profiles!
—
## What to Serve With Butterfinger Caramel Bars
– **Vanilla Ice Cream**: The creaminess of vanilla ice cream balances the richness of these bars perfectly.
– **Fresh Berries**: A side of tart berries adds a refreshing contrast to the rich flavors.
– **Chocolate Sauce**: Drizzling extra chocolate sauce elevates the indulgence factor.
– **Coffee or Espresso**: The bold flavors of coffee enhance the dessert experience and provide a lovely finish.
**More Inspiration:** Experiment with different toppings, like whipped cream or caramel drizzle, to customize each serving.
—
## Storage and Meal Prep Tips
– **Refrigeration Times**: Store leftover bars in an airtight container in the fridge for up to one week.
– **Freezing Methods**: Freeze these bars for up to three months. Wrap them tightly in plastic wrap and foil; label them clearly.
– **Reheating Instructions**: If desired, allow the bars to come to room temperature for about 15 minutes before serving for the best texture.
– **Best Containers**: Store them in glass containers with lids to keep them fresh longer.
– **Make-Ahead Strategies**: These bars can be prepared a day in advance, making them perfect for special occasions.
– **How Flavors Evolve**: As they sit in the refrigerator, the flavors meld more deeply, creating an even more decadent treat.
**Meal Prep Bonus:** Prepare the crust and filling separately, then layer them just before serving to maintain freshness.
—
## Nutrition Highlights
These NO-BAKE BUTTERFINGER CARAMEL BARS are not just a treat; they also provide several nutritional benefits. You’ll find:
– **Protein**: The creamy peanut butter serves as a great source of protein, which is ideal for sustained energy.
– **Fiber**: Depending on the graham crackers used, these bars can provide a fair amount of dietary fiber.
– **Vitamins & Minerals**: From the nuts and chocolate, obtain essential minerals like magnesium and antioxidants.
– **Antioxidants**: Dark chocolate, if used, provides various health benefits due to its higher antioxidant content.
These bars can fit into a balanced diet to satisfy your sweet tooth while providing some nutritional value. Reminder: moderation is key!
**Nutrition Insight:** Incorporating healthier ingredients like dark chocolate can create an indulgence that’s as enjoyable as it is nourishing.
—
## Frequently Asked Questions
1. **Can I use crunchy peanut butter in this recipe?**
Yes, crunchy peanut butter can reinforce texture, adding delightful bites, but it will alter the smoothness of the filling.
2. **What can I substitute for caramel sauce?**
Homemade caramel sauce or dulce de leche works well in place of store-bought caramel, but ensure consistency and creaminess.
3. **How should I store leftover bars?**
Place them in an airtight container in the refrigerator for up to one week, or freeze them for longer-term storage.
4. **Can I make these without chocolate?**
While the chocolate layer adds a rich depth, you can skip it entirely for a lighter formula, then consider finishing with a dusting of powdered sugar.
5. **What if I don’t have graham crackers?**
You can substitute with almond flour or digestive biscuits to maintain a similar base structure.
—
## Variants Section
Here are some creative variations to explore:
1. **Almond Joy Bars**: Replace Butterfinger with almond pieces and shredded coconut.
2. **S’Mores Inspired**: Add mini marshmallows atop the chocolate layer for a campfire taste.
3. **White Chocolate Raspberry**: Substitute dark chocolate with white chocolate and add raspberry puree.
4. **Mint Chocolate**: Combine mint chocolate chips for a refreshing twist.
5. **Cinnamon Roll Bars**: Introduce cinnamon and pecans to the crust for a warm spice flavor.
6. **Peanut Butter Cup**: Fold mini peanut butter cups into the chocolate layer for an extra surprise.
7. **Holiday Flavor**: Use gingerbread crumbs for the crust and top with seasonal sprinkles.
—
## Conclusion
These NO-BAKE BUTTERFINGER CARAMEL BARS embody the delightful blend of flavors and textures that make desserts so irresistible. With their effortless preparation and rich taste, they’ll become a kitchen staple that everyone adores. They are a fantastic way to bring joy to any occasion or simply treat yourself after a long day.
Try this NO-BAKE BUTTERFINGER CARAMEL BARS recipe tonight — your kitchen will smell amazing, and everyone will ask for seconds.


