Prep time: 30 minutes
Cook time: 30 minutes
Total time: 1 hour
Servings: 24
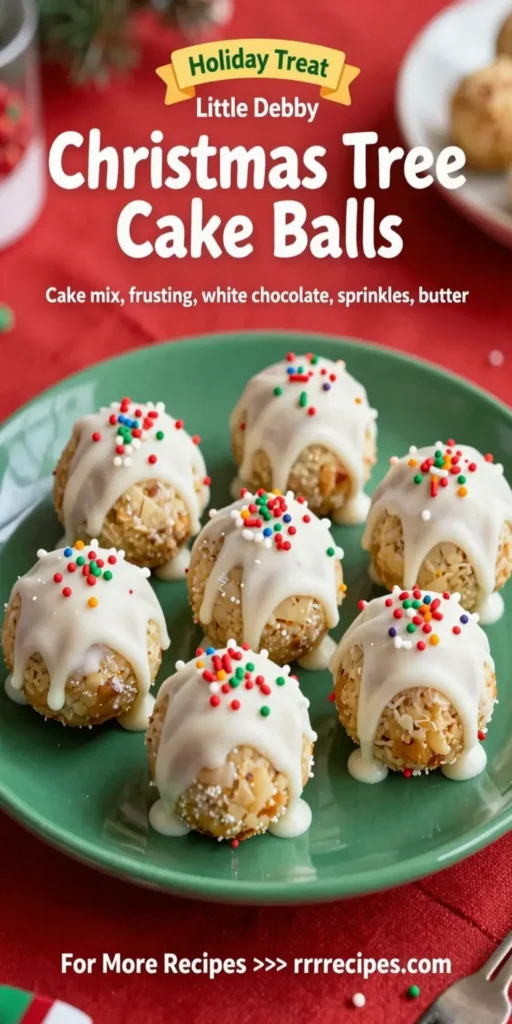
Little Debbie Christmas Tree Cake Balls are a delicious, festive treat perfect for holiday gatherings. Inspired by the popular Little Debbie Christmas Tree Cakes, these cake balls encapsulate that soft, creamy, and delicious essence with a delightful chocolate coating. The combination of cake, frosting, and chocolate makes for an indulgent snack that is sure to please both young and old alike. Easy to make and even easier to eat, these cake balls are a must for your holiday baking list.
What Is Little Debbie Christmas Tree Cake Balls?
Little Debbie Christmas Tree Cake Balls are bite-sized confections inspired by the iconic holiday snack. These cake balls incorporate vanilla cake and frosting, mixed together and coated with melting chocolate. They replicate the characteristic flavor of the classic Christmas treat while providing a fun twist that fits into the cake ball trend. They are great for celebrations, cookie exchanges, or as a sweet holiday gift.
Why You’ll Love This
These cake balls are loved for several reasons:
- Easy to make: You can whip up these treats in no time, making them perfect for busy holiday schedules.
- Customizable: You can decorate them in various ways to match your festive theme.
- Rich flavor: The combination of cake and frosting creates a rich, delicious flavor profile that everyone loves.
- Fun for all ages: Kids and adults alike will enjoy crafting and eating these desserts.
Ingredients You’ll Need
To make Little Debbie Christmas Tree Cake Balls, gather the following ingredients:
- 1 box of vanilla cake mix: This will be the base of your cake balls, providing that lovely vanilla flavor. You can choose a classic or a festive holiday mix.
- 3 large eggs: Eggs help bind the cake mixture, providing moisture and richness.
- 1 cup water: Water is needed to prepare the cake mix according to package instructions.
- ½ cup vegetable oil: This ingredient adds moisture and helps keep the cake balls tender.
- 1 can of frosting (vanilla or Christmas flavor): Frosting adds sweetness and creaminess, making the cake balls richer.
- 1 pound of melting chocolate or candy coating (white or dark): Use melting chocolate to cover the cake balls, giving them a smooth and appealing finish.
- Sprinkles (optional): Festive sprinkles enhance the holiday theme and add color.

How to Make
To prepare your Little Debbie Christmas Tree Cake Balls, follow these step-by-step instructions:
- Preheat your oven to 350°F (175°C). Grease and flour a baking dish or prepare it with parchment paper. This will ensure that the cake comes out easily after baking, preventing any sticking that could ruin your cake balls’ shape.
- In a large mixing bowl, combine the cake mix, eggs, water, and vegetable oil. Mix until well combined using an electric mixer on medium speed for about 2-3 minutes. This step is crucial as it will create an evenly mixed batter, leading to a light and fluffy cake once baked.
- Pour the batter into the prepared baking dish and bake in the preheated oven for 25-30 minutes or until a toothpick inserted into the center comes out clean. Be careful not to overbake, as it can lead to a dry cake. Once baked, let the cake cool for about 10 minutes in the pan, then transfer it to a wire rack to cool completely.
- Once the cake has cooled, crumble it in a large bowl, ensuring there are no large chunks remaining. Next, add the entire can of frosting. Use your hands or a spatula to mix the frosting into the cake crumbs until thoroughly combined. The mixture should be moist but not overly sticky; it should hold together easily when formed into balls.
- Using a cookie scoop or your hands, portion out the mixture and roll it into balls, roughly 1 inch in diameter. Place the cake balls on a baking sheet lined with parchment paper. This step can be fun, especially for kids who enjoy rolling the balls and getting their hands into the mixture!
- Once all the cake balls have been formed, place the baking sheet in the freezer for at least 30 minutes. Freezing them will help the balls set, making it easier to coat them in chocolate.
- Meanwhile, prepare your topping. Melt the chocolate or candy coating in a microwave-safe bowl in 30-second intervals, stirring in between until smooth. Be sure not to overheat the chocolate, as it can burn and become unusable.
- Remove the cake balls from the freezer. Dip each ball into the melted chocolate, ensuring it’s completely coated. Use a fork to lift the ball out, allowing the excess chocolate to drip back into the bowl. Place the coated balls back on the lined baking sheet.
- Add any sprinkles or edible decorations to the top of the cake balls before the chocolate hardens. You can get creative here, using seasonal colors and themes to enhance their festive appeal.
- Allow the chocolate coating to set at room temperature, or speed up the process by placing the baking sheet in the fridge for about 15-20 minutes. Once set, your Little Debbie Christmas Tree Cake Balls are ready to be served.
Variations & Substitutions
Chocolate Cake Variation: For those who love chocolate, swap the vanilla cake mix with a chocolate version. This will enhance the overall chocolate flavor and pair beautifully with a chocolate frosting—or even a festive peppermint icing!
Gluten-Free Option: Utilize a gluten-free cake mix to cater to those with dietary restrictions, ensuring everyone enjoys these delectable treats. Pairing this with a gluten-free frosting will keep the dessert safe for those avoiding gluten.
Colorful Christmas Trees: Add food coloring to your white melting chocolate to create fun colors that reflect the festive season. This not only adds a pop of color but can also be aligned with holiday themes. Think red, green, and even gold for an extravagant touch!
Nutty Surprise: For a crunchy texture, incorporate crushed nuts such as walnuts or pecans into the cake and frosting mixture. This adds a delightful contrast to the soft cake balls while enhancing their flavor complexity.
Common Mistakes to Avoid
One common mistake is overbaking the cake. This can lead to a dry cake, making it difficult to form cohesive balls. Always check for doneness a few minutes before the suggested time to ensure a moist cake.
Another frequent error is not cooling the cake adequately before crumbling it. If the cake is too warm, the resulting mixture can be overly sticky, causing issues during shaping.
Lastly, when melting chocolate, ensure you don’t overheat it, which can cause it to seize or become grainy. Melting in short intervals is the safest method to maintain a smooth consistency.
Storage, Freezing & Reheating Tips
To maintain freshness, store the cake balls in an airtight container at room temperature for up to 3 days. If you plan to save them for longer, consider freezing them. Place the individual cake balls on a baking sheet to freeze, then transfer them to a freezer bag once solid. They can be stored for up to 3 months in the freezer.
When ready to enjoy, simply thaw the cake balls at room temperature for about 30 minutes. Avoid refreezing once thawed, as this can compromise their texture and flavor.
If you want to maintain the coating while reheating, consider placing them in the fridge rather than the microwave to avoid melting the chocolate.
Frequently Asked Questions
Can I use a different flavor of cake mix? Yes! You can definitely experiment with other flavors such as red velvet or lemon. Each variation will provide a unique twist to the basic recipe, allowing you to get creative with your dessert.
How can I make these cake balls last longer? To extend their shelf life, it’s best to keep them stored in an airtight container. Refrigeration can help, and they can also be frozen for later enjoyment. Just remember to write the date on the container to keep track.
What do I do if my melting chocolate is too thick? If your melting chocolate seems too thick, you can add a small amount of vegetable oil or shortening to help thin it out, allowing for better coverage over the cake balls.
Are they safe for kids to make? Absolutely! This is a fun, easy project for kids with adult supervision, especially during the mixing and dipping stages. The creative aspect of decorating makes it even more enjoyable.
Can I skip the frosting? While frosting adds moisture and flavor, you can adjust the liquid in the cake mix if you choose to omit it; however, the resulting cake balls might lack some of their creaminess. A good alternative is to use yogurt or a fruit puree for added moisture.
Conclusion: Little Debbie Christmas Tree Cake Balls combine ease, flavor, and festive charm. They are perfect for the holiday season, allowing everyone to indulge in a delicious treat that evokes childhood memories. Not only are they simple to make, but they also provide a delightful way to share joy during gatherings, cozying up with loved ones, or even giving as gifts. Don’t hesitate to get creative with flavors and decorations to make them your own!


