Prep time: 30 minutes
Cook time: 0 minutes (chilling)
Total time: 4 hours (including chilling)
Servings: 24 balls
Indulging in the holiday spirit can often involve delightful treats that remind us of our childhood. One such treat is the much-loved Little Debbie Christmas Tree Cake. It’s a nostalgic favorite, and transforming that iconic dessert into bite-sized cake balls is a fun and easy way to bring festive cheer to any gathering. Not only are these cake balls visually appealing, but they also burst with flavor, combining rich chocolate and fluffy cake with a creamy filling. Perfect as a dessert for parties, family gatherings, or even as a sweet surprise for busy parents juggling their holiday plans!
What Is Little Debbie Christmas Tree Cake Balls?
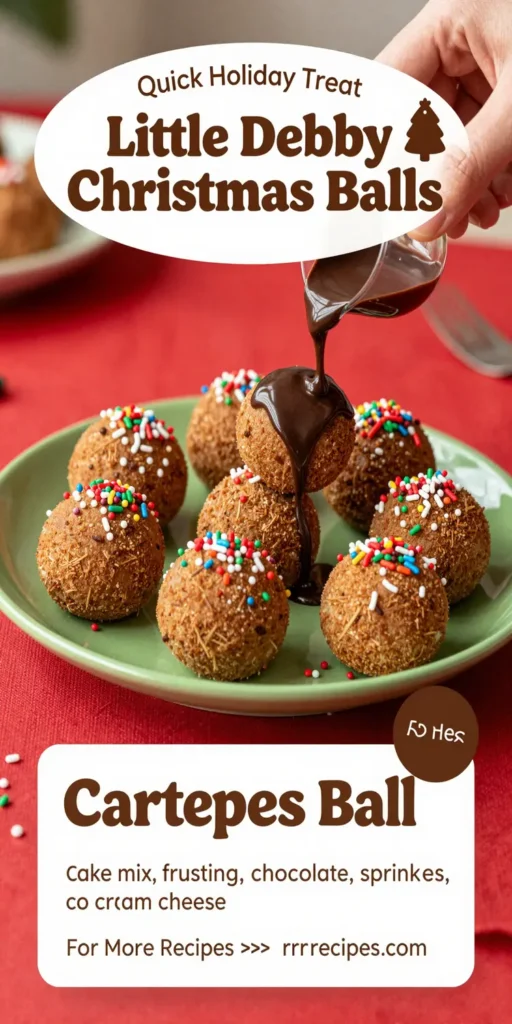
Little Debbie Christmas Tree Cake Balls are a creative and scrumptious twist on the classic Christmas Tree Cakes made by Little Debbie. They incorporate the same delightful flavors of vanilla cake and chocolate icing but are reimagined into a handheld dessert that offers fun, portion-controlled indulgence. The cake balls feature moist cake covered in a rich chocolate candy coating, making them perfect for sharing or simply enjoying yourself during the holiday season.
Why You’ll Love This
These cake balls are not only incredibly delicious but also easy to make, which is a huge plus for busy parents or individuals new to baking. They come together using just a few simple ingredients, most of which you may already have at home. The process is straightforward, and the end result is guaranteed to impress friends and family alike. Plus, they look adorable on any holiday dessert table, adding a festive touch that evokes feelings of joy and celebration. Whether you’re in charge of holiday treats this year or just want to enjoy a taste of nostalgia, these Little Debbie Christmas Tree Cake Balls will satisfy your sweet tooth and bring smiles all around.
Ingredients You’ll Need
- 1 box of vanilla cake mix: This serves as the base of your cake balls. The sweetness and fluffiness of the cake mix create a wonderful texture that pairs beautifully with the chocolate coating.
- 3 eggs: Added for richness and moisture, the eggs help bind the cake mix together, ensuring that your cake balls hold their shape.
- 1 cup of water: Essential for preparing the cake mix, the water helps hydrate the dry ingredients and creates a smooth batter.
- 1/2 cup of vegetable oil: This ingredient contributes to the moist texture of the balls, making them tender and delightful.
- 1 can of cream cheese frosting: This is the decadent component that captures the classic flavors of Little Debbie’s cake. It adds a creamy richness that enhances the overall taste.
- 2 cups of chocolate candy melts: Used for coating the cake balls, these melted chocolates add a delightful sweetness and a smooth finish.
- Sprinkles: Optional but recommended for decoration, festive sprinkles add a pop of color and cheer, making your cake balls visually appealing.

How to Make
- Preheat your oven to 350°F (175°C). While it’s heating, gather all your ingredients so that everything is within reach. This makes the process smoother and more enjoyable!
- In a large mixing bowl, combine the cake mix, eggs, water, and vegetable oil. Use a hand mixer or a whisk to blend the ingredients until they are well combined, ensuring that there are no lumps. The batter should be smooth and creamy.
- Pour the batter into a greased 9×13 inch baking pan and spread it evenly with a spatula. Bake in the preheated oven for 25–30 minutes, or until a toothpick inserted in the center comes out clean. This step creates the delicious cake base for your balls.
- Once baked, remove the cake from the oven and allow it to cool completely in the pan. Cooling is crucial to ensure easy shaping of your cake balls; if you rush this step, they might fall apart.
- After the cake has cooled, crumble it into a large bowl. You can use your hands or a fork for this step. Add the cream cheese frosting to the crumbled cake and mix thoroughly. Your mixture should be moist but not overly sticky, allowing it to hold together well when formed into balls.
- Using your hands, shape small portions of the cake mixture into balls about the size of a golf ball. Place the shaped balls onto a baking sheet lined with parchment paper. Ensure they are spaced apart to avoid sticking together as they chill.
- Place the baking sheet in the refrigerator for about 30 minutes. Chilling the cake balls solidifies their shape and makes them easier to coat in chocolate. This step is essential for achieving the best texture.
- While the cake balls are chilling, melt the chocolate candy melts according to the package instructions. Make sure not to overheat the chocolate as this can lead to a thick and unworkable texture.
- Once the cake balls have chilled, dip each one into the melted chocolate using a fork or a dipping tool. Let the excess chocolate drip off before placing them back onto the parchment paper.
- If desired, sprinkle festive decorations on top of the chocolate-coated cake balls while the chocolate is still wet. This step adds charm and cheer to your dessert.
- Allow the coated cake balls to set in the refrigerator for at least 30 minutes. This final chilling will ensure that the chocolate coating hardens properly, resulting in a delightful crunch when you take a bite.
Variations & Substitutions
Mint Chocolate Variation:
For those who love the refreshing taste of mint, you can incorporate mint extract into the cream cheese frosting. Use 1/2 teaspoon of mint extract along with the frosting. This will give your cake balls a refreshing twist that complements the chocolate wonderfully! Opt for green chocolate melts for a festive touch.
Gluten-Free Alternative:
If you or your guests are sensitive to gluten, substitute regular cake mix with a gluten-free cake mix. Make sure to also check that the frosting is gluten-free. This allows everyone to enjoy the festive treat without worry.
Nutty Crunch:
Incorporating a handful of finely chopped nuts or crushed pretzels into the cake mixture can add an unexpected and enjoyable crunch to the cake balls. Walnuts or pecans complement the flavor well, while pretzels add a salty contrast to the sweetness.
White Chocolate Coating:
For a sweeter, creamier flavor, consider using white chocolate melts instead of chocolate. This will transform the cake balls into an elegant dessert perfect for holiday parties.
Common Mistakes to Avoid
Not letting the cake cool:
One common mistake is not allowing the cake to cool completely before crumbling. This can lead to a wet mixture that won’t hold its shape. Always be patient; cooling is key!
Overheating chocolate:
When melting the chocolate, be cautious to avoid overheating. This can create a clumpy texture that doesn’t coat well. Stir regularly and heat in short bursts, checking frequently.
Using too much frosting:
It’s tempting to add extra frosting for moisture, but too much can make the mixture too sticky. The balance is crucial; just enough to bind the crumbles is ideal.
Storage, Freezing & Reheating Tips
To store your Little Debbie Christmas Tree Cake Balls, place them in an airtight container in the refrigerator. They can last up to one week, but they are typically consumed much quicker due to their deliciousness! For longer storage, you can freeze them for up to 3 months. To freeze, arrange them on a baking sheet and freeze until firm. Once solid, transfer them to a freezer-safe container. Thaw in the refrigerator for a few hours before enjoying.
Reheating isn’t necessary, as they are intended to be enjoyed cold or at room temperature. However, if you find that the chocolate has become slightly soft, a brief time in the refrigerator can help restore their firmness.
Frequently Asked Questions
Can I use any cake mix for this recipe?
Absolutely! While vanilla cake mix captures the essence of Little Debbie’s Christmas Tree Cake, other flavors such as chocolate or even spice cake can be used to create unique variations. Just keep in mind that the frosting flavor should complement whichever cake mix you choose.
What can I do if my mixture is too sticky?
If you find your cake mixture is too sticky to form balls, you may need to add a bit more crushed cake crumbs to balance it out. Try chilling your mixture in the refrigerator for a bit longer, as it often helps firm up the texture for easier handling.
Can I make these cake balls ahead of time?
Yes! In fact, these cake balls can be made a few days in advance. Store them in an airtight container in the refrigerator until you’re ready to serve. They actually taste better after the flavors have melded together over time.
Is cream cheese frosting required, or can I use something else?
While cream cheese frosting adds a wonderful flavor reminiscent of the original cake, you can substitute it with other frosting flavors of your choice. Vanilla or chocolate frosting would work well too!
How do I prevent the chocolate from cracking?
To prevent the chocolate from cracking, ensure the cake balls are thoroughly chilled before dipping. Additionally, allowing the chocolate to cool slightly before coating can help prevent this issue as well. If cracks do occur, don’t fret; they will still taste delicious!
Conclusion: Making Little Debbie Christmas Tree Cake Balls is not only a fun activity to engage in during the festive season, but they also serve as a delightful treat that everyone will enjoy. With their playful appearance and delicious flavors, these cake balls are sure to become a beloved addition to your holiday dessert lineup. So grab your ingredients and get to making these tasty bites that capture the essence of Christmas cheer!


