**Meta Title:** Irresistible Homemade Huckleberry Pie Recipe
**Meta Description:** Discover the secrets to a delicious homemade huckleberry pie. Perfect for summer gatherings or cozy family dinners!
—
You know that feeling when you take a summer stroll through the woods, and suddenly a burst of sweet, tangy huckleberries catches your eye? This is the essence of homemade huckleberry pie—a dessert that encapsulates the spirit of nature’s bounty and the delightful nostalgia of warm afternoons spent berry picking. The aroma of buttery crust baking in the oven, mingling with the sweet scent of huckleberries, fills your kitchen and creates an irresistible invitation that’s nearly impossible to resist.
In this article, I’ll guide you through the intricacies of making a luscious huckleberry pie from scratch—everything from picking the perfect huckleberries to achieving that golden, flaky crust that everyone dreams of. Let’s dive into this delicious endeavor together!
What is Huckleberry Pie?
Huckleberry pie is a beloved dessert, especially in the Pacific Northwest, where these tiny berries thrive in the wild. Huckleberries are similar to blueberries but are often more intense in flavor, with a bright, tangy sweetness balanced by earthy undertones. The little jewels range in color from deep blue to dark purple and are packed with antioxidants and vitamin C.
Traditional huckleberry pie consists of a simple filling made from fresh huckleberries, sugar, and a touch of lemon juice to enhance their natural sweetness. The results are stunning: a vibrant filling that bubbles joyously beneath a flaky crust, creating a dessert that’s both beautiful and bursting with flavor. Those who savor a slice experience a delightful explosion of juicy huckleberries that perfectly balances sweetness and tartness.
Why You’ll Love This Homemade Huckleberry Pie
This homemade huckleberry pie stands out for several reasons. First and foremost, it highlights the natural flavors of huckleberries, making it an ideal dessert for anyone who appreciates the essence of fresh, seasonal produce. The satisfaction of creating this pie from scratch is unparalleled—it’s not just about food; it’s about memories, family gatherings, and the joy of sharing something made with love.
Additionally, this recipe is incredibly versatile. Whether you’re looking for a comforting dessert to end a family dinner, a show-stopping centerpiece for a potluck, or a simple treat with your afternoon cup of tea, this pie fits the bill perfectly. It’s impressively easy to make, requiring only a handful of ingredients while delivering an impressive and delectable result.
Lastly, imagine how you’ll feel serving this beautiful pie at your next barbecue—friends and family will be raving about it long after the last crumb is gone, and you’ll be known as the huckleberry pie master!
Ingredients You’ll Need
To create your very own huckleberry pie, you’ll need the following ingredients:
1. **Fresh Huckleberries (4 cups)**: These are obviously the star of the show! When selecting, look for firm, plump berries free of any blemishes. If you don’t have access to fresh huckleberries, you can substitute blueberries, although the flavor will differ slightly.
2. **Granulated Sugar (1 cup)**: This will sweeten the filling. You can adjust the amount based on your taste and the tartness of the berries.
3. **Lemon Juice (2 tablespoons)**: Freshly squeezed lemon juice adds brightness and enhances the berries’ natural flavors.
4. **All-Purpose Flour (2 tablespoons)**: This helps thicken the filling, ensuring it holds together while still being wonderfully juicy.
5. **Unsalted Butter (1 tablespoon)**: Dotting the filling with butter adds richness and depth of flavor.
6. **Salt (1/4 teaspoon)**: A pinch of salt to balance the sweetness is essential.
7. **Pie Crusts (2)**: You can make your own from scratch or use store-bought crusts for convenience. If you’re a fan of buttery crusts, use a recipe rich in butter for an even more flavorful pie.
How to Make Irresistible Homemade Huckleberry Pie
**Step 1: Prepare the Crust**
Start by making your pie crust if you’re opting for homemade. In a large mixing bowl, combine 2 ½ cups of flour with 1 teaspoon of salt and 1 tablespoon of sugar. Add 1 cup of chilled, unsalted butter cubed. Using a pastry cutter or your fingers, work the butter into the flour until the mixture resembles coarse crumbs. Slowly drizzle in cold water (about 6-8 tablespoons) while mixing until the dough just comes together. Divide the dough into two equal discs, wrap them in plastic wrap, and refrigerate for at least 1 hour.
**Step 2: Preheat the Oven**
Preheat your oven to 425°F (220°C). You want your oven nice and hot to achieve that perfect golden crust.
**Step 3: Prepare the Huckleberry Filling**
While the dough cools, wash your huckleberries gently under cold water and drain them well. In a large bowl, combine the huckleberries with 1 cup of granulated sugar, 2 tablespoons of lemon juice, 2 tablespoons of flour, and a pinch of salt. Gently toss the mixture to ensure the berries are coated evenly in the fruity goodness. Let this mixture sit for about 10-15 minutes, allowing the juices to release.
**Step 4: Roll Out the Pie Crust**
On a floured surface, roll one of the chilled dough discs into a 12-inch circle. Carefully transfer it to a 9-inch pie pan, pressing gently into the corners. Trim any overhanging dough, but leave about 1 inch since you’ll want to fold it under for a nice, thick edge.
**Step 5: Fill the Pie**
Spoon the wonderful huckleberry filling into the prepared crust, making sure to evenly distribute the berries. Dot the top of the filling with small pieces of the remaining 1 tablespoon of butter, which will melt and enrich the filling as it bakes.
**Step 6: Top with the Second Crust**
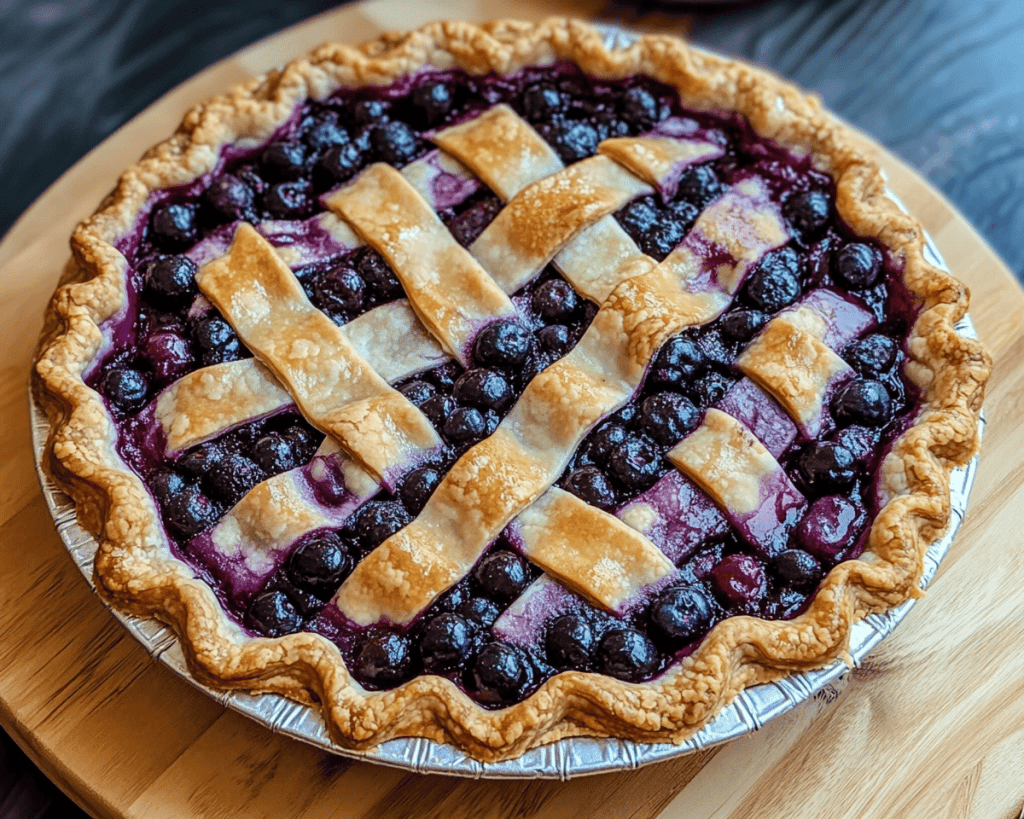
Roll out the second dough disc in the same manner and place it over the huckleberry filling. Seal the edges by crimping them with your fingers or a fork. Cut a few slits in the top crust to allow steam to escape, which prevents the pie from bubbling over.
**Step 7: Bake the Pie**
Bake the pie in the preheated oven for 15 minutes. Then, reduce the temperature to 350°F (175°C) and bake for an additional 30-35 minutes, or until the crust is golden brown and the filling is bubbling. The scent of the huckleberries will fill your kitchen, teasing everyone who passes by.
**Step 8: Cool and Serve**
Once baked, remove the pie from the oven and let it cool for at least 2 hours before slicing. This cooling period allows the juices to thicken, giving you clean slices and a beautifully set filling.
Tips, Tricks & Variations
1. **Use Frozen Huckleberries**: If fresh huckleberries are out of season or unavailable, frozen huckleberries can be a great alternative. Just increase the flour to 3 tablespoons to help absorb extra moisture.
2. **Add Spices**: For an extra layer of flavor, consider adding a pinch of cinnamon or nutmeg to the filling—these warm spices pair wonderfully with huckleberries.
3. **Glaze the Crust**: Brush the top crust with an egg wash (a beaten egg mixed with a tablespoon of water) before baking for a shiny, beautiful crust.
4. **Serving Suggestions**: Huckleberry pie is delightful on its own, but add a scoop of vanilla ice cream or a dollop of whipped cream for that extra indulgence.
5. **Storage Tips**: This pie can be refrigerated for up to 5 days. It also freezes beautifully; just wrap well in plastic and foil. When ready to enjoy, thaw in the fridge and reheat at 350°F for about 15 minutes.
What to Serve With Huckleberry Pie
Pair your huckleberry pie with a lovely scoop of vanilla ice cream for a classic dessert combination. The creamy texture of the ice cream complements the pie’s juicy filling, creating a comforting dessert experience. If you prefer, serve it with freshly whipped cream sprinkled with a dash of cinnamon for an aromatic touch. For drinks, a cup of fresh-brewed black coffee balances the sweetness delightfully, or consider a sparkling lemonade for a refreshing, slightly tart contrast.
Nutrition & Health Benefits
Huckleberries are not only delicious but also packed with health benefits. They are high in antioxidants, which help combat oxidative stress in the body, and they have anti-inflammatory properties. These little berries are also a good source of vitamin C, vitamin A, and fiber, making huckleberry pie a treat that can be enjoyed in moderation as part of a healthy diet. According to the USDA, half a cup of huckleberries contains about 35 calories, which makes it a relatively guilt-free indulgence .
Frequently Asked Questions
**1. Can I use blueberries instead of huckleberries?**
Yes! Blueberries can be a delicious substitute if huckleberries are difficult to find. Keep in mind that blueberries are sweeter, so adjust the sugar to your taste.
**2. How can I store leftover pie?**
Leftover pie can be covered with plastic wrap and stored in the refrigerator for up to 5 days. For longer storage, freeze slices individually and reheat in the oven when desired!
**3. What if my pie filling is too runny?**
If your huckleberry filling is runny, it may be due to excess moisture from the berries. Adding a bit more flour next time or cooking the filling briefly on the stove to reduce some liquid can help.
**4. Can I make the pie crust ahead of time?**
Absolutely! You can make the pie crust a day or two in advance. Just wrap the dough in plastic wrap and store it in the refrigerator. Let it rest for a few minutes at room temperature before rolling out.
**5. Is huckleberry pie gluten-free?**
While this recipe contains all-purpose flour, you can make it gluten-free by using a gluten-free pie crust and substituting the flour in the filling with a gluten-free flour blend.
—
Now that you have the perfect homemade huckleberry pie recipe, I invite you to gather your loved ones, roll up your sleeves, and create something truly magical. This pie isn’t just a dessert—it’s a slice of summer, a celebration of flavor, and a cherished memory in the making. If you loved this recipe, please leave a comment or tag me on Instagram with your delicious results! Happy baking!


