Prep time: 15 minutes
Cook time: 25 minutes
Total time: 40 minutes
Servings: 8
If you’ve ever stepped into a cozy Italian restaurant and been welcomed by the intoxicating aroma of freshly baked bread infused with garlic and herbs, then you know the allure of **pull apart garlic bread**. The golden, crispy exterior that gives way to fluffy, tender pieces of bread is enough to make anyone feel at home. This recipe isn’t just about satisfying cravings; it’s a journey of flavors and aromas that makes your kitchen feel like a warm hug.
What makes this recipe truly special is its ability to impress both seasoned chefs and beginners alike. Not only is it incredibly easy to prepare, but it also allows you to customize and elevate the dish with your own unique twist. By the end of this article, you will learn how to create this irresistible pull apart garlic bread, exploring its textures, flavors, and various exciting variations.
What Is How Can You Make Pull Apart Garlic Bread So Irresistible?
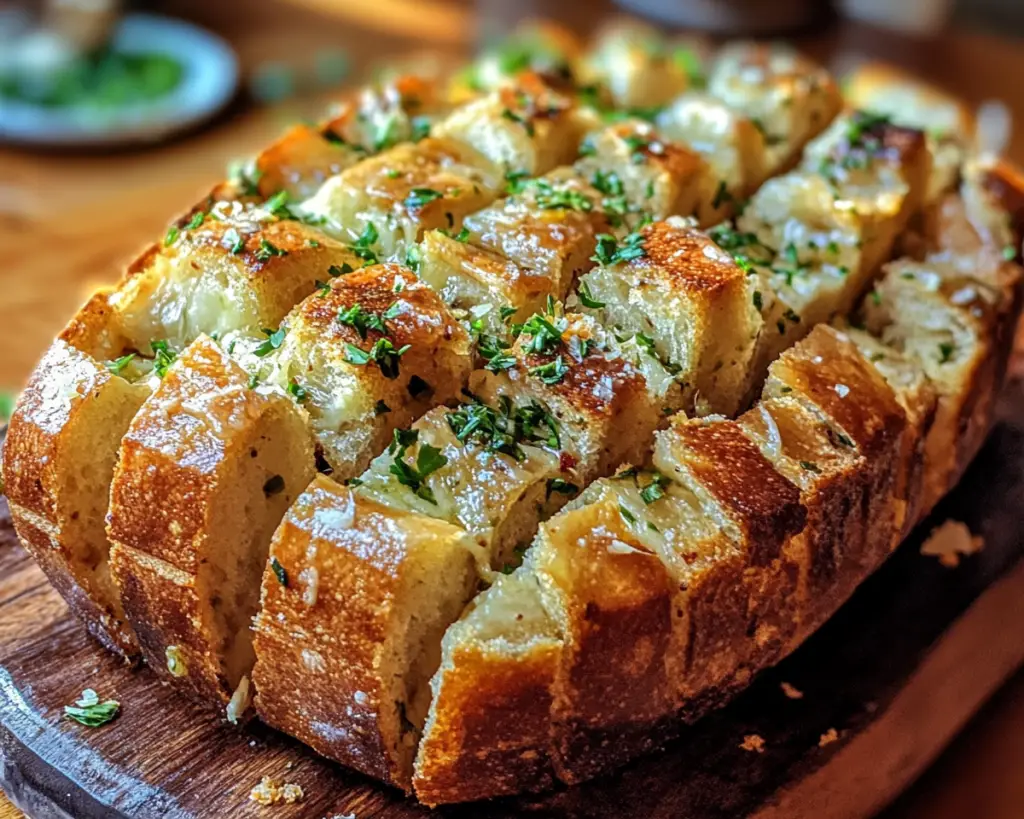
**Pull apart garlic bread** has its roots deeply embedded in Italian cuisine. Often seen as an appetizer or side dish, it is made from a rich, pillowy bread that’s cut into pieces, allowing for easy sharing and enjoyment. The savory combination of **butter**, **garlic**, and **herbs** gives the bread its irresistibly rich flavor. When baked, the individual pieces become golden brown and develop a delightful crunch on the outside, while remaining soft and tender on the inside.
The texture of pull apart garlic bread is one of its defining features. The crispy exterior contrasts beautifully with the fluffy interior, creating a harmonious bite that makes you want to go back for more. You can even serve it with a side of marinara sauce for dipping, adding an exciting extra layer of flavor. In addition to its deliciousness, pull apart garlic bread offers endless opportunities for personalization, allowing you to infuse your creativity into each loaf.
Whether you are preparing a family meal, hosting a game night, or simply craving a delicious indulgence, pull apart garlic bread is sure to impress. The ability to tailor it according to your preferences is what makes this recipe so adaptable and appealing.
Why You’ll Love This
There are countless reasons to love this recipe! First and foremost, the **taste** is out of this world. Garlic and butter are a match made in culinary heaven, and when combined with bread, they create a flavor experience that’s hard to resist. Every bite bursts with a satisfying garlicky goodness that can make even the toughest days feel brighter.
The **ease of preparation** is another major attraction. With minimal ingredients and straightforward steps, this recipe is perfect for busy parents looking to whip up a quick yet impressive side dish for dinner. If you are new to cooking, don’t worry! The step-by-step instructions will guide you through every aspect, ensuring that even beginners can achieve spectacular results.
On top of taste and ease, this recipe is also **cost-effective**. Using simple ingredients, you can create an amazing appetizer without breaking the bank. Moreover, this recipe can be a playful way to engage kids in the kitchen, transforming cooking into a fun family activity.
Finally, the dish’s **versatility** allows it to suit a variety of dietary needs. Whether you are a vegetarian, someone looking for a keto option, or just love to experiment with flavors, this pull apart garlic bread can easily adapt to your preferences.
However, one common misconception is that this dish is only for special occasions. In reality, you can enjoy pull apart garlic bread any time you like, whether as a snack or as a companion to your favorite pasta dish. Take it from me: once you try this recipe, you won’t want to keep it a secret!
Ingredients You’ll Need
To make pull apart garlic bread, you’re going to need the following ingredients:
- French or Italian Bread: The base of your dish, you can also use sourdough or any other bread of your choice. The texture should be sturdy enough to hold the filling.
- Unsalted Butter: This gives richness and moisture to the bread. You can substitute with olive oil if you’re looking for a healthier option.
- Garlic: Fresh minced garlic delivers the best flavor. In a pinch, garlic powder can be used, but fresh is always preferred.
- Parsley: Freshly chopped parsley adds a pop of color and freshness. Dried parsley can work if fresh is unavailable.
- Cheese: Mozzarella or cheddar provide a gooey, melty texture that makes the bread even more irresistible.
- Salt and Pepper: To taste, these enhance the flavors of the other ingredients. Adjust according to your preferences.
- Optional Ingredients: Add red pepper flakes for heat, or Parmesan cheese for extra depth.
Each of these ingredients plays a critical role in making this dish a home-run. The bread is the canvas, while the garlic and butter serve as the main flavors that pull everything together. Cheese brings a delightful gooeyness that enhances every pull, making you keep reaching for just one more piece.
How to Make
Making pull apart garlic bread is a fun and straightforward process. Follow these simple steps:
- Preheat your oven: Start by preheating your oven to 375°F (190°C). This ensures that the bread gets that golden crunch you desire right from the beginning.
- Prepare the bread: Take your bread and cut it into uniform squares, but be careful not to cut all the way through. Leave the base intact, this way the pieces stay connected, making it easier to pull apart later on. This step is crucial as it helps retain the integrity of each piece.
- Create the garlic butter mixture: In a small saucepan over low heat, melt the **unsalted butter**. Add minced **garlic**, finely chopped **parsley**, and season with **salt and pepper**. Stir until everything is well combined and fragrant, usually about 1-2 minutes. The aroma at this stage is heavenly!
- Fill the bread: Use a brush or a spoon to spoon the garlic butter mixture generously between the cuts in the bread. Make sure to get it into every crevice, maximizing the flavor infusion. Don’t be shy here; the more butter, the better!
- Add the cheese: After you have filled the bread with garlic butter, stuff shredded **mozzarella** or your cheese of choice into each cut. This will create that beautiful, melty college that everyone dreams of with every pull.
- Wrap it up: Once stuffed, wrap the entire loaf in aluminum foil. This helps to keep moisture in while baking, resulting in a tender interior.
- Bake: Place the wrapped loaf in the preheated oven and bake for about 20 minutes. After 20 minutes, carefully remove the foil and bake for an additional 5-10 minutes, until the top is golden brown and crispy. The total baking time might vary depending on your specific oven, so keep an eye on it!
- Cool and Serve: Once out of the oven, let it cool for a few minutes. Serve warm, pulling apart pieces that burst with garlicky happiness. Enjoy with your favorite dip or just on its own!
With each step, the excitement builds as you wait for that golden-brown masterpiece to emerge from the oven. The aroma will fill your kitchen, enticing anyone nearby, and the final product will be even more rewarding than you can imagine.
Variations & Substitutions
Cheesy Spinach Variation: For a delightful twist on the classic recipe, consider adding some fresh spinach along with your cheese filling. The combination of **spinach** with **garlic** creates a rich, comforting taste that pairs beautifully with the bread. Sauté the spinach first in a little olive oil with minced garlic for an enriched flavor. This variation suits vegetarians perfectly, and the nutrient boost makes it guilt-free!
Herbed Garlic Butter Variation: If you want to elevate the flavors further, try mixing different **herbs** into your garlic butter. Fresh rosemary, thyme, or basil can add an aromatic touch that enhances the complex flavors of the dish. This option is great for herb lovers and allows you to bring a garden-fresh taste to the bread.
Spicy Garlic Butter Variation: If you’re a fan of heat, consider adding some chopped **jalapeños** or red pepper flakes into your garlic butter mixture. This variation spices things up and has a unique flavor that complements the garlic. This addition works wonderfully for those who enjoy a kick in their meals and makes the bread an exciting side to serve with heartier dishes.
Gluten-Free Variation: If you’re adhering to a gluten-free diet, simply substitute regular bread with gluten-free alternatives. Make sure to choose a variety that holds up well and has a comparable texture to bread, like gluten-free sourdough or bread rolls. The flavor might differ slightly, but the joy of pulling apart still remains intact.
Vegan Variation: For a vegan-friendly adaptation, substitute the **butter** with coconut oil and use dairy-free cheese. Additionally, ensure that your bread is dairy-free by checking the labels. Add in vegan alternatives, and you’ll still have a delicious, pull apart bread that everyone can enjoy together!
Common Mistakes to Avoid
While making pull apart garlic bread may seem simple, there are a few common pitfalls that can lead to less than satisfactory results. One of the most prevalent mistakes is cutting the bread slices too deep. If you cut all the way through, the pieces will fall apart completely. Only slice partially through to leave them connected at the base.
Another mistake is not allowing the **garlic butter** mixture to absorb properly into the bread. If you rush this step, note that you may miss out on those incredible flavors. Make sure to be generous with the filling, providing ample time for it to soak into the interior.
Furthermore, keeping your oven temperature too high can lead to uneven cooking, with the outer pieces getting burnt while the interior remains soft. Always ensure your oven is preheated, and use a thermometer for accuracy, especially if you’re baking for a gathering.
Watch out for overbaking! If you leave the bread in the oven for too long, it can dry out significantly. Always keep an eye on it during that last few minutes to achieve a perfectly crispy top without sacrificing the soft, tender inside.
Lastly, don’t skip cooling your bread before serving. While it may be tempting to dive in immediately, letting it cool slightly will allow the cheese to firm up a bit, making it easier to pull apart without losing a whole chunk of bread!
Storage, Freezing & Reheating Tips
Storing pull apart garlic bread is essential to maximizing its lifespan. Once it has cooled down, wrap it tightly in aluminum foil or place it in an airtight container. Properly stored, it can last up to 3 days at room temperature. However, keep in mind that the texture may not stay as fresh after a couple of days.
If you wish to store it for a longer period, consider **freezing** it. Wrap the bread tightly in plastic wrap and then in aluminum foil or place it in a freezer-safe bag. It can last up to three months in the freezer. When you’re ready to enjoy it, allow it to thaw in the fridge overnight.
To **reheat**, preheat your oven to 350°F (175°C). Remove the wrapping and place the bread directly onto the oven rack or a baking tray. Heat it for around 10-15 minutes, or until warmed through. You can also wrap it in foil for the first part of reheating to prevent it from getting too crispy.
It’s crucial to note food safety guidelines when storing and reheating. If your garlic bread has been sitting out for more than two hours, discard any leftovers to prevent any foodborne illnesses.
Frequently Asked Questions
Can I use different types of cheese in this recipe?
Absolutely! While mozzarella is a popular choice for its meltiness, you can experiment with other cheeses like cheddar, gouda, or even a spicy pepper jack. Just remember to adjust the amount to maintain the right consistency and flavor.
What’s the best way to ensure my bread doesn’t become soggy?
To prevent sogginess, make sure your **garlic butter** mixture is not overly greasy, and try not to over-saturate the bread. Also, be sure to bake it immediately after filling to lock in that perfect balance of flavors and textures.
Can I make this ahead of time?
Yes! You can prepare the garlic butter mixture and slice the bread ahead of time. Simply wrap the bread and refrigerate it until you’re ready to bake. When you’re ready, allow it to come to room temperature before baking.
Is this recipe easy to customize for dietary restrictions?
Definitely! This recipe is highly adaptable. You can easily make it gluten-free or vegan with simple swaps, ensuring that everyone can enjoy this delicious pull apart garlic bread.
What meals pair well with pull apart garlic bread?
It pairs beautifully with a variety of dishes! Consider serving it alongside pasta, soups, salads, or even as a starter for a family meal. The wonderful flavor complements many meals and can be a crowd-pleaser.
Conclusion:
Pull apart garlic bread is an exciting dish that brings people together while tantalizing their taste buds. With its **irresistible** flavors, simple preparation, and endless variations, it’s easy to see why this recipe is a must-try for every home cook. So why not give it a go? Personalize it to suit your taste, and don’t hesitate to share the creation with friends and family, sparking joy that will linger long after the last piece is gone. Enjoy your culinary adventure with this delectable recipe, and watch as it becomes a beloved staple in your household!


