Prep time: 20 minutes
Cook time: 30 minutes
Total time: 50 minutes
Servings: 4
Do you ever find yourself craving a mealtime delight that feels indulgent yet is still healthy? If so, the **Ricotta Eggplant Roll-Ups** might be just the ticket to fulfill your desires. Imagine layers of roasted eggplant, filled with a creamy ricotta mixture, baked to perfection and topped with a rich marinara sauce. This recipe not only satisfies your taste buds but also comes packed with nutrients. Here, you’ll discover how to whip up this delightful dish, along with my tried-and-true tips, variations to explore, and answers to some common questions.
What Is How Can Ricotta Eggplant Roll-Ups Taste This Good?
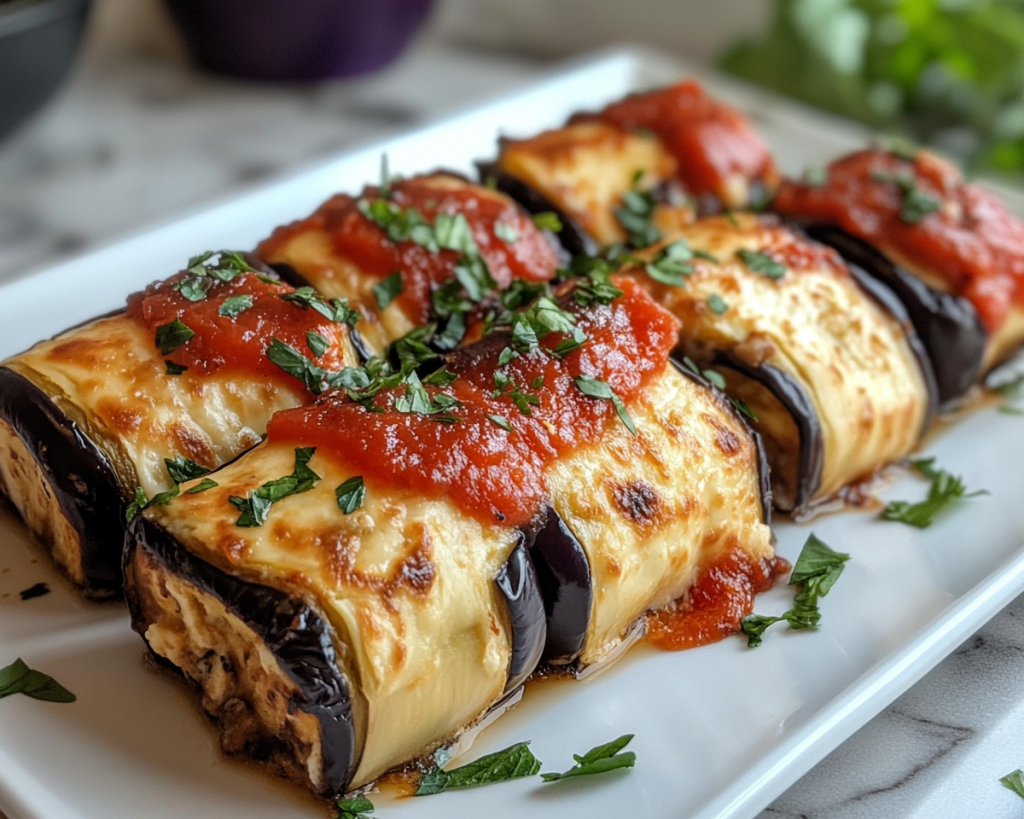
Ricotta Eggplant Roll-Ups are a delightful Italian-inspired dish that combines the earthy flavor of roasted eggplant with the creamy richness of **ricotta cheese**. Traditionally, eggplant is used in numerous Italian dishes, but in this recipe, it takes center stage as it is transformed into the perfect vehicle for a flavorful filling. The dish hails from the classic Italian cuisine, where layers and textures play a critical role in creating memorable meals.
In terms of texture, the **roasted eggplant** has a soft and tender feel, while the ricotta filling is creamy and slightly tangy, brightened with herbs and spices. When baked, the assembled roll-ups become enveloped in the bubbling goodness of marinara sauce, creating a dish that is both comforting and satisfying. You’ll also find that these roll-ups are versatile; they can be made ahead of time and stored for future meals, making them suitable for busy weeknights or meal prep.
What you will learn here is not only how to create this dish but also how to adapt it to suit your personal preferences and dietary needs. So, if you’re ready to get started, gather your ingredients and prepare for a culinary adventure!
Why You’ll Love This
There are countless reasons why Ricotta Eggplant Roll-Ups should become a staple in your kitchen. First and foremost, the **flavor combination** is simply divine. The sweetness of roasted eggplant pairs beautifully with the rich and creamy ricotta cheese, all enhanced by aromatic herbs like basil and oregano. This dish is a foolproof way to impress your family or guests without spending hours in the kitchen.
Ease is another significant factor in this recipe’s favor. You don’t need to be a gourmet chef to create something extraordinary; it’s suitable for beginners and experienced cooks alike. Preparing Ricotta Eggplant Roll-Ups involves straightforward techniques like roasting, mixing, and rolling, which keeps the cooking process manageable. Not to mention, you can easily double the recipe if you want to feed a larger crowd or stash a few away for future meals.
Many might associate eggplant with being **high-maintenance** or tricky to work with, but that’s a misconception. When prepared correctly, eggplant is a wonderful vegetable that absorbs flavors well and has a satisfying texture. Plus, this dish is inherently healthy, loaded with fiber and vitamins A, C, and K, making it a nutritious addition to your meal rotation.
Ingredients You’ll Need
To create these delicious Ricotta Eggplant Roll-Ups, gather the following ingredients:
- 1 large eggplant – Provides the primary structure for the roll-ups. Make sure to select a firm, glossy eggplant for the best results. If you prefer a more delicate flavor, you can use young eggplants.
- 15 oz ricotta cheese – Adds creaminess to the filling. For a lower-fat option, use part-skim ricotta, or substitute with cottage cheese for a different texture.
- 1 cup marinara sauce – Enhances flavor and adds moisture to the dish. You can also use homemade sauce or your favorite store-bought variety.
- 1 cup shredded mozzarella cheese – Melts beautifully on top, adding a delicious cheesy layer. If you’re feeling adventurous, try using goat cheese instead for a tangy kick.
- 2 cloves garlic – Adds depth to the filling. You can use garlic powder if fresh isn’t available.
- 1 tablespoon olive oil – Used for roasting the eggplant. Feel free to substitute with avocado oil for a different flavor profile.
- 1 teaspoon dried oregano – Complements the ricotta and adds a classic Italian flavor. Fresh oregano can be a wonderful substitute if you have it on hand.
- Salt and pepper – Essential for seasoning the dish to taste.
- Fresh basil leaves – Optional, for garnishing before serving to lend a fragrant aroma.
Each ingredient has a specific role in ensuring the dish comes together perfectly, so be sure to select the best quality where possible for maximum flavor.
How to Make
Follow these step-by-step instructions to ensure your Ricotta Eggplant Roll-Ups turn out perfectly:
- Preparing the eggplant: Start by preheating your oven to 400°F (200°C). While the oven is heating, slice the eggplant lengthwise into 1/4-inch thick slices. Lay the slices out on a baking sheet lined with parchment paper. Drizzle olive oil over them and sprinkle with salt and pepper. Roast in the oven for about 20 minutes or until the eggplant is tender and golden. This step not only enhances the flavor but also helps reduce excess moisture from the eggplant, which could make the roll-ups soggy.
- Making the filling: While the eggplant is roasting, mix the ricotta cheese, minced garlic, dried oregano, and a pinch of salt and pepper in a bowl until well combined. The garlic will infuse the ricotta with flavor, resulting in a creamy and savory filling. Taste the mixture and adjust the seasoning if necessary. If you’re adding any variations like spinach or sun-dried tomatoes, fold them into the mixture at this point.
- Assembling the roll-ups: Once the eggplant slices have cooled slightly, take one slice and place a spoonful of the ricotta mixture on the wider end. Carefully roll it up and place it seam-side down in a baking dish. Repeat this for all eggplant slices and filling, ensuring they are snugly placed against each other for effective baking.
- Adding the sauce and cheese: Pour half of the marinara sauce over the assembled roll-ups, making sure each one is coated. Sprinkle the shredded mozzarella evenly on top, followed by the remaining marinara sauce. This layering helps ensure that the flavors meld beautifully together while baking, making for a comforting dish that’s loaded with flavor.
- Baking the dish: Cover the baking dish with aluminum foil and bake in the preheated oven for 20 minutes. This step allows the roll-ups to heat through while keeping them moist. After 20 minutes, remove the foil and bake for an additional 10 minutes, or until the cheese turns golden and bubbly. You want a nice crust on the cheese for that irresistible texture.
- Serving: Once out of the oven, allow the roll-ups to rest for about 5 minutes. This brief cooling period ensures that they hold their shape when being served. If desired, add fresh basil leaves on top for a fragrant finish. Serve hot, perhaps with a side salad or crusty bread to round out the meal. Your guests will be begging for your secret!
Variations & Substitutions
Vegetarian Mushroom Add-In: If you want to amp up the umami flavor and texture of your roll-ups, consider adding sautéed mushrooms to your filling. Simply chop 1 cup of mushrooms (like cremini or portobello) and cook them in a skillet with a drizzle of olive oil until soft. Fold them into the ricotta mixture for an extra layer of flavor and a boost of nutrients. This variation is perfect for mushroom lovers and adds another dimension to the overall taste.
Spinach and Feta Option: If you prefer a Mediterranean twist, mix in cooked and squeezed spinach along with crumbled feta cheese to your ricotta. This will not only enhance the flavor profile but also add a beautiful green color. Saute the spinach first to reduce moisture, as this will help keep your rolls from getting watery. It’s a delightful variation that can appeal to anyone who enjoys a little zest in their meal.
Gluten-Free Version: For a gluten-free option, just ensure that the marinara sauce and any optional ingredients are certified gluten-free. The roll-ups themselves are naturally gluten-free, so there’s no need to change anything in that regard. Pair it with a gluten-free bread or pasta on the side, and you have a complete meal that everyone can fully enjoy without worrying about allergens.
Common Mistakes to Avoid
One of the most common mistakes when making Ricotta Eggplant Roll-Ups is skipping the **salting and draining** of the eggplant. This essential step not only reduces bitterness but also prevents excess moisture, ensuring that your roll-ups do not end up soggy. To effectively salt your eggplant, sprinkle salt generously over the slices, then let them sit for about 30 minutes before rinsing and patting dry with paper towels.
Another error is overstuffing the roll-ups. It’s tempting to use a generous amount of filling, but overstuffing can lead to them bursting open while baking. Aim for about 2 tablespoons of ricotta filling per roll for best results. This way, they maintain their shape and cook evenly, creating the perfect bite.
Lastly, be cautious not to overbake the roll-ups, as this may dry them out. Monitor the dish closely during the last few minutes of cooking, removing it from the oven once the cheese is golden and bubbling, not burnt. These simple but critical warnings can make all the difference in your cooking experience.
Storage, Freezing & Reheating Tips
Storing your Ricotta Eggplant Roll-Ups is straightforward. Once cooled, place them in an airtight container in the fridge, where they can be enjoyed for up to three days. This makes them perfect for meal prep or for leftovers. When storing, it’s best to separate each layer with parchment paper to minimize sticking.
If you want to make these roll-ups in advance, consider freezing them prior to baking. Assemble the roll-ups and place them in a freezer-safe container. To cook, thaw them overnight in the fridge, then bake as directed. They can be frozen for up to three months. Make sure to seal tightly to avoid freezer burn.
To reheat, place the roll-ups in an oven at 350°F (175°C) for about 20 minutes, covered with foil to retain moisture. Alternatively, you can microwave them for about 3-5 minutes, but note that the texture won’t be quite the same as oven heating. Always ensure the internal temperature reaches 165°F (74°C) before serving.
Frequently Asked Questions
Can I use other types of cheese instead of ricotta?
Absolutely! While ricotta is a traditional choice, you can certainly experiment with other cheeses. Cream cheese, cottage cheese, or even goat cheese can be used for a different texture or flavor. Just keep in mind that the flavor profile will change, so be sure to adjust seasonings accordingly.
Is this recipe suitable for vegans?
While Ricotta Eggplant Roll-Ups are not vegan due to the use of dairy products, you can make a vegan version by substituting the ricotta cheese with a vegan cheese alternative or a homemade cashew nut cream. Additionally, you should replace or omit the mozzarella cheese for a fully plant-based option.
How can I make these roll-ups spicier?
If you’re a fan of heat, consider adding crushed red pepper flakes to your ricotta filling or mixing in some jalapeños or diced hot peppers. This will lend a spicy kick to your dish without overpowering the other flavors. Always start with a small amount and adjust to your taste preference.
Can I prepare the roll-ups ahead of time?
Yes, you can prepare the roll-ups a day in advance and store them in the fridge before baking. Simply cover them with plastic wrap or foil to keep them fresh. This can save you time during a busy weeknight or when entertaining guests.
How do I know when the eggplant is properly cooked?
When roasting eggplant, it should feel tender and slightly golden when finished. A fork should easily pierce through the flesh. It’s important to avoid undercooking, as this can lead to a chewy and unpleasant texture in the finished dish.
Conclusion:
To sum it up, these Ricotta Eggplant Roll-Ups not only deliver a burst of flavor but also provide a healthy and satisfying meal option that’s perfect for various occasions. They’re simple enough for weeknight dinners and elegant enough for gatherings. I encourage you to personalize the recipe with your own favorite ingredients and to share it with friends or family. Try your hand at making this delightful dish, and I assure you, it will become a cherished addition to your recipe repertoire!


