Let’s Get Real
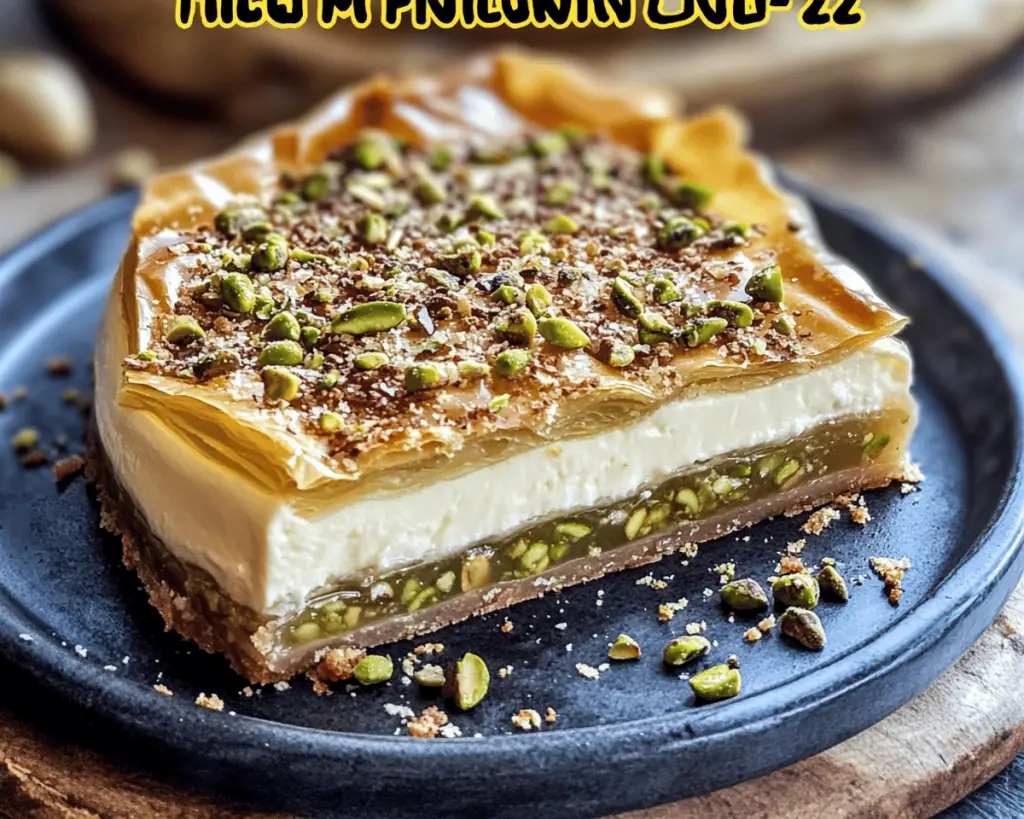
Listen, I’m going to let you in on a little secret: I have a massive sweet tooth and not-so-secret obsession with making desserts that speak to my multicultural palate. Growing up, I was the kid who would trade her PB&J at lunch for a slice of baklava. Every holiday at my house (whether it was Christmas, Easter, or Wednesday) involved layers of flaky phyllo dough smeared with butter and stuffed with nuts and honey. Fast forward to adulthood, and all I can think about is how to mix all those delicious vibes with the magic of cheesecake. Yes, folks, you read that right: Honey Pistachio Cheesecake meets Classic Baklava, and it’s a borderline obsession.
These days, I feel like there’s a new cheesecake twist every time I turn around. There’s Nutella cheesecake, pumpkin spice cheesecake… you name it, we’ve cheesecaked it. But I like to think that my Honey Pistachio Cheesecake is like the cool kid in high school who doesn’t even care about popularity because, you know what? This dessert is all about flavor, texture, and, let’s be honest, serious dessert bragging rights. So grab a fork and prepare to impress, because we’re diving into a recipe that pays homage to two of the most luscious desserts out there, while looking infinitely more complicated than it really is. Trust me, your taste buds are going to stage an encore.
Ingredients, Unfiltered
What’s Really in Honey Pistachio Cheesecake Meets Classic Baklava
Let’s break this beauty down. I’ll give you my thoughts on each ingredient, which sometimes feels like sharing my deepest secrets rather than cooking.
Phyllo Dough: The unsung hero of this recipe. Look, if you’re thinking about using puff pastry because it’s a little more popular, do yourself a favor and stick to phyllo. It brings that delicate flakiness that is essential for that baklava experience. I’ve rolled my eyes so many times at bakers screaming about how hard it is to work with phyllo dough— like, please, just let it thaw and be gentle. Take care of it, and it’ll thank you by making your dessert legendary.
Unsalted Butter: Ah, the elixir of life. Butter makes everything better and no, I don’t care who says otherwise. In this case, we’re going to use butter to brush each layer of phyllo dough, creating that glorious, crispy goodness. Make sure it’s unsalted so we can manage the flavor balance later— let’s save the salt for other life decisions.
Pistachios: Now here’s where things get a bit interesting. Obviously, we’re using pistachios because they are the nut superstar in the baklava world, and they have a subtle sweetness that pairs beautifully with honey. Pro tip: if you can, get shelled pistachios that are also roasted and salted. Your future self will thank you—I promise. If you don’t like pistachios (seriously, who doesn’t?), you can swap them out for walnuts or almonds, but that really puts you on a different dessert path.
Cream Cheese: The foundation of cheesecake beauty, and what gives the whole thing that rich, creamy texture. Make sure it’s at room temperature—I learned the hard way that a cold, stubborn cream cheese will leave you with a lumpy cheesecake that’s begging for forgiveness.
Sour Cream: That tangy bite is key! Sour cream adds moisture and a smoothness that makes this cheesecake heavenly. Using it instead of heavy cream? A bold, delicious move.
Honey: Honey is like the liquid gold of the dessert world, and in this recipe, it sweetens the cheesecake while giving that classic baklava taste. Do yourself a favor and don’t skimp on quality; go for local honey if you can find it.
Granulated Sugar: Yes, I’m using sugar because, well, cheesecake. This ingredient is non-negotiable; it’s a dessert after all, folks, not a salad.
Vanilla Extract: Adds depth to that sweet cheesecake filling. Only the best vanilla extract will do for this recipe! And yes, the imitation stuff? I see you. No thanks.
Eggs: Eggs are the magic binding agents that hold everything together. For a dessert that ultimately needs to set well, you can’t skip them if you want to bask in the glory of a perfectly baked cheesecake.
Let’s Talk Health (or Not)
Is This Even Healthy? Let’s Discuss
My initial confession? I have an ongoing love affair with desserts, particularly the kind that cheer you up like nothing else can. And let’s be real, is this cheesecake healthy? Sure, there are pistachios (that can count as a protein, right?), and honey has its health benefits— but let’s not kid ourselves. Between the cream cheese, butter, and sugar, we’re decidedly leaning toward the “indulgent” side of the spectrum.
But here’s the deal: I firmly believe in balance. One slice of this Honey Pistachio Cheesecake isn’t going to throw your diet into a tailspin. Enjoy it, live a little! This dessert is packed with flavor, love, and plenty of calories— but isn’t food designed to bring us joy? Give each slice a little drizzle of extra honey, and soak in that sweet bliss.
Your Grocery List
Here’s What You’ll Need
– 1 package of phyllo dough (about 16 oz)
– 1 cup unsalted butter, melted
– 2 cups shelled roasted pistachios (plus extra for garnish)
– 16 oz cream cheese, at room temperature
– 1 cup sour cream (full fat, please!)
– 3/4 cup honey (plus more for drizzling)
– 1 cup granulated sugar
– 2 teaspoons vanilla extract
– 3 large eggs
This recipe yields approximately 12 delicious slices, but let’s be honest, if you’re serving this to guests, I’d recommend cutting smaller slices because it’s richer than anyone will be prepared for—and that just means everyone will get to enjoy a slice of happiness.
The Actual Cooking Part
Okay, Let’s Make This
1. **Preheat that Oven!**: I always get ahead of myself and try to skip this part. But come on, let’s not insult baked goods with room temperature oven temperatures. Preheat your oven to 325°F (that’s 163°C for you metric folks).
2. **Prep that Pan**: Grab a 9-inch springform pan and grease the bottom and the sides. You can be fancy and line the bottom with parchment paper if you want, but sometimes I’m just too lazy; we’ll see how it goes!
3. **Phyllo Layers**: Now comes the fan-favorite part: working with the phyllo dough. Carefully unroll it and cover it with a damp paper towel so it doesn’t dry out—trust me, a dried-out phyllo is just sad.
4. **Butter Those Layers**: Using a pastry brush (or your hands if you’re feeling saucy), take one sheet of phyllo and lay it in your springform pan. Brush with melted butter. Repeat this step, layering about 8–10 sheets, brushing each layer with butter. If you’re feeling wild (and I always do), you can sprinkle some crushed pistachios between the layers when you feel like it, just to give your cheesecake that texture explosion.
5. **Crush Those Pistachios**: Toss your pistachios into a food processor (or zest up your life with a knife if you don’t own one—please don’t drive yourself crazy). Blend until finely chopped, with some larger bits remaining for texture. It’s like a party in your food processor!
6. **Make the Cheesecake Filling**: In a mixing bowl, beat together the room temperature cream cheese and sugar until it’s light and fluffy. Then mix in the sour cream, honey, and vanilla extract. Finally, add your eggs one at a time, blending well after each addition. You want everything nice and combined, so channel your inner zen chef here.
7. **Add the Pistachios**: Stir in those crushed pistachios until they’re evenly distributed. If you can manage not to eat all the filling before getting it into the pan, well done!
8. **Combine**: Pour that creamy, nutty filling right into your phyllo-lined springform pan. Smooth the top with a spatula so it looks pretty and even.
9. **Bake**: Pop the pan into your preheated oven and let it bake for about 60 minutes. The edges should be set, but the center may still have a little jiggle to it. Don’t panic! That’s what we want; it’ll firm up as it cools.
10. **Cool Down**: After baking, turn the oven off and crack the door slightly, letting the cheesecake cool gradually in the oven for about an hour. This step is crucial for avoiding cracks—nobody likes a cracked cheesecake; it’s just sad.
11. **Chill**: Once it’s cooled down, cover it and throw it in the fridge for at least 4 hours or overnight. The longer the better, honestly; flavors will get more intense.
12. **Drizzle & Serve**: When you’re ready to serve, release the cheesecake from the springform pan. Drizzle additional honey on top and sprinkle extra crushed pistachios for that Instagram-worthy finish before cutting into it. Go ahead and take a slice… or two. I don’t judge.
Side Notes & Sassy Hacks
Bonus Tips You Didn’t Ask For
– **Ingredient Swaps**: Not a fan of pistachios? Try walnuts or almonds instead. I promise it will still be just as fabulous, though the name might change from “Honey Pistachio” to “Honey Nut Delight”—you see where I’m going with this.
– **Baking Tip**: If you’re worried about cracks in your cheesecake, try placing a shallow pan full of water in the oven while the cheesecake bakes. It creates a steamy environment that helps keep the cheesecake moist and results in fewer cracks—voilà!
– **Leftover Butter**: I know you’ll have leftover melted butter. Don’t let it go to waste! Use it to prep some popcorn, make some garlic bread, or heck, just dip your favorite fruits in it. Life’s too short not to enjoy the little things.
– **Presentation**: Put some extra love into the topping by adding fresh fruit or berries. They give it that “I’m fancy” vibe while balancing that sweetness with some tartness.
– **Freezing Hacks**: Can’t finish it all in one go? Slice it up and freeze individual pieces. They hold up surprisingly well. When you need a quick sweet fix later, it’s like having your own dessert stash ready to go!
Final Words of (Culinary) Wisdom
So there you have it, folks: Honey Pistachio Cheesecake Meets Classic Baklava. It’s such a thrill to see cultures collide in such a culinary explosion of flavor; this isn’t just food—it’s a heartwarming community event on your plate. If you try this out, tag me on Instagram or send me a mental high-five. This recipe deserves all the love, and I can’t wait for you to experience your very own cheesecake glow-up. So whip on that apron, channel your inner baker, and let the magic unfold! Happy baking!


