Let’s Get Real
Alright, everyone, gather ’round because I have something sweet to confess: I was once a Dulce de Leche hater. Yes, you read that right. A HOT TAKE that will probably have some of you crying out for my culinary head. But before you revoke my foodie card, let me elaborate. I grew up in a household where the only acceptable desserts were chocolate chip cookies and ice cream — nothing complicated, thank you very much. But then I stumbled upon this recipe for Homemade Dulce De Leche Cheesecake, and let me tell you, it was a total game changer. One bite, and I was unhooked from my chocolate-loving ideals!
Now, every time I hear the weather reports mentioning “sweater weather,” I’m not wishing for the crisp air or the colorful leaves — I’m wishing for the excuse to make this cheesecake for the umpteenth time! What could be better than creamy cheesecake, silky caramel over the top, and a graham cracker crust? It’s like a love letter to my sweet tooth and a warm hug on a chilly day — just what I need considering my perpetual battle with my electric heating unit that apparently has a vendetta against me. Or maybe it’s me being too “electric” for it to handle? Who knows!
So here we are, ready to dive into a delightful dessert that will have you hopelessly hooked and leaving your family members wondering if you’ve become the new Baking Queen (or King). Get your aprons on because we’re about to beat some cream cheese, whip up a storm, and transform a simple cheesecake into a Dulce de Leche masterpiece that will make you the talk of the town, or at least among your dessert-loving friends.
Ingredients, Unfiltered
What’s Really in Homemade Dulce De Leche Cheesecake
Let’s get down to brass tacks, people. I like to keep it real and honest, so here’s a breakdown of everything that’s going into this creamy deliciousness.
Graham Crackers: You’re gonna need some good-quality graham crackers for the crust. I typically reach for whatever brand is on sale because I like to live dangerously. But honestly, they’re all pretty much the same if you don’t count that weird organic kind that costs more than my rent. Just be sure they are fresh!
Butter: What’s life without a little butter? Please, if you even utter the words “margarine” around me, I might just walk out of the kitchen. Get yourself some unsalted butter, and let it be your friend in this buttery journey. Trust me — your tastebuds will thank you.
Granulated Sugar: Because, duh, cheesecake without sugar is like a party with no music. I prefer the regular stuff, but if you want to shake things up, you can try substituting with coconut sugar or whatever magical sugar alternative is trending nowadays.
Cream Cheese: The star of the show, really. Get it to room temperature for maximum creaminess. If you forget to take it out ahead of time, just toss it in the microwave for a few seconds. But don’t blame me if it turns into a molten cream cheese blob — that’s on you!
Dulce de Leche: Okay, this one’s a no-brainer – we are literally making a Dulce de Leche cheesecake! You can buy it, but nothing, I repeat, nothing compares to homemade. So prepare for a little sweet kitchen alchemy. If you’re pinched for time, grab a can of the stuff from the store. But for the full experience, we’ll go homemade.
Sour Cream: Adds that gorgeously tangy taste that offsets the sweetness of the cheesecake. Use full-fat sour cream; your cheesecake hangs in the balance.
Heavy Cream: For that extra richness and to fold into latter stages of our cream cheese mixture. Yes, I understand this isn’t a health treat, but these calories aren’t going to count if you make it with love!
Eggs: How else are we going to bind the whole glorious mess together? Three large eggs are all you need to create that creamy texture. Embrace your inner chicken!
Salt: Just a pinch, my friend. It helps balance the flavors like a harmony you didn’t know you needed.
Let’s Talk Health (or Not)
Is This Even Healthy? Let’s Discuss
Well, well, well. The dreaded “is it healthy?” question. Spoiler alert: it’s not! This is a cheesecake we’re making, not a kale salad. Let’s get real. Sure, there’s butter, cream cheese, and loads of sugar involved. But hey, when it’s cold and dreary outside, a piece of this cheesecake is worth every calorie! Will I sleep soundly after scarfing down a gigantic slice — you betcha! You only live once, and I choose to live decadently, thank you very much.
So, sweep that guilt under the rug and just embrace the sweetness. Life is short — if I want sugar, I’m going to have the damn sugar! Plus, we can always pretend it’s healthy because it contains dairy (cheese, duh) and eggs—those eggs have protein, right? So when your friends ask you what’s in it, you can simply say, “It’s got eggs and dairy, so it’s practically health food,” and walk away like the cheerful life philosopher you are.
Your Grocery List
Here’s What You’ll Need
– 1 ½ cups of graham cracker crumbs
– ½ cup of unsalted butter, melted
– ½ cup of granulated sugar
– 24 ounces of cream cheese, room temperature
– 1 cup of homemade or store-bought dulce de leche (plus more for drizzling)
– 1 cup of sour cream
– 1 cup of heavy cream
– 3 large eggs
– 1 teaspoon of vanilla extract
– Pinch of salt
This recipe serves around 8-10 people, assuming you can stop at a slice (good luck with that).
The Actual Cooking Part
Okay, Let’s Make This
Alright, put on your favorite playlist, make sure your oven is preheated to 350°F (175°C), and let’s dive into this mouth-watering adventure!
1. **Crust Time!** Grab a big bowl, and mix together the graham cracker crumbs, granulated sugar, and melted butter until it resembles wet sand. Seriously, it should hold together when pinched. If it looks crumbly, add a splash more butter because we want this crust to hold its own.
2. **Press it Down:** Grab a 9-inch springform pan (if you don’t have one, run to the store like your life depends on it), and firmly press the graham cracker mix into the bottom, and slightly up the sides. You should feel like you’re creating a little fortress of deliciousness. Bake this beauty in your preheated oven for about 10-12 minutes until it’s golden brown. The aroma will lure anyone within a 5-mile radius! Let it cool while we move on.
3. **Make the Cheesecake Filling:** In a large mixing bowl, beat the cream cheese on medium speed until smooth — about 2-3 minutes. You want it creamy and devoid of lumps because no one enjoys little surprise lumps in their cheesecake.
4. **Add the Good Stuff:** Add your dulce de leche, sour cream, heavy cream, sugar, vanilla extract, and salt. Beat until everything is combined and ridiculously creamy. This mix should glisten as it reflects your kitchen lights like a dreamy cloud of caramel goodness.
5. **Egg-citing Part:** It’s time to add the eggs! You’re going to add them one at a time, mixing on low speed between each addition. Don’t overdo it! Just get them incorporated. This process is kinda like nurturing a relationship—you want it to be together but not too intense.
6. **Pour & Bake:** Pour the cheesecake filling over your baked crust. Smooth the top with a spatula because, obviously, we want it to look presentable, even if it’s just for Instagram. Pop it in the oven and bake for about 1 hour. This is the waiting game of patience. You’ll know it’s done when the edges are set, but the center is still a bit wobbly (like your knees after leg day, am I right?).
7. **Cool It Down:** Turn off the oven, crack the door open, and let the cheesecake cool slowly for about 1 hour. Say goodbye to those horrendous cracks! Afterward, transfer it to the fridge for at least 4 hours (or overnight, if you can wait) to really let it set.
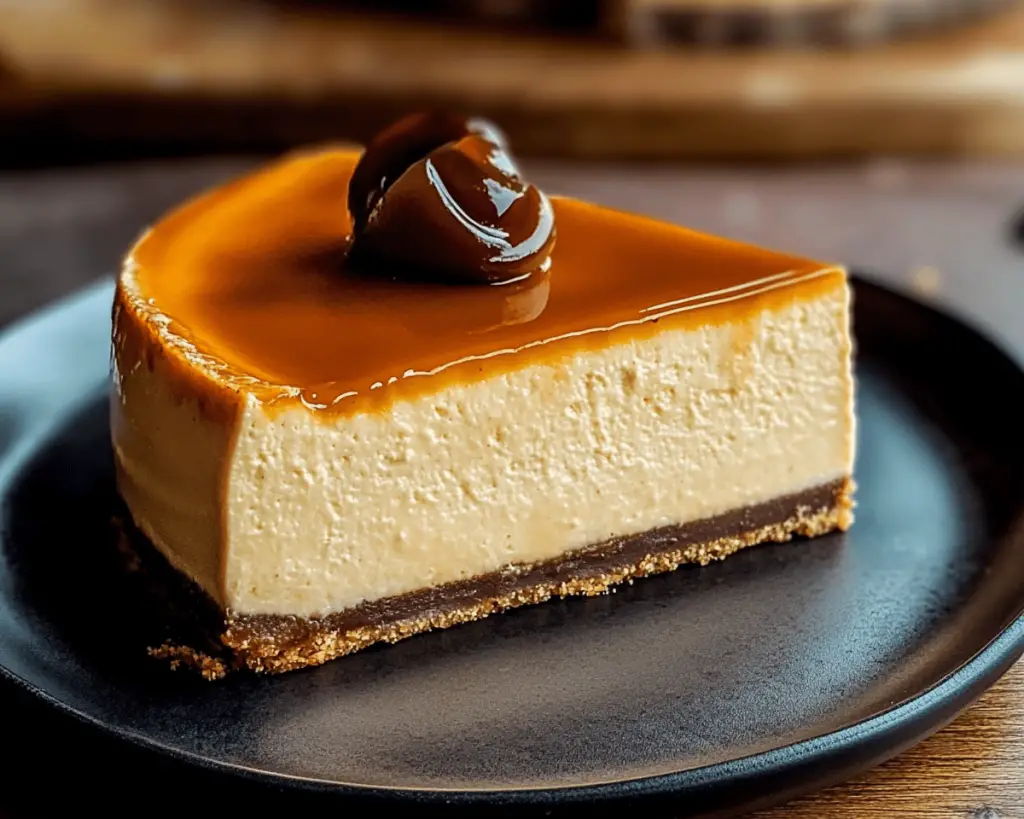
8. **Finishing Touch:** When you’re finally ready to serve, drizzle more dulce de leche over the top — seriously, don’t hold back! Want to impress the crowd? Consider dolloping some fresh whipped cream on each slice before you serve it—it’s always a crowd-pleaser.
Side Notes & Sassy Hacks
Bonus Tips You Didn’t Ask For
– **Dulce de Leche Hack:** In a pinch? You can create an instant dulce de leche by simmering a can of sweetened condensed milk in a pot of water. Just make sure the water level is always above the can’s top and simmer for about 2-3 hours. Voila! Gold medal dulce de leche right at your fingertips.
– **Crust Variations:** If you’re feeling adventurous, consider swapping out graham crackers for crushed chocolate cookies or digestive biscuits. I mean, chocolate + caramel = a taste explosion.
– **Freezer Friendly:** Not going to finish this bad boy in one sitting? Wrap slices tightly in plastic wrap and pop them in the freezer. They can last up to a month—or so they say. I won’t tell if you eat your stash in one night.
– **Skip The Guilt:** Serve with berries or a sprinkle of sea salt on the dulce de leche. You know, to give the illusion that you’re making it *healthier*.
Final Words of (Culinary) Wisdom
If you’ve made it this far, I just want to say that I hope you dive into this cheesecakey, dulce de leche-rific storm of flavors without reservation! Life’s too short not to indulge once in a while. If you try this out, please tag me on Instagram or send me virtual hugs because I want to relish in your victories! And remember, desserts have a way of connecting us, whether it’s celebrating a win or just making it through another week. Happy baking, and may your cheesecake vibes always remain strong!


