Prep time: 20 minutes
Cook time: 45 minutes
Total time: 1 hour 5 minutes
Servings: 8
Indulging in a slice of heart-shaped cherry pie is not just a treat; it’s an experience filled with sweetness and nostalgia. The aroma of baked cherries mingling with buttery crust brings back memories of family gatherings and celebrations. This Heart Shaped Cherry Pie Recipe is perfect for Valentine’s Day or any occasion that requires a touch of love. Whether you are a busy parent looking to surprise your loved ones, a beginner trying to navigate the kitchen, or anyone in between, this recipe guarantees a beautiful result that melts hearts. You’ll learn the best tips, tricks, and delightful variations to customize this classic dessert.
What Is Heart Shaped Cherry Pie Recipe – Easy Valentine’s Day Dessert?
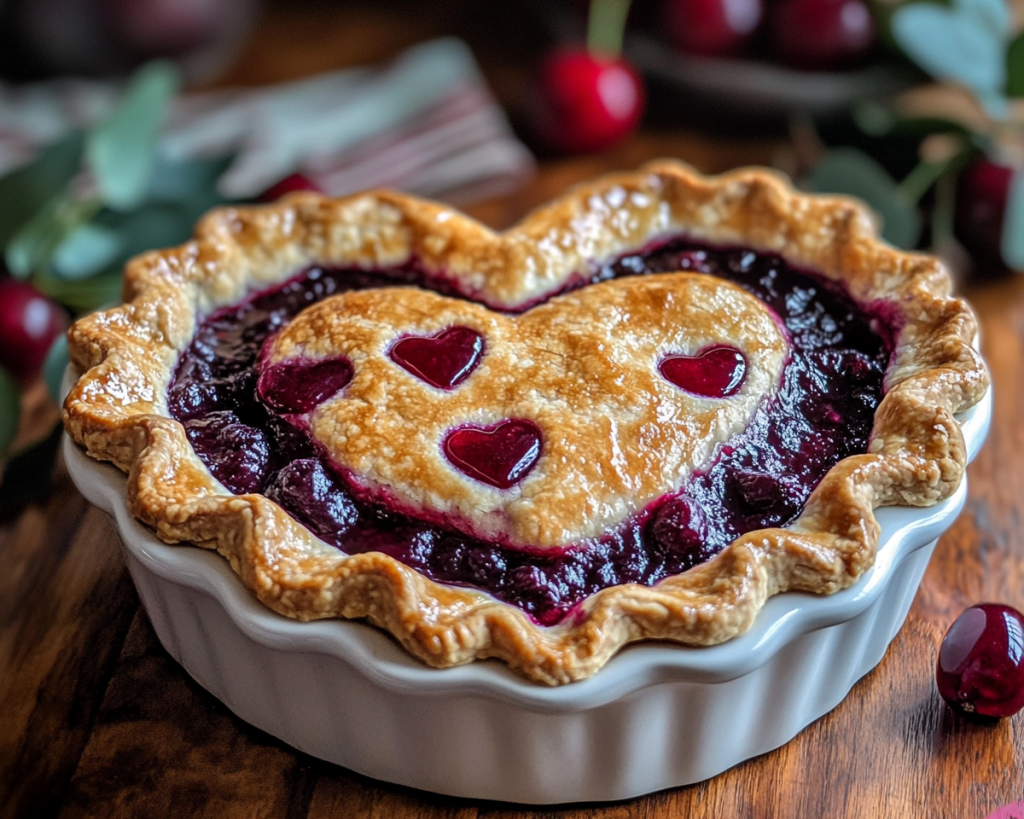
At its core, heart-shaped cherry pie is a delightful twist on the traditional cherry pie, emphasizing love and affection through its unique shape. The origin of cherry pie dates back to early American settlers who loved to make pies from the fruits they harvested. The cherry filling, bursting with flavor, is complemented by a flaky crust that provides a satisfying crunch. When transformed into a heart shape, the pie serves as a visual expression of love, making it an ideal choice for romantic celebrations.
The texture of this pie is a harmonious blend of flaky crust and juicy cherry filling. Each bite reveals a sweet and tart explosion thanks to the cherries, which lend a vibrant color and rich flavor. With the right blend of spices and a perfectly baked crust, this dessert is sure to impress. Whether enjoyed warm with a scoop of vanilla ice cream or cooled, it delivers a comforting hug in dessert form.
Why You’ll Love This
You’ll fall in love with this Heart Shaped Cherry Pie for several compelling reasons. Firstly, its taste is simply heavenly; the vibrant cherry flavor paired with the buttery crust creates a delightful balance of sweetness and tartness. Every bite is a little piece of heaven that makes you want to come back for more. Secondly, the ease of this recipe means it’s accessible to everyone, including beginners. With simple ingredients and straightforward steps, you can create a show-stopping dessert without feeling overwhelmed.
Cost-effectiveness is another benefit; cherry pie is often made with pantry staples, and fresh or even frozen cherries can fit within a budget. This makes it a fantastic option for those who want to impress without financial strain. Additionally, the recipe is versatile enough to allow for a touch of personalization, whether you prefer a more tart pie or want to incorporate flavors like almond extract or lemon zest.
Common misconceptions may lead you to think pie-making must be complicated, requiring special skills or tools. However, with this straightforward recipe, you’ll learn that creating a beautiful pie is simpler than it seems. Comparatively, this cherry pie is not just for baking enthusiasts—it invites everyone in the kitchen, encouraging creativity and innovation in the process.
Ingredients You’ll Need
- Cherry Filling: Fresh or frozen cherries are essential for this recipe, providing the primary flavor. Fresh cherries should be pitted and sliced. If using frozen, thaw and drain them to avoid excess moisture.
- Sugar: Used to sweeten the filling, sugar balances the tartness of the cherries. You can substitute it with honey or a sugar alternative if needed.
- Cornstarch: This thickens the filling and gives it the right consistency. If you prefer, you can also use arrowroot powder as a substitute.
- Lemon Juice: Adds acidity and enhances the flavor of the cherries. Using fresh lemon juice is recommended for brightness.
- Pie Crust: A buttery, flaky crust brings the whole pie together. You can either make your own or use store-bought to save time.
- Almond Extract: Optional but recommended, this adds a subtle depth of flavor that pairs beautifully with cherries.
- Salt: Just a pinch helps to enhance the other flavors in the pie.
- Egg Wash: An egg mixed with water or milk for brushing the crust, which gives the pie a lovely golden finish.
Understanding the role of each ingredient helps to achieve the best results. Embrace creativity in the kitchen by making substitutions where needed.
How to Make
- Begin by preparing the pie crust. If you’re making a homemade version, combine flour, butter, sugar, and salt in a bowl until crumbly. Gradually add cold water until the dough holds together. Wrap it in plastic wrap and refrigerate for at least 30 minutes.
- While the crust is chilling, move on to preparing the cherry filling. In a bowl, mix your pitted cherries with sugar, cornstarch, lemon juice, and optional almond extract. Allow the mixture to sit for about 10 minutes so the cherries release some juice.
- Preheat your oven to 375°F (190°C). After the crust has rested, divide it into two equal parts. Roll out the first half on a lightly floured surface until it’s about 1/8 inch thick. Use a heart-shaped cookie cutter to cut out shapes for the bottom and tops of the pie. Place the heart shapes in a pie dish, ensuring they cover the bottom completely.
- Pour the cherry filling into the prepared crust. Be mindful not to overfill, as the cherries will bubble during cooking. Roll out the second half of the dough and cut out heart shapes for the top. If you’re feeling creative, you can make a lattice top for a more refined look.
- Seal the edges of your pie by pinching them together. Brush the top with the egg wash for a beautiful golden color. Cut small slits in the top hearts to allow steam to escape during baking.
- Place the pie in the preheated oven, and bake for about 45 minutes, or until the crust is golden and the filling is bubbling. Keep an eye on it to avoid burning, and if necessary, cover the edges with foil to prevent over-browning.
- Once baked, remove from the oven and let it cool for at least 20 minutes before serving. This waiting period allows the filling to set. Enjoy your heart-shaped cherry pie warm or at room temperature!
Cooking is not just about following recipes; it’s about the joy of creating something special. Involve your family in the process, and don’t shy away from making it your own.
Variations & Substitutions
Cherry Almond Pie: Enhance the flavors by adding almond extract to the filling. This variation not only complements the cherries but also adds a unique depth that many find irresistible. If you or your loved ones are fans of almonds, this flavorful twist will surely make your pie stand out.
Classic Cherry Pie with Lattice Top: For those who want to give their pie a visually stunning appearance, try a lattice top. Roll out the second half of the dough and slice it into strips. Lay them over the pie in a crisscross pattern, sealing the ends. This presentation is attractive and allows for more filling exposure while baking.
Chocolate Cherry Pie: Indulge your taste buds by incorporating chocolate. Melt some dark chocolate and mix it into the cherry filling before adding it to the crust. The combination of chocolate and cherries creates a heavenly dessert perfect for chocolate lovers.
Gluten-Free Cherry Pie: For a gluten-free option, replace traditional flour with a gluten-free pie crust mix. Be on the lookout for brands that hold up well during baking. This makes the recipe more inclusive and allows those with gluten sensitivities to join in the fun.
Sugar-Free Cherry Pie: Use stevia or another sugar alternative instead of granulated sugar to create a dessert that’s lower in carbs but still sweet and satisfying. Be sure to check the conversions for the sweetener you choose as they often differ from regular sugar.
Each of these variations allows you to cater to different preferences, making this cherry pie both adaptable and exciting to prepare.
Common Mistakes to Avoid
Making pie is as much of an art as it is a science. One common mistake is using filling that is too watery. When using frozen cherries, be sure to drain extra liquid to avoid a soggy crust. Conversely, ensure you don’t add too much cornstarch, as the filling should be thick but not gummy.
Another mistake is neglecting to pre-bake the crust, especially for those who prefer a crisp bottom. If your filling is particularly juicy, consider an initial blind bake (baking the crust without the filling) for about 10 minutes before adding your cherry mixture.
Lastly, be cautious with the baking time. Too long in the oven can lead to a burnt crust while too little can yield an undercooked pie. Always keep an eye on it, and feel free to use a thermometer; the internal temperature should reach around 200°F (93°C) when fully baked. A little vigilance ensures you achieve that perfect golden-brown crust.
Storage, Freezing & Reheating Tips
Proper storage is essential to preserve the freshness of your cherry pie. If you have any leftovers, store them in the refrigerator, covered with plastic wrap or in an airtight container, where they can last for about 3 to 4 days. For optimal taste, enjoy it within the first couple of days.
If you wish to freeze your pie, make sure it’s completely cooled first. Wrap it tightly in plastic wrap and then in foil to prevent freezer burn. It can be kept frozen for up to 3 months. When you’re ready to enjoy it, thaw it in the refrigerator overnight before reheating.
To reheat, you can place slices in a microwave for about 20-30 seconds, or bake the entire pie at 350°F (175°C) for about 15–20 minutes, until warmed through. Be cautious with the reheating time to prevent the crust from becoming overcooked.
Food safety is crucial, especially when working with fruit fillings. Always make sure to check for any off smells or textures before consuming leftovers that have been stored.
Frequently Asked Questions
Can I use other fruits besides cherries?
Absolutely! Feel free to experiment with fruits like blueberries, raspberries, or even a mix of them for a fruit medley pie. Just adjust the sugar accordingly based on the fruit’s natural sweetness.
How can I tell when my pie is done baking?
You’ll know your pie is ready when the filling is bubbling and the crust is a lovely golden brown. If you have a thermometer, the internal temperature should be around 200°F (93°C).
Can I make this pie ahead of time?
Yes! You can prepare the pie a day or two in advance. Just store it in the refrigerator once baked, or you can freeze it as noted earlier.
What if the crust is too crumbly?
If your pie crust is crumbly, it may be due to too much flour or not enough water. Start with a smaller amount of flour next time and gradually add water until the dough comes together.
Is it possible to make this pie vegan?
Definitely! Use a vegan pie crust and substitute the egg wash with almond milk or soy milk. For the filling, ensure you’re using a sugar that’s not processed with bone char.
Conclusion:
This Heart Shaped Cherry Pie Recipe is an incredible way to share love and joy through baking. Its delightful flavors and beautiful presentation make it the perfect dessert for any special occasion or everyday treat. Now it’s your turn! Dive into this recipe, customize it to your liking, and create memorable moments around your dining table. Whether it’s for Valentine’s Day or just because, this pie is sure to be a hit. Happy baking!


