**Meta Title:** Spooky & Delicious Halloween Dinner: Cheeseburger Skulls
**Meta Description:** Get ready for Halloween with these cheesy, juicy cheeseburger skulls! A fun, spooky dinner idea perfect for family celebrations.
—
As the air grows crisp and the leaves start to turn orange and gold, Halloween begins to loom just around the corner. While visions of trick-or-treating and spooky decorations dance in your mind, I can’t help but focus on one thrilling aspect of the holiday: the food! We all know that Halloween is more than just candy; it’s an opportunity to create culinary magic that’ll delight kids and adults alike.
Imagine gremlins gathering around your dinner table, excitedly eyeing a platter of savory, cheesy cheeseburger skulls that are both creepy and irresistibly delicious. Yes, you heard that right—these are not just any ordinary burgers; they’re satisfying, perfectly seasoned, and molded into spooky skull shapes that will unleash your creativity in the kitchen.
With each bite, your family will enjoy the juicy flavor of a classic cheeseburger coupled with gooey cheese, making it perfect for chilly October nights when you want festive, fun, and easy comfort food. What’s even better is how simple this Halloween dinner idea is to pull together, ensuring that your haunted celebration gets a boost from the kitchen without anyone feeling overwhelmed.
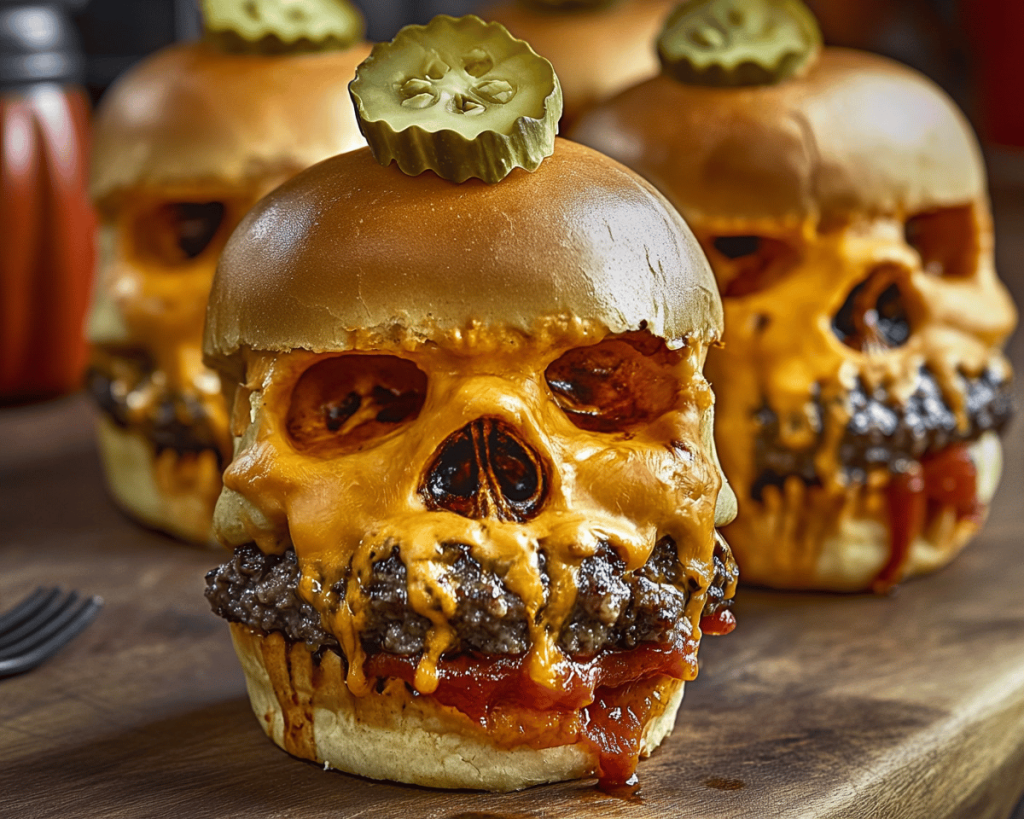
## What Are Cheeseburger Skulls?
Cheeseburger skulls are a playful twist on the classic cheeseburger, shaped into fun skull forms suitable for Halloween dinners, parties, or even a spooky movie night with friends. These skull-shaped patties are each bursting with **flavor**, thanks to a savory blend of beef, spices, and gooey cheese, encapsulated perfectly within a crispy outer shell made from bread.
The key ingredients—**ground beef**, **cheese**, and **buns**—combine to create bursts of juiciness and melty happiness with every bite. You can personalize your cheeseburger skulls with additional ingredients like sautéed onions, pickles, or your favorite condiments, ensuring they cater to every family member’s taste.
## Why You’ll Love This Halloween Dinner Idea
– **Spooktacular Fun**: These cheeseburger skulls add a fun and festive element to your Halloween dinner, perfect for kids and adults alike. They make dinner exciting!
– **Quick & Easy to Make**: With minimal prep and cook time, you can whip up these cheesy delights in no time. Gather your family—or your little monsters—to help shape and assemble!
– **Customizable**: Mix and match flavors! From the type of cheese to the kind of seasonings, you can adapt the recipe to your family’s liking.
– **Satisfying Comfort Food**: Juicy, cheesy, and oh-so-delicious, they deliver all the goodness of a burger while being ideal for cooler weather.
– **Great for Meal Prep**: You can prep the skull heads in advance and bake or fry them just before serving, making it a perfect option for busy Halloween nights filled with trick-or-treating.
– **Family-Friendly**: Kids will love the spooky shape, while grown-ups will relish the flavors. It’s a win-win for your Halloween gathering!
– **Photo-Ready**: Impress your guests with these Instagram-worthy skulls. They’re so cute, you might hesitate to eat them!
## Ingredients You’ll Need
To make your cheesy and juicy cheeseburger skulls, gather the following ingredients:
– **1 lb ground beef**: The star of the show! Choose a high-fat content for juicy burgers.
– **1 cup shredded cheddar cheese**: For that ooey-gooey flavor within the skulls.
– **1 tsp garlic powder**: It adds a punch of flavor to your meat.
– **1 tsp onion powder**: Enhances the savory notes in the patties.
– **1 tsp salt and pepper**: Essential for bringing out the flavors.
– **1 tbsp Worcestershire sauce**: Adds depth to the beef.
– **1 package of hamburger buns**: Opt for whatever bread you prefer; whole wheat adds a nice touch but classic white works too.
– **Optional spices**: If you like a little heat, try adding cayenne pepper or smoked paprika.
– **Cooking oil or butter**: For frying the skulls if you choose to go that route.
## How to Make Cheeseburger Skulls
Creating these skull-shaped cheeseburgers is easier than you might think! Let’s walk through the steps together.
### Step 1: Prepare the Meat Mixture
In a mixing bowl, add **1 lb of ground beef**. Sprinkle in **1 tsp garlic powder**, **1 tsp onion powder**, **1 tsp salt**, **1 tsp pepper**, and **1 tbsp Worcestershire sauce**. Use your hands or a wooden spoon to mix it until all seasonings are incorporated. Be careful not to overmix, as it could make the meat tough.
### Step 2: Shape the Skull Patties
Take a handful of the seasoned beef mixture and roll it into a ball. Flatten it gently into a patty that’s about ½ inch thick. If you have skull-shaped burger molds, this is the perfect time to use them for shaping. Press the mixture into the mold to get the skull form, making sure it’s compact and even. If you don’t have a mold, use your hands to shape the patties.
### Step 3: Add Cheese
Once you’ve formed the patties, create a pocket in the center of each patty. Take a small amount of **shredded cheddar cheese** (about 1-2 tablespoons) and place it in the center. Top with another patty to seal the cheese inside. Gently press the edges to make sure the cheese doesn’t ooze out during cooking.
### Step 4: Cook the Skull Patties
Heat a frying pan over medium heat and add a tablespoon of **cooking oil** or **butter**. Once the oil is shimmering, carefully place the skull patties in the pan. Cook for about 5-7 minutes on each side, or until they are nicely browned, and the internal temperature reaches 160°F (70°C). You can also grill them for a smokier flavor!
### Step 5: Toast the Buns
While the patties are cooking, slice your **hamburger buns** in half and lightly toast them in the oven or on a skillet. This adds an extra crunch to your cheeseburger skulls and enhances the overall texture.
### Step 6: Assemble the Skulls
Once the skull patties are cooked and the cheese is melted, place each one on a toasted bun. You can add toppings like lettuce, tomato, pickles, or your favorite sauces at this stage. Then, top it off with the other half of the toasted bun.
### Step 7: Serve with Style
Arrange your cheeseburger skulls on a decorative platter. You can add some spooky decoration like plastic spider rings or fake cobwebs for added flair. Pair them with fries or veggie sticks on the side for a complete Halloween feast!
## Expert Tips, Tricks & Variations
– **Skull Molds**: If you can find skull-shaped molds, they’ll make the process a breeze. But don’t worry if you can’t find one—shaping them by hand works just as well.
– **Pasta Sauce**: Consider serving a small bowl of marinara or a spicy ketchup next to the cheeseburger skulls for dipping. The contrast of flavors can heighten the experience!
– **Cooking Methods**: You can also bake these skulls in a preheated oven at 375°F (190°C) for about 15-20 minutes if you prefer a less greasy option. Just ensure they are cooked through!
– **Batch Cooking**: These cheeseburger skulls can be made in large quantities. Prepare and freeze uncooked patties, and you can pop them directly from the freezer into the pan when you need a quick meal.
– **Veggie Option**: For a vegetarian twist, use lentils, mushrooms, or black beans instead of ground beef. Just ensure you season them well for flavor!
## What to Serve With Cheeseburger Skulls
Here are a few suggestions to complement your Halloween feast:
– **Crispy Sweet Potato Fries**: Their sweetness perfectly balances the savory flavor of the cheeseburger skulls.
– **Coleslaw**: A citrusy slaw can provide a refreshing crunch against the hearty skulls.
– **Pumpkin Soup**: For an extra festive touch, serve a small bowl of pumpkin soup as an appetizer.
– **Creepy Cocktails**: Consider serving spooky-themed drinks, like a “Witch’s Brew” punch or blood-orange soda for a fun twist!
## Storage, Freezing & Meal Prep
If you find yourself with leftovers (which is unlikely with how delicious they are), here’s how to store them:
– **Store in the Fridge**: Place any unconsumed cheeseburger skulls in an airtight container. They’ll last for up to 3 days in the refrigerator.
– **Freezing**: If you want to stash some for later, freeze the cooked skulls on a baking sheet until solid, then transfer them to a freezer bag. They’ll keep well for up to 3 months.
– **Reheating**: To reheat, simply bake them in the oven at 350°F (180°C) for about 15-20 minutes or microwave for 1-2 minutes. Ensure they’re heated all the way through.
## Frequently Asked Questions
### Can I use different types of meat for cheeseburger skulls?
Absolutely! Ground turkey, chicken, or even plant-based alternatives like Beyond Meat can work wonderfully. Just make sure to season them well, as leaner meats may need some extra flavor.
### How can I make these cheeseburger skulls spicier?
If you love a kick, add chopped jalapeños or a dash of your favorite hot sauce into the beef mixture. You can also top the burgers with spicy mayonnaise or salsa.
### Can I prep these skulls in advance?
Definitely! You can shape the patties and freeze them until you’re ready to cook. Just allow extra time for cooking if they go into the pan frozen.
### What if I don’t have skull molds?
No problem! Shape them by hand; they’ll be just as tasty and fun. A little irregularity adds a homemade charm to each one!
### Are cheeseburger skulls suitable for kids?
Yes! Kids typically enjoy these spooky shapes. You can also involve them in the preparation for an interactive cooking experience.
—
Now it’s your turn—grab your ingredients and create this enchanting Halloween magic in your kitchen tonight! Whether it’s for a spooky dinner or a festive gathering, these cheeseburger skulls are sure to be a hit. Don’t forget to tag me when you try it and share your delicious creations! 🌟


