Prep time: 20 minutes
Cook time: 25 minutes
Total time: 45 minutes
Servings: 8
Springtime is a season filled with color and renewal, and what better way to celebrate it than by decorating a vibrant cake? In just five straightforward steps, you can transform a simple cake into a breathtaking centerpiece perfect for family gatherings, birthdays, or sunny afternoon picnics. This guide to easy spring cake decorating not only simplifies the decorating process but also inspires creativity, making it perfect for busy parents, kitchen beginners, or anyone looking to bring a touch of delight to their desserts.
What Is Easy Spring Cake Decorating: 5 Steps to a Gorgeous Cake?
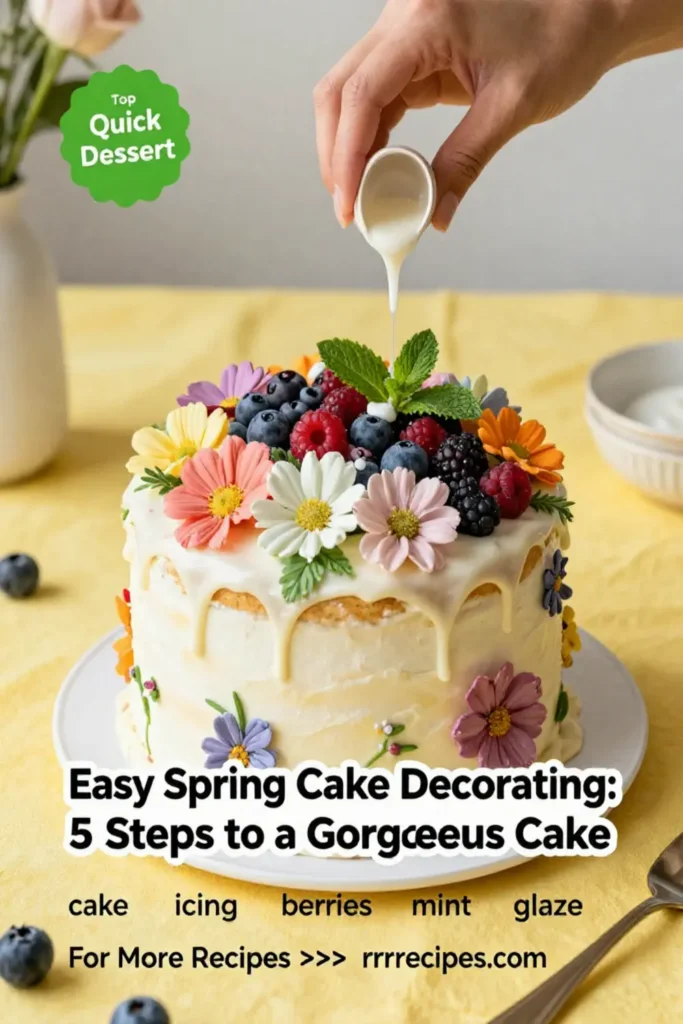
Easy spring cake decorating is all about utilizing fresh, vibrant ingredients and simple techniques to achieve an impressive visual appeal. This cake is often adorned with seasonal fruits, whipped cream, and edible flowers which reflect the essence of spring. With just a few basic ingredients and some straightforward steps, you can create a cake that not only looks appealing but also tastes fantastic.
Why You’ll Love This
You will love this recipe because it emphasizes simplicity and ease, allowing you to focus on enjoying the process rather than stressing over complex techniques. Here are a few reasons why this method stands out:
- Quick and easy: You can decorate your cake in less than an hour.
- Seasonal flavors: Utilize fruits that are in season for a fresh taste.
- Versatile: The decorating style can be adapted for various occasions.
- Family-friendly: Perfect for engaging children in the decorating process.
Ingredients You’ll Need
To make an irresistibly beautiful spring cake, here’s a list of the ingredients you will need:
- 2 cups all-purpose flour: This forms the cake’s base and gives it structure.
- 1 ½ cups sugar: For sweetness and moisture.
- 1 cup unsalted butter: Adds richness and flavor to the cake.
- 4 large eggs: Essential for binding and providing structure.
- 1 cup whole milk: Contributes to moisture and softness.
- 2 teaspoons baking powder: This helps the cake rise.
- 1 teaspoon vanilla extract: Adds depth of flavor.
- Seasonal fruits: Such as strawberries and blueberries, for decoration.
- Whipped cream: To add texture and taste.
- Edible flowers: Like pansies or nasturtiums, for a beautiful finishing touch.

How to Make
To create your stunning spring cake, follow these easy steps:
- Begin by preheating your oven to 350°F (175°C). Grease and flour two round cake pans. This will help the cakes release easily once baked. Ensure the butter and eggs are at room temperature to allow for better mixing.
- In a large mixing bowl, cream together the unsalted butter and sugar using an electric mixer until light and fluffy. This should take about 3-5 minutes. The mixture should exhibit a pale yellow color and a light, airy texture.
- Gradually add in the eggs, one at a time, mixing well after each addition. Scrape down the sides of the bowl to incorporate all ingredients effectively. This step ensures a homogenous batter.
- In a separate bowl, combine the flour and baking powder. Slowly add this mixture to the butter and egg mixture, alternating with the milk. Mix until just combined. Be careful not to over-mix, as this will affect the cake’s texture.
- Pour the batter evenly into the prepared pans and bake for approximately 25 minutes or until a toothpick inserted into the center comes out clean. Allow the cakes to cool in the pans for 10 minutes before transferring to wire racks to cool completely.
- Once the cakes are completely cool, spread a layer of whipped cream on top of one cake layer. Add a layer of seasonal fruits and then gently place the second layer on top. Finish by covering the entire cake with more whipped cream and decorating it with additional fruits and edible flowers for a fresh, vibrant look.
Variations & Substitutions
Fruit Variations: Depending on your preference, you can adapt the fruits used for decoration. Instead of strawberries and blueberries, consider using raspberries, peaches, or even citrus slices. Each fruit offers a unique flavor profile and enhances the cake visually with its colors.
Flavored Icing: If you want to add a unique touch to your whipped cream, consider flavoring it. A dash of almond extract or the zest from a lemon can provide a delightful twist that complements the cake beautifully.
Gluten-Free Option: You can substitute all-purpose flour for a gluten-free blend. Just ensure all other ingredients are gluten-free as well. This makes your cake accessible for those with gluten intolerances, and they will appreciate the effort!
Vegan Option: For a vegan version, replace butter with coconut oil and use flaxseed meal mixed with water as an egg substitute (1 tablespoon of flaxseed meal with 3 tablespoons of water for each egg). Use a dairy-free whipped cream alternative for the frosting.
Additional Toppings: Consider adding chocolate shavings or sprinkles for an extra touch of sweetness and texture. This variation not only enhances the visual appeal but also adds flavor and crunch.
Common Mistakes to Avoid
One common mistake is not measuring ingredients accurately. This can lead to unexpected results, such as a cake that is too dense or doesn’t rise properly. Always use the proper measuring cups for dry and liquid ingredients.
Another issue is not allowing cakes to cool completely before decorating. A warm cake will cause the whipped cream to melt and create a mess. Be patient and wait until the cake is fully cooled on the wire rack.
Additionally, skipping the greasing and flouring of the pans can result in the cakes sticking, making it difficult to remove them without breaking. Take the time to prepare your pans properly for a smooth baking experience.
Lastly, being heavy-handed with icing can mask the beautiful decoration beneath it. Aim for a light, airy layer that complements rather than overpowers the fruits and flowers.
Storage, Freezing & Reheating Tips
For best quality, store your decorated cake in the refrigerator if it isn’t consumed immediately. Cover it with plastic wrap or place it in an airtight container to prevent it from absorbing odors or drying out. This cake can be stored for up to 5 days in the refrigerator.
If you want to prepare ahead of time, the cake layers can be baked in advance. After cooling completely, wrap them tightly in plastic wrap and freeze. When you’re ready to decorate, simply thaw the layers overnight in the refrigerator and proceed with the decoration process.
Reheating a frosted cake is not recommended as the whipped cream may melt or separate. It’s best enjoyed cold and fresh. If you prefer warmed desserts, try serving a slice of the cake with warm fruit compote instead.
Frequently Asked Questions
Can I make this cake ahead of time?
Absolutely! You can bake the cake layers in advance and freeze them. Just be sure to let them cool completely before wrapping them tightly in plastic wrap. This way, you can prepare them a few days before your event.
How can I adjust the sweetness of the cake?
If you prefer a less sweet cake, you can reduce the sugar by up to a half cup. But be cautious, as sugar is essential for moisture. Alternatively, you could enhance flavor using extracts like vanilla or almond to compensate for the reduced sugar.
What if I can’t find edible flowers?
If edible flowers are unavailable, you can skip them or use additional fruits for decoration. Fresh mint leaves also provide a beautiful green contrast and are safe to use.
What’s the best way to prepare seasonal fruits for decoration?
Wash the fruits thoroughly and pat them dry. If using larger fruits like strawberries, slice them for better presentation. Arrange them artistically on the cake for maximum visual impact.
Can I use a cake mix instead of making the cake from scratch?
Yes, if time is tight, you can absolutely use a store-bought cake mix. Just prepare it according to the package instructions and then proceed with the decorating steps outlined above.
Conclusion:
Decorating an easy spring cake can be a delightful adventure brimming with flavor, color, and creativity. Whether you’re crafting this cake for a special occasion or simply to enjoy with loved ones, the straightforward steps outlined above ensure success. So gather your ingredients, get the kids involved, and let your imagination bloom. Enjoy your delicious masterpiece!


