**Prep time:** 20 minutes
**Cook time:** 45 minutes
**Total time:** 1 hour 5 minutes
**Servings:** 24 cake balls
There’s a certain cosmic chemistry that happens when autumn arrives and kitchens around the world start buzzing with the aroma of *pumpkin spice* and *warm baked treats*. One such delightful autumn creation is the **Easy Pumpkin Cake Balls**, a decadent treat that pairs beautifully with cider, coffee, or an evening bonfire. These little bites of joy not only capture the essence of fall but are also incredibly simple to prepare, making them ideal for busy parents, beginners, or anyone looking to whip up some seasonal fun for gatherings.
As the leaves turn color, the air becomes crisp, and festive gatherings abound, nothing satisfies quite like these rich and moist pumpkin cake balls. Dipped in creamy chocolate and decorated with festive sprinkles, they bring that perfectly cozy feeling we all crave. Plus, today I’ll walk you through each step of making these gems, share some variations you can try, and offer tips to ensure your cake balls are the hit of your next party.
What Are Easy Pumpkin Cake Balls?
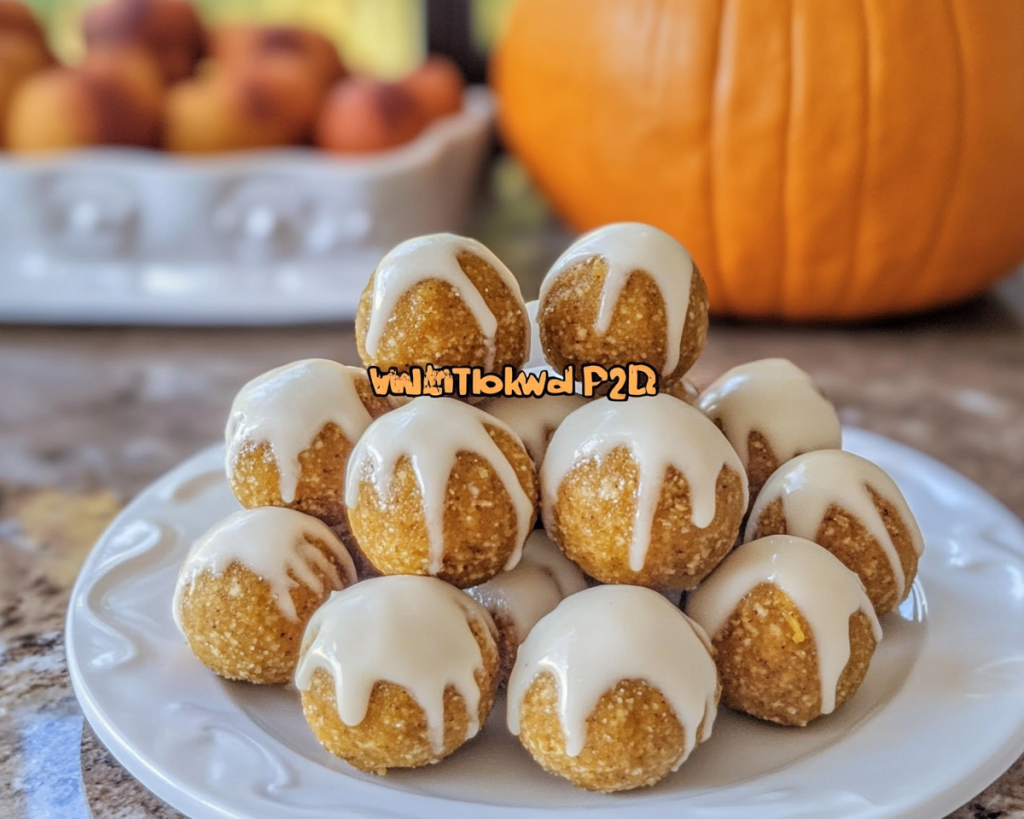
Pumpkin cake balls are bite-sized treats made from a moist pumpkin cake combined with cream cheese frosting, rolled into balls, and coated in chocolate. These delightful goodies boast a tender texture and a rich flavor profile that blends spiced pumpkin with a touch of sweetness. The soft cake centers and the crisp chocolate shell create a delightful contrast, making them irresistible — you might even find yourself stealing a few before serving!
Originating from popular cake pop trends, cake balls take on all kinds of flavors, but pumpkin is without a doubt the star during the fall season. With spices like cinnamon, nutmeg, and clove in the mix, each bite transports you to the heart of autumn, evoking memories of chilly November nights spent with family. The secrecy of the golden pumpkin mush combined with sweet frosting wrapped up in a chocolate shell offers a tantalizing experience for your taste buds, making them not only rich and satisfying but incredibly special for the time of year.
One of the best aspects of these pumpkin cake balls is their versatility. You can customize both the cake and the coating, allowing you to express your creativity while enjoying this simple recipe.
Why You’ll Love This Easy Pumpkin Cake Balls Recipe
There are countless reasons why you’ll adore these Easy Pumpkin Cake Balls. For starters, they capture the *delicacies of fall* in a compact treat, so you can enjoy the flavors of the season any time you wish. Let’s break down the benefits:
– **Taste:** The flavor combination of pumpkin and spices is heavenly, especially when coated in rich chocolate. Each bite is a delightful explosion of warm and familiar flavors that feel just like home.
– **Simplicity:** You don’t need advanced baking skills to make these cake balls. They’re straightforward, perfect for beginners or those short on time.
– **Cost-effective:** Making your treats is often more economical than purchasing them. With a few simple ingredients, you can whip up two dozen of these delightful bites!
– **Versatility:** You can easily modify this recipe to suit dietary preferences. Gluten-free cakes or vegan options can be used without compromising flavor and fun.
– **Perfect for gatherings:** Whether it’s a cozy fall gathering, a Halloween party, or Thanksgiving dessert, these pumpkin cake balls are sure to impress and entice guests of all ages.
Before we dive into the recipe, let’s gather the ingredients!
Ingredients You’ll Need
Here’s a straightforward list of the ingredients you’ll need for our Easy Pumpkin Cake Balls:
– **1 can (15 oz) of pumpkin puree:** The star ingredient, providing moisture and a rich flavor. Make sure to use pure pumpkin puree, not pumpkin pie filling. If you want a fresh taste, you can roast and puree your own pumpkin!
– **1 ½ cups all-purpose flour:** This gives structure to our cake balls. For a gluten-free version, gluten-free all-purpose flour works wonderfully.
– **1 cup granulated sugar:** A little sweetness in the mix; you can substitute with brown sugar for a richer flavor or use a sugar substitute if needed.
– **1 tsp baking powder:** This helps to leaven the cake slightly without making it too fluffy, setting the right texture for rolling.
– **1 tsp baking soda:** Adds lightness and creates a tender crumb.
– **1 tsp ground cinnamon:** The quintessential fall spice, imbuing the cake with warm flavor.
– **½ tsp ground nutmeg:** Adds complexity and depth to your cake with its earthy undertones.
– **¼ tsp ground ginger:** A hint of spiciness that complements pumpkin beautifully.
– **¼ tsp ground cloves:** A pinch of this adds a warming bite, perfect for autumn.
– **½ tsp salt:** Enhances the sweetness of the cake.
– **2 large eggs:** Provides richness and binds the mixture together. For a vegan option, substitute with flax eggs or a plant-based egg replacement.
– **½ cup vegetable oil:** Keeps your cake balls moist and tender. You can use melted coconut oil as a healthier alternative.
– **1 cup cream cheese frosting:** This is what brings our cake and cake balls together! Store-bought is fine, or you can make your own.
– **1 lb melting chocolate or chocolate chips:** The coating that gives our cake balls their charming appearance and smooth texture. Choose dark, milk, or white chocolate based on your preference.
– **Confetti sprinkles (optional):** For that celebratory look, especially great around any festivity!
How to Make Easy Pumpkin Cake Balls
Making these cake balls is a breeze and so enjoyable! Here’s how to do it step by step:
1. **Preheat the oven:** Start by preheating your oven to 350°F (175°C). This ensures the cake cooks evenly and rises correctly.
2. **Mix dry ingredients:** In a large mixing bowl, combine the all-purpose flour, sugar, baking powder, baking soda, salt, cinnamon, nutmeg, ginger, and cloves. Whisk everything together very well, ensuring the spices and leavening agents are evenly distributed throughout the flour.
3. **Combine wet ingredients:** In another mixing bowl, mix the pumpkin puree, eggs, and vegetable oil. Use a whisk to blend everything seamlessly until smooth.
4. **Combine mixtures:** Gradually pour in the dry ingredients to the wet mixture. Gently fold with a spatula or large spoon until just combined. Be careful not to overmix, as this can make the cake dense. The batter should be smooth and slightly thick.
5. **Bake:** Grease a 9×13 inch baking dish or line it with parchment paper, then pour the batter into the prepared dish. Spread it evenly and smooth the top with a spatula. Place it in the preheated oven and bake for 25 to 30 minutes, or until a toothpick inserted into the center comes out clean.
6. **Cool the cake:** Allow the cake to cool in the pan for about 10 minutes, then transfer it to a wire rack to cool completely. This is an essential step; they need to be completely cool before rolling them into balls.
7. **Prepare the frosting:** Once the cake is completely cooled, crumble it into a large bowl. You can use your hands or a fork for this part! Then, add the cream cheese frosting gradually. The amount will depend on how wet you want your cake balls to be; generally, start with half a cup and add more if necessary. The mixture should be moist enough to hold together when rolled into balls but not too wet that it falls apart.
8. **Roll the cake balls:** Use your hands to scoop out portions of the mixture and roll them into one-inch balls. Place them on a baking sheet lined with parchment or wax paper. Ensure there is space between each ball, as they need to be placed in the refrigerator for firming up.
9. **Chill the balls:** Refrigerate the rolled cake balls for at least 30 minutes or until firm. This step is crucial, as it helps keep your cake balls from falling apart during the coating process.
10. **Melt the chocolate:** While the cake balls are chilling, melt your chocolate or candy melts according to package instructions. If using a microwave, heat in 30-second intervals, stirring until you achieve a smooth consistency.
11. **Coat the cake balls:** Take the chilled cake balls out of the fridge one at a time. Dip each ball into the melted chocolate, coating it completely. Use a fork or a skewer to lift it out, allowing excess chocolate to drip off. Return the coated ball to the parchment-lined sheet.
12. **Add sprinkles (optional):** Before the chocolate hardens, sprinkle some festive confetti sprinkles on top of each ball. This gives them a lovely touch and adds color to your autumn treats.
13. **Let them set:** Allow the chocolate coating to harden, which should take approximately 30 minutes at room temperature. You can also refrigerate them for quicker setting.
14. **Enjoy:** Your pumpkin cake balls are now ready! Serve them at your fall gathering, or enjoy them as a sweet treat anytime you crave a fall indulgence.
4 Variations & Substitutions
While this Easy Pumpkin Cake Balls recipe offers everything you could want, don’t hesitate to get creative! Here are some fun variations and substitutions you might consider:
1. Gluten-Free Pumpkin Cake Balls
For those following a gluten-free diet, swap out regular all-purpose flour for a gluten-free blend. Make sure to choose a blend that contains xanthan gum for better structure. These gluten-free cake balls will be just as moist and delicious, ensuring everyone gets to enjoy them!
2. Vegan Pumpkin Cake Balls
To create a vegan version, use *flax eggs* instead of regular eggs (1 tablespoon of ground flaxseed mixed with 3 tablespoons of water equals one egg) and replace the cream cheese frosting with a dairy-free alternative. Also, opt for vegan chocolate melts for the coating. You will still have that rich and flavorful bite, minus the animal products.
3. Spicy Chocolate Coating
For extra kick, add a pinch of cayenne pepper or chili powder to your melted chocolate for a sweet and savory combination. This will surprise your taste buds and offer a unique twist to your pumpkin cake balls!
4. Pumpkin Spice Cake Balls
If you want to enhance even more of that pumpkin spice flavor, consider adding a pumpkin spice extract or even a splash of vanilla extract to the batter. This will deepen the flavor profile and bring a comforting aroma to your cake balls!
Common Mistakes to Avoid
To make sure your Easy Pumpkin Cake Balls turn out perfectly every time, here are some common pitfalls to avoid:
– **Using pumpkin pie filling:** Be sure to use pure pumpkin puree instead of pre-seasoned pumpkin pie filling. The latter contains added sugars and spices that can overwhelm the cake’s base flavor.
– **Overmixing the batter:** When combining the wet and dry ingredients, mix just until combined. Overmixing can lead to dense and tough cake balls instead of tender ones.
– **Not cooling the cake completely:** It is crucial that the cake is completely cooled before rolling into balls. If it’s still warm, the cake balls may crumble or not hold their shape.
– **Rushing the chilling process:** Don’t skip the step of chilling your rolled cake balls. If they are warm, they will melt when dipped in chocolate and may not have the desired consistency.
– **Using cold chocolate:** Ensure your chocolate is melted and at a warm temperature when dipping the balls. Cold chocolate can cause cracking and doesn’t provide a smooth coating.
Storage, Freezing & Reheating Tips
Store your Easy Pumpkin Cake Balls in an airtight container in the refrigerator, where they can stay fresh for about a week. If you find you have leftovers—although they’re bound to disappear quickly—you can also freeze them. Here’s how:
1. **Freeze:** Place the cake balls on a baking tray lined with parchment paper, not touching one another. Freeze for about 1-2 hours until solid.
2. **Transfer to a container:** Once firm, transfer the cake balls to an airtight container or freezer bag. They can be stored in the freezer for up to 3 months.
3. **Reheat:** To enjoy, simply let them thaw in the refrigerator overnight or at room temperature for a few hours. Avoid microwaving them, as this may cause the chocolate to become molten and lose texture.
Following food safety best practices is essential. Always ensure that when thawing, they remain at safe temperatures and avoid letting them sit at room temperature for more than a couple of hours.
Frequently Asked Questions
**1. Can I make the cake ahead of time?**
Absolutely! You can bake the pumpkin cake a day or two in advance. Just store it wrapped tightly in plastic wrap or in an airtight container at room temperature until you’re ready to turn it into cake balls.
**2. Can I use a different type of chocolate for the coating?**
Yes! You are welcome to use milk chocolate, dark chocolate, white chocolate, or even flavored melts like butterscotch or caramel. Each type of chocolate will impart its unique flavor to the cake balls, ensuring a delightful variety!
**3. How do I know if my cake is baked through?**
The best way to check if your cake is baked is to insert a toothpick in the center. If it comes out clean or with a few moist crumbs, your cake is done. If it comes out wet with batter, allow it to bake for a few more minutes.
**4. Can I add nuts or other mix-ins to the batter?**
Definitely! Consider adding walnuts or pecans for an extra crunchy texture that complements the soft and sweet cake. Just be sure to chop the nuts roughly so that they don’t overpower the cake.
**5. Are these cake balls kid-friendly?**
Yes! Pumpkin cake balls are a great treat for kids. They are small enough for little hands and pack a flavor that’s beloved by all ages. Plus, the fun of dipping in chocolate and decorating with sprinkles adds a fun, interactive element that kids will enjoy!
In conclusion, you’ve just acquired everything you need to dive into making decadent Easy Pumpkin Cake Balls. These treats promise taste, warmth, and happiness, all bundled up in a tiny package. Whether you’re making them for an autumn potluck, a Halloween party, or simply to enjoy at home, these cake balls will surely be a crowd-pleaser. So preheat that oven, gather your ingredients, and create some sweet memories this fall with your delightful pumpkin cake balls. Don’t forget to customize the flavors or share this recipe with friends and family. Happy baking!


