**Meta Title:** Easy No-Bake Butterfinger Balls Recipe
**Meta Description:** Indulge in these easy No-Bake Butterfinger Balls! With just a few ingredients, create the ultimate creamy, crunchy treat that everyone will love.
—
You know that moment when a sweet craving hits, and all you want is something rich, creamy, and utterly delightful? Perhaps it’s a lazy afternoon or a spontaneous dessert party, and you’re left wondering what to whip up. Enter the **Easy No-Bake Butterfinger Balls**! These heavenly little bites encapsulate the satisfying crunch of Butterfinger candy bars, cloaked in a smooth chocolatey coating that melts in your mouth. They’re the perfect sweet treat to share with family or enjoy all by yourself—no baking required!
In this article, you will learn how to make these irresistible treats with ease, while also exploring their flavor, why they’re beloved, and clever variations to try. With simple ingredients you can easily find at home or at your local grocery store, I’m excited to guide you step by step through the process of making these delicious no-bake wonders.
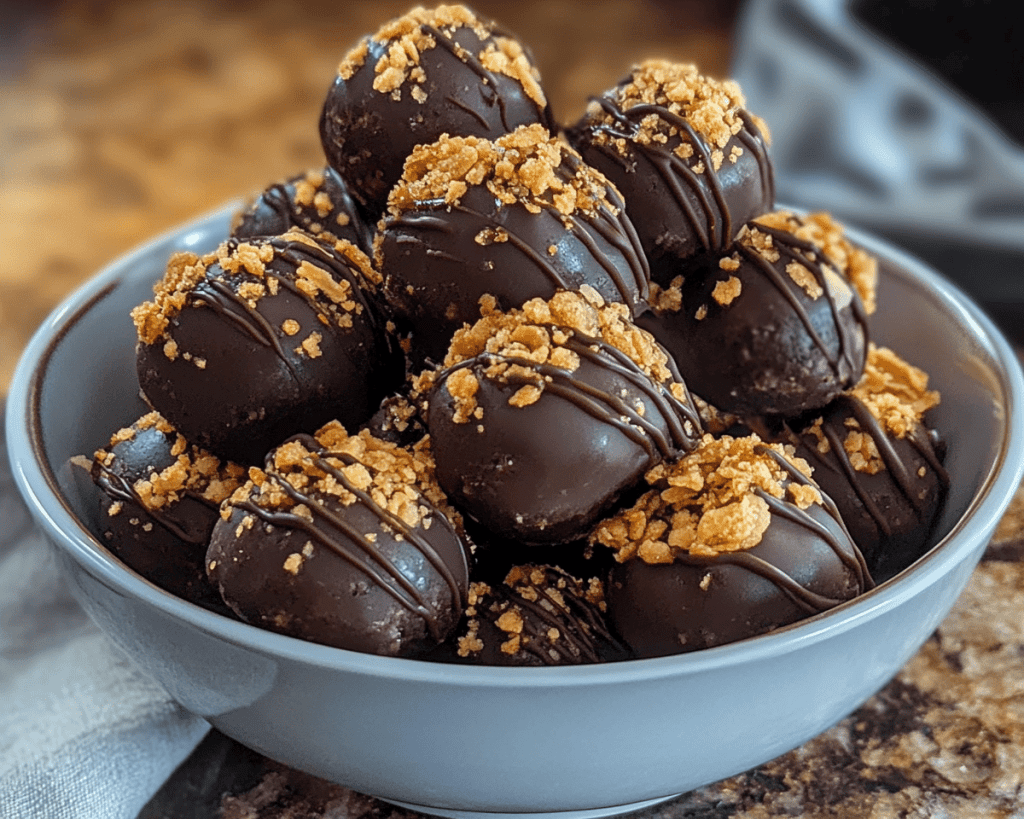
What is No-Bake Butterfinger Balls?
At its core, a **no-bake Butterfinger ball** is a delightful confection made from crushed Butterfinger bars mixed with a creamy peanut butter and powdered sugar base. This mixture is rolled into bite-sized balls, chilled, and then dipped in a rich chocolate coating. The resulting treat satisfies both the sweet tooth and the desire for something crunchily textured.
Originating from the popular Butterfinger candy bar, these bites take the beloved flavors of buttery, crunchy peanuts and chocolate and transform them into a fun, easy-to-make dessert that doesn’t require a stovetop or oven. Imagine sinking your teeth into a creamy sphere that bursts with that nostalgic and iconic Butterfinger crunch mixed with smooth chocolate. It’s like a cozy hug for your sweet tooth!
Why You’ll Love This Easy No-Bake Butterfinger Balls Recipe
This **Easy No-Bake Butterfinger Balls Recipe** is a true crowd-pleaser for many reasons. First and foremost, it’s simplicity—just a handful of ingredients mixed together and you’re ready to go. You don’t need to worry about baking times or tricky techniques. The most complicated step is melting the chocolate, and even that’s pretty straightforward!
Moreover, they’re convenient! Perfect for last-minute gatherings or when you want to indulge in something sweet without the hassle. They also make a fantastic gift, beautifully packaged in a cute tin or box. Just imagine your friends or family’s faces lighting up when they receive these treats!
Another reason to fall in love with this recipe is its versatility. You can swap out ingredients, add mix-ins, or customize the toppings. Plus, they’re budget-friendly, requiring minimal investment for delightful results. Whether you’re preparing them for a family movie night or just because, these simple little bites guarantee happiness.
Ingredients You’ll Need
Here’s what you’ll need to make these luscious **no-bake Butterfinger balls**:
1. **Butterfinger Candy Bars** – The star of the show! Choose the best quality Butterfinger bars; they should be crunchy and fresh. If you prefer, you can use crushed Butterfinger crumbs, but I find that whole bars provide the best texture.
2. **Creamy Peanut Butter** – This luscious ingredient binds the mixture together and enhances the overall flavor. You can opt for natural peanut butter for a healthier twist, but the creamy varieties work beautifully for sweetness.
3. **Powdered Sugar** – This adds sweetness and helps to create a perfectly moldable mixture. Make sure to sift it first to avoid lumps for a smooth final product.
4. **Vanilla Extract** – Just a dash! It elevates the flavor profile, giving these balls an aromatic touch. You can also use almond extract for a nutty flavor.
5. **Chocolate Chips** – For dipping! Semi-sweet chocolate chips are a classic choice, but you can also experiment with milk chocolate, dark chocolate, or even white chocolate for a fun twist.
6. **Sprinkles or Crushed Nuts (optional)** – These are optional but can make for beautiful decoration and an additional crunch. Choose colorful sprinkles for a festive touch or crushed peanuts to enhance the crunchiness.
How to Make Easy No-Bake Butterfinger Balls
Ready to create your sweet masterpiece? Follow these simple steps to whip up your very own **No-Bake Butterfinger Balls**!
1. **Prepare Your Ingredients**
Start by gathering all your ingredients. Unwrap your Butterfinger bars, and chop them into small pieces or pour them into a zip-top bag and crush using a rolling pin. The pieces should be roughly the size of chocolate chips to ensure an even distribution.
2. **Mix the Base**
In a large bowl, combine the crushed Butterfinger bars, creamy peanut butter, and sifted powdered sugar. Add in the vanilla extract. Use a spatula or your hands to mix until the ingredients are well combined, and you have a slightly sticky but firm dough. Don’t hesitate to get in there with your hands for the best results!
3. **Shape the Balls**
Once combined, use a small cookie scoop or your hands to portion out the mixture into balls, about 1 inch in diameter. Roll the mixture between your palms to create smooth and even balls. Place them on a parchment-lined baking sheet.
4. **Chill the Dough**
Refrigerate the rolled balls for about 30 minutes, allowing them to firm up. This step is essential to make them easier to coat with chocolate.
5. **Melt the Chocolate**
While the balls chill, melt your chocolate chips. You can do this in a microwave-safe bowl in 30-second intervals, stirring between each until completely melted and smooth. Alternatively, you can use a double boiler for a more controlled melting process. If desired, you can add a teaspoon of vegetable oil to the chocolate to make it easier to dip in.
6. **Dip and Decorate**
Remove the chilled Butterfinger balls from the fridge. Using a fork or a toothpick, dip each ball into the melted chocolate, allowing any excess to drip off. Place them back onto the parchment-lined baking sheet and quickly sprinkle with optional decorations like crushed nuts or sprinkles while the chocolate is still soft.
7. **Let Them Set**
Once all the balls are dipped and decorated, place the tray back in the refrigerator for about 15 to 20 minutes until the chocolate is set.
8. **Enjoy!**
Once the chocolate has hardened, your **Easy No-Bake Butterfinger Balls** are ready to be enjoyed! Store any leftovers in an airtight container in the fridge for up to a week (if they last that long!).
Tips, Tricks & Variations
Here are some expert tips to make your no-bake Butterfinger balls even better:
1. **Storage**: These treats last about one week in an airtight container in the refrigerator. For longer storage, consider freezing them for up to three months—just thaw at room temp before enjoying!
2. **Dipping Variations**: Try using different types of chocolate for dipping. White chocolate provides a sweet contrast, while dark chocolate adds a rich, sophisticated flavor. You can also create a marble effect by swirly dipping!
3. **Healthy Twist**: For a healthier version, use natural peanut butter and reduce the amount of powdered sugar, or substitute it with honey or maple syrup.
4. **Add Mix-Ins**: Consider adding crushed nuts, shredded coconut, or even some crispy rice cereal for additional texture and flavor!
5. **Unique Flavors**: Play around with other extracts, like peppermint or coconut, to give your Butterfinger balls a seasonal twist.
What to Serve With No-Bake Butterfinger Balls
While these **No-Bake Butterfinger Balls** are delightful on their own, consider pairing them with these delicious accompaniments for a complete dessert offering:
– **Coffee**: A rich, dark coffee will complement the sweet and salty flavor of the bars perfectly.
– **Milk**: A classic pairing that never does wrong! You can even serve it with flavored milk, like chocolate or almond.
– **Ice Cream**: These treats can be used to make a fun sundae! Top a scoop of vanilla or chocolate ice cream with chopped Butterfinger balls, drizzled chocolate, and whipped cream.
Nutrition & Health Benefits
These no-bake treats are not just delicious, but they can also be a part of a balanced diet when enjoyed in moderation. Each Butterfinger ball contains roughly 120 calories, depending on the serving size and ingredients used. They provide a quick source of energy due to the sugar and fat content from the peanut butter and chocolate.
For more specific nutritional details and health benefits, check out credible sources like [Healthline](https://www.healthline.com/) for insightful information about ingredients like peanut butter being a good protein source and how to balance sweet treats in your diet without overdoing it .
Frequently Asked Questions
1. **Can I make these peanut-free?**
Absolutely! You can replace the peanut butter with almond butter or sunflower seed butter for a nut-free alternative. Just ensure that your choice of butter matches well with the flavor profile.
2. **Can I use homemade peanut butter?**
Yes, as long as it’s creamy! Homemade peanut butter can add a fresh taste, but ensure it’s smooth enough to bind the ingredients.
3. **What can I use instead of chocolate chips for coating?**
You might try candy melts or coating chocolate, which can often be melted easily and provide a variety of colors and flavors.
4. **Are these suitable for a gluten-free diet?**
Yes, just make sure to use certified gluten-free ingredients, especially the Butterfinger bars, as some brands may use ingredients that contain gluten.
5. **How long does it take to set in the fridge?**
The chocolate coating typically takes 15-20 minutes to set in the refrigerator. However, for the balls to firm up initially, a longer chill time of 30 minutes is recommended.
—
Now that you’re armed with this **Easy No-Bake Butterfinger Balls Recipe**, it’s time to head into the kitchen and craft your sweet creations! Imagine delighting your family or friends with these delectable little bites—each one a perfect fusion of creamy, crunchy, and delectable chocolatey goodness.
If you loved this recipe, leave a comment or tag me on Instagram when you share your creations. Your friends and family are going to be begging for more! Happy cooking!


