Prep time: 15 minutes
Cook time: 15 minutes
Total time: 30 minutes
Servings: 4
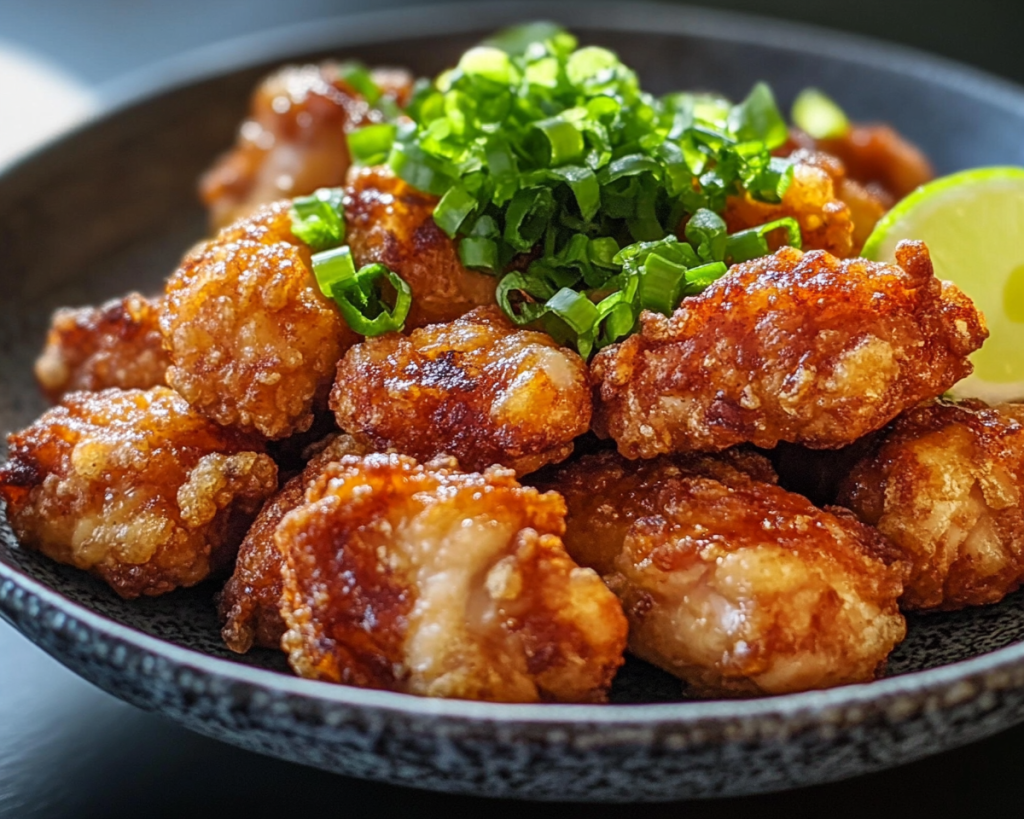
When it comes to Japanese cuisine, the delightful crunch and mouthwatering flavor of Chicken Karaage often stand out. Picture perfectly seasoned chicken, marinated to perfection and then fried until crispy on the outside, juicy on the inside. If you’ve ever craved a dish that makes every bite feel like a treat, this is it. Easy Homemade Chicken Karaage captures all those delightful textures and flavors right in your kitchen.
What makes this recipe particularly special is its simplicity and the ability to customize it based on your preferences. Whether you’re a busy parent looking for a quick meal, an aspiring chef wanting to add a Japanese classic to your repertoire, or someone who simply loves indulging in great food, this recipe has something for everyone. In this guide, we’ll walk you through the effortless process of making these crunchy Japanese chicken bites, providing you with tips and tricks at every turn, variations to try, and answers to some frequently asked questions.
What Is Easy Homemade Chicken Karaage – Crunchy Japanese Chicken Bites?
Chicken Karaage is a traditional Japanese dish that features bite-sized pieces of chicken marinated in a flavorful blend of ingredients. Originating from Japan, the word “karaage” refers to the method of deep-frying food, often with a light coating of starch. This cooking style allows the chicken to become beautifully crispy on the outside while retaining its tender juiciness on the inside.
Usually served as an appetizer or side dish, Chicken Karaage is frequently enjoyed with rice and a side of salad or dipping sauces. The taste is a harmonious blend of savory, umami flavors, often highlighted with hints of garlic and ginger. Using ingredients like soy sauce and rice vinegar adds an authentic touch, transporting your taste buds straight to the streets of Tokyo. Easy Homemade Chicken Karaage also gives you the opportunity to experiment with different seasonings, making each batch uniquely yours.
The texture of the chicken after frying is key; it should be crunchy yet not overly greasy. When prepared correctly, you’ll find that this dish draws you in with its alluring aroma and keeps you coming back for more with every bite; it’s a comforting reminder of home cooking, no matter where you are.
Why You’ll Love This
The beauty of Easy Homemade Chicken Karaage lies in its simplicity and versatility. Not only is it delicious, but it’s also incredibly economical, making it a perfect option for families. The ingredients are often pantry staples, which means you won’t have to make a special trip to the store. Additionally, the use of **boneless, skinless chicken thighs** ensures a succulent meat that cooks quickly, providing a meal that’s easy to whip up even on busy weeknights.
Beyond being just crunchy and flavorful, Chicken Karaage opens up a world of culinary exploration. You can serve it with rice and a salad for a complete meal or as finger food during gatherings. This dish is also a crowd-pleaser, making it an ideal choice for entertaining. Some may wonder if frying at home is daunting or messy; however, it’s quite manageable with some preparation and the right techniques. Proper marination and oil temperature are crucial here to achieve that crispy texture without the chicken becoming greasy.
Whether you’re a beginner in the kitchen or an experienced home cook, you’ll find that this recipe can empower you to recreate authentic Japanese flavors effortlessly.
Ingredients You’ll Need
- Chicken thighs: 500 grams, boneless and skinless, usually yielding a juicier result compared to chicken breasts.
- Soy sauce: 3 tablespoons for that umami depth and saltiness; can substitute with a low-sodium version if desired.
- Rice wine or sake: 2 tablespoons, helps to tenderize the meat and adds a layer of complexity to the flavor.
- Grated ginger: 1 tablespoon, brings a hint of sharpness and aromatic quality.
- Garlic: 2 cloves, minced; enhancing the overall aroma and richness.
- Potato starch or cornstarch: 1 cup, essential for the crispy coating once fried.
- Oil: For frying, a neutral oil such as vegetable or canola is ideal for high frying temperatures.
- Lemon wedges: For serving, adds a refreshing zest.
Each of these ingredients plays a vital role in creating the final dish. The chicken serves as the heart of this recipe, while the marinade ensures it’s packed with flavor. The starch coating is critical for achieving that crunch that everyone loves. Should you need substitutions or adjustments based on dietary restrictions, feel free to experiment. For example, gluten-free soy sauce can replace regular soy sauce if needed, and you might use arrowroot flour instead of cornstarch for those following a grain-free diet.
How to Make
1. **Prepare the Marinade:** Start by gathering your ingredients. In a large mixing bowl, combine the soy sauce, rice wine or sake, grated ginger, and minced garlic. Whisk these until well blended. This combination creates the aromatic marinade that will infuse your chicken with flavor.
2. **Marinate the Chicken:** Cut the boneless chicken thighs into bite-sized pieces and add them to the marinade. Make sure every piece is thoroughly coated, as this ensures the flavors seep deep into the meat. Cover the bowl with plastic wrap and let it marinate for at least 15 minutes; for deeper flavor, marinate it in the fridge for up to 2 hours. Don’t rush this step, as it significantly impacts the overall taste.
3. **Prepare for Frying:** After the marination time, remove the chicken from the fridge and let it rest at room temperature for a few minutes. Meanwhile, pour the potato starch or cornstarch into a shallow dish. Take each piece of marinated chicken and dredge it in the starch, making sure it’s evenly covered. This starch coating is the key to achieving that well-known crunch.
4. **Heat the Oil:** In a deep pan or a heavy-duty pot, pour enough oil to submerge the chicken pieces (about 2-3 inches deep). Heat the oil over medium temperature until it reaches around 160–170°C (320–340°F). To test if the oil is ready, drop a small pinch of the starch into the oil. If it sizzles, you’re good to go!
5. **Fry the Chicken:** Carefully place the coated chicken pieces in the hot oil, ensuring not to overcrowd the pan. Depending on your pan size, you may need to fry them in batches. Fry each batch for about 5-6 minutes until they turn golden brown and crispy. Maintaining the oil temperature is crucial; too low, and the chicken absorbs oil, too high, and you risk burning the coating.
6. **Drain and Serve:** Once cooked, transfer the chicken to a plate lined with paper towels to drain any excess oil. Allow them to rest briefly to maintain crispiness, and ready your lemon wedges for serving. Enjoy your crispy Chicken Karaage with a side of rice and salad or grab them as is; they are delicious either way!
Variations & Substitutions
Spicy Chicken Karaage: If you’re someone who enjoys a bit of heat, consider adding 1-2 teaspoons of chili flakes or spicy sesame oil to your marinade. The spice can drastically change the overall flavor profile, bringing an exciting kick to your chicken. This variation is perfect for those who love a zesty twist that complements the original taste. Serve with a cooling dipping sauce made from yogurt or sour cream to balance the heat.
Vegetarian Karaage: For a vegetarian alternative, replace the chicken with cubed **tofu** or **seitan**. Press the tofu to remove excess moisture for the best texture. Marinate as you would the chicken and follow through the frying process. The satisfying crunch combined with the flavors will ensure this dish pleases both vegetarians and meat-lovers alike.
Citrus Marinade:** Using fresh orange juice or yuzu instead of rice wine can yield a refreshing citrusy touch that elevates the flavor. Simply replace the rice wine with an equal amount of citrus juice and use the zest for additional aroma. This is a delightful variation particularly in warmer months when fresh citrus is in season.
Karaage Bowl: If you want to transform this dish into a complete meal, consider making a Karaage rice bowl. Serve the pieces over a bed of rice and top with pickled vegetables and a drizzle of your favorite sauce. This makes a satisfying one-bowl meal that is both comforting and nourishing.
Common Mistakes to Avoid
One common mistake is not allowing the chicken to marinate long enough. The marinade acts as a tenderizer; if you skip sufficient marination, the chicken won’t absorb those wonderful flavors. Aim for at least 15 minutes, but let it sit longer when you can.
Another critical point is **not checking the oil temperature** before frying. If the oil isn’t hot enough, the chicken will absorb excess oil and become greasy rather than crispy. Use a thermometer or the simple test mentioned earlier to check for readiness.
Lastly, be cautious about overcrowding the pan. Frying too many pieces at once can lower the oil temperature drastically, resulting in unevenly fried chicken. It’s better to fry in smaller batches to achieve that perfect golden crust.
Storage, Freezing & Reheating Tips
For any leftover Easy Homemade Chicken Karaage, allow it to cool completely before transferring it to an airtight container in the refrigerator. It should last for about 3-4 days. Reheating can be tricky; to retain that signature crunch, consider using an oven or an air fryer at 180°C (350°F) for about 10-15 minutes.
If you wish to freeze the chicken, arrange them in a single layer on a baking sheet to freeze individually before transferring to a freezer-safe container. This prevents clumping. When you’re ready to enjoy the leftovers, deep-fry straight from frozen to maintain the crunch or oven-bake them until heated through.
It’s worth noting that proper food safety practices are essential; always store the chicken within 2 hours of cooking, and only reheat once to prevent any food safety issues.
Frequently Asked Questions
Can I make Chicken Karaage ahead of time? Yes, you can marinate the chicken and freeze it for future use. Just remember to adjust the cooking times accordingly if the chicken is frozen. It’s best to fry them just before serving for maximum crunch.
What type of oil is best for frying Chicken Karaage? The best oils for frying are those with high smoke points, such as canola, vegetable, or peanut oil. These oils allow for higher cooking temperatures without burning.
Can I bake Chicken Karaage instead of frying it? While true Chicken Karaage is traditionally fried for the best results, you can bake them if you prefer a healthier alternative. Bake them at around 200°C (400°F) for about 20-25 minutes, flipping halfway through, but note that the texture will differ.
Is Chicken Karaage gluten-free? Typically, Chicken Karaage is not gluten-free because of the soy sauce used. However, you can use a gluten-free soy sauce alternative to make this dish suitable for gluten-sensitive individuals.
How do I know when my Chicken Karaage is done? The chicken should be golden brown and reach an internal temperature of 75°C (165°F). The outside should be crispy, and a meat thermometer can easily help ensure it’s safely cooked.
Conclusion:
Easy Homemade Chicken Karaage is a dish that combines satisfying crunch with deep, flavorful layers. With minimal effort and ingredients, you can bring a piece of Japan into your home kitchen, making for the perfect addition to family meals, parties, or even a casual snack. Don’t hesitate to personalize this recipe to suit your tastes, and remember—every experience in cooking enhances your skills. Dive in, enjoy the process, and share this delightful dish with friends and family; you’ll be thrilled by the smiles it brings!


