Prep time: 30 minutes
Cook time: 20 minutes
Total time: 50 minutes
Servings: 20 cake pops
Easter season is a time for celebration, family gatherings, and of course, delightful sweets. One treat that has captured the hearts of both children and adults alike is the wonderfully tasty Easter Vanilla Cake Pops. These delightful bites are not just visually appealing but also incredibly satisfying. They serve as a perfect way to bring a festive spirit to your table while also being a fun activity for the whole family. The joy of crafting these cake pops lies in their versatility and the creativity involved in decorating them. In this article, you’ll discover not just how to make these cake pops but also tips to enhance their flavor, variations to try, and answers to common questions.
What Is Easter Vanilla Cake Pops?
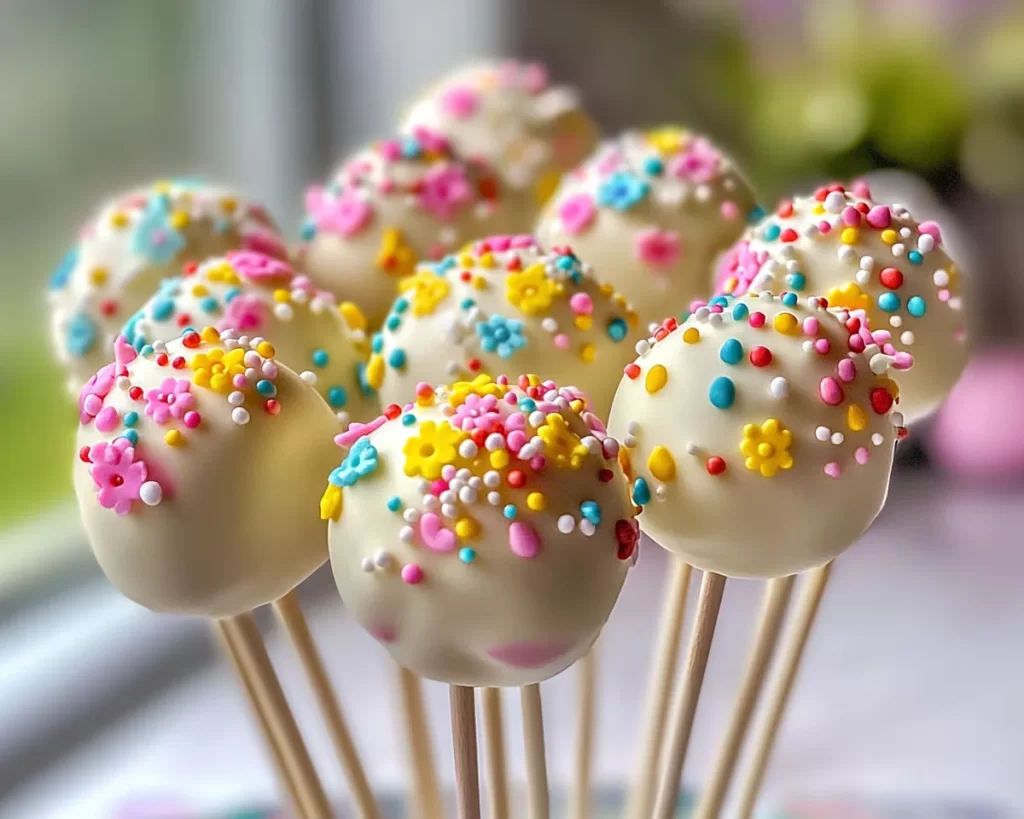
Easter Vanilla Cake Pops are small, round cake balls coated in a layer of candy coating or chocolate, usually served on a stick. They originate from the cake pop phenomenon, which gained immense popularity in recent years, particularly for celebrations and parties. The use of vanilla cake brings a light, fluffy texture and a sweet flavor profile that pairs wonderfully with various decorations. When you take a bite, you experience a delightful combination of creaminess from the frosting and the rich texture of the cake that melts in your mouth.
What makes these Easter Vanilla Cake Pops even more special is the opportunity for customization. You can personalize them with different colored coatings, sprinkles, and edible glitter for a festive touch. The visual appeal of these cake pops is undeniable, making them perfect for Easter celebrations or any gathering. They are not only festive but also extremely enjoyable to eat, especially for kids who find them fun and easily manageable—after all, who doesn’t love a sweet snack on a stick?
Why You’ll Love This
One of the biggest reasons to fall in love with Easter Vanilla Cake Pops is their incredible taste. These cake pops combine a soft vanilla cake with sweet frosting, creating a luxurious bite-sized treat that leaves you wanting more. They are rich in flavor yet light enough to not overwhelm your palate, making them ideal for any time of the day.
Another fantastic aspect is the ease of preparation. The steps are straightforward, making it accessible for busy parents or beginners in the kitchen. Not to mention, they are budget-friendly, requiring minimal ingredients while delivering maximum satisfaction.
The versatility of these cake pops also extends to dietary needs, as you can easily tweak the recipe—substituting gluten-free cake mixes or using dairy-free chocolate coatings—making them suitable for those with various dietary restrictions. However, a common misconception is that cake pops are too complicated; in reality, they can be made with simple ingredients and have a minimal mess factor.
Ingredients You’ll Need
- Vanilla Cake: This forms the base of your cake pops. You can use store-bought or homemade.
- Frosting: A good quality vanilla frosting is essential for binding the cake and adds flavor. You can use buttercream or cream cheese frosting as alternatives.
- Candy Coating or Chocolate: This is used to cover the cake pops. You can find various flavored candy melts in stores. Dark, milk, or white chocolate can be used as substitutes.
- Sprinkles or Edible Decorations: These make your cake pops festive and visually appealing. Choose from a variety of colors that remind you of Easter.
- Decorative Sticks: These are the base for your cake pops. You can find these in craft stores or baking specialty shops.
Knowing the role of each ingredient can change how you prepare these delightful treats. If you don’t have frosting, consider pureed fruit or cream cheese, which can add unique flavors.
How to Make
- Prepare the Cake: Begin by preparing your vanilla cake according to the package instructions or your chosen recipe. Ensure that it cools completely before proceeding. The cooling process is critical as warm cake may affect the texture and binding in your cake pops.
- Crumble the Cake: Once the cake is completely cooled, crumble it into fine pieces using your hands or a food processor. You want the texture to mimic fine sand; this ensures a smooth consistency when mixed with the frosting.
- Add Frosting: In a large mixing bowl, combine the crumbled cake with your frosting of choice. You want to mix it until it’s well-incorporated but not overly wet. The mixture should hold together when you form a ball. This is the critical step in ensuring that your cake pops will hold their shape.
- Form the Cake Balls: Using your hands, form the mixture into small balls, about one inch in diameter. Place them on a lined baking tray. This is where you can use fun shapes if you’re feeling adventurous!
- Chill the Cake Balls: Place the tray in the refrigerator for at least 30 minutes. This step hardens the cake balls, making it easier to coat them later.
- Melt the Coating: While the cake balls chill, melt your candy coating or chocolate in a microwave-safe bowl. Start with 30-second intervals, stirring in between, until fully melted and smooth. Pay close attention to avoid burning. You should achieve a velvety consistency that coats easily.
- Coat the Cake Pops: Remove the cake balls from the fridge. Dip the end of each stick into the melted coating and then insert it into the center of a cake ball. This helps secure the stick. Next, dunk the cake ball into the coating, making sure it’s fully covered. Tap off the excess coating.
- Decorate: While the coating is still wet, sprinkle your chosen decorations over the cake pops. This is your chance to get creative with colors and designs!
- Let Set: Place the decorated cake pops upright in a piece of Styrofoam or a cake pop stand to allow the coating to harden. This usually takes about 15-30 minutes.
Following these steps will provide you with delightful Easter Vanilla Cake Pops, perfect for any celebration or to satisfy your cravings. Make sure to keep an eye on the cake texture as it’s crucial for the final outcome.
Variations & Substitutions
Chocolate Cake Pops: Swap out the vanilla cake for chocolate cake for a rich twist. Using chocolate frosting can elevate the chocolate flavor further. This variation is perfect for chocolate lovers and can be coated in different types of chocolate—dark, milk, or white. Add a sprinkle of sea salt on top for a delightful contrast.
Gluten-Free Cake Pops: For those with gluten sensitivities, a gluten-free vanilla cake mix can work wonders. Ensure that the frosting and the candy coating are also gluten-free. This variation ensures that everyone can enjoy the deliciousness without worry.
Vegan Cake Pops: To make a vegan version, use plant-based ingredients such as almond milk, egg substitutes, and coconut oil. Vegan frosting is readily available and can be an excellent choice. This variation will appeal to those following a vegan lifestyle while still maintaining the delightful flavors of traditional cake pops.
White Chocolate Coated Pops: If you prefer a sweeter taste, consider using white chocolate for the coating. You can also add a drop of food coloring to the white chocolate to make the pops more festive for Easter. A hint of raspberry extract can elevate the flavor, making it even more delightful.
Fruity Flavor Pops: For a fruity twist, consider adding chopped fruits such as strawberries or crushed pineapple to your cake mix. Using a fruit-flavored coating can also enhance this vibrant variation. It’s a fun way to introduce a refreshing taste and is perfect for warmer weather.
Each variation you choose can open a world of flavors and creativity, letting you personalize your Easter Vanilla Cake Pops to suit your tastes perfectly.
Common Mistakes to Avoid
One common mistake is using warm cake or frosting. Using warm ingredients can lead to a runny mixture, making it difficult to form cake balls. Always ensure that your cake is fully cooled and your frosting is at room temperature.
Another pitfall is overly crumbling your cake. While crumbling is essential, going too far can cause a mixture that is too fine, resulting in compact cake pops that lack texture. Aim for a consistency similar to coarse sand for the best results.
Additionally, not allowing sufficient time for the cake balls to chill can result in pops that are challenging to coat and shape properly. Skipping this crucial step often leads to cake balls falling apart while coating.
Moreover, if your coating is too thick, it may not stick to the cake pop. You can fix this by adding a little shortening to your melted candy coating to thin it out.
Be sure to avoid over-decorating; while sprinkles and edible glitter add a festive look, overdoing it can clutter the aesthetic. Keep it balanced for visual appeal.
Storage, Freezing & Reheating Tips
For best results, store your Easter Vanilla Cake Pops in an airtight container at room temperature for 3 to 5 days. If you are in a warmer climate, keeping them in the fridge can extend their shelf life and ensure they remain firm.
If you wish to freeze them, make sure they are completely set before placing them in a single layer in an airtight container or freezer-safe bag. They can be frozen for up to 3 months. When you’re ready to enjoy them, allow them to thaw in the refrigerator for a few hours rather than at room temperature. Thawing in the refrigerator will prevent condensation from forming on the coating.
Reheating is generally not necessary for cake pops; however, if they are slightly soft, you can place them in the fridge to firm them up. Always avoid melting the chocolate coating again as it can lead to a glossy finish turning dull.
When enjoying your cake pops, it’s always best to consume them fresh for the best texture and flavor experience.
Frequently Asked Questions
Can I use a different flavor cake mix?
Yes, absolutely! You can experiment with various cake flavors such as chocolate, red velvet, or lemon. Just keep in mind that the frosting and decorations may need to match the flavor profile to maintain a cohesive final taste.
What can I substitute for the frosting?
If you prefer a lighter option, consider using a cream cheese mixture. This can provide a tangy flavor that complements the sweetness of the cake. Alternatively, pureed fruit can also serve as a binding agent while adding unique flavor notes.
Can I create themed decorations for Easter?
Yes! You can create fun designs such as bunnies, chicks, or flowers using colored candy coatings and different sprinkles. For special shapes, use cookie cutters to help guide your designs.
Can I make cake pops ahead of time?
Definitely! Cake pops can be made a couple of days in advance. Just remember to store them properly in an airtight container to maintain freshness. This makes them a perfect party treat that can save you time on the day of your gathering.
Why are my cake pops falling off the stick?
If your cake pops are falling off the stick, it could be because the coating is too thick, or the cake balls did not chill long enough before dipping. Ensure that you chill the cake balls adequately and use a thinner coating by adding some shortening.
Conclusion:
The Easter Vanilla Cake Pops recipe offers a delightful combination of taste and creativity that captures the spirit of the holiday. With their fun size, colorful decorations, and mouth-watering flavor, they just might become your go-to dessert for gatherings. Don’t hesitate to customize them to suit your taste or the occasion, and be sure to share your creations with family and friends. Your kitchen will be filled with joy and laughter as you whip up these scrumptious cake pops. So gather your ingredients, unleash your creativity, and get ready to impress everyone with these fun, festive treats!