Prep time: 5 minutes
Cook time: 10 minutes
Total time: 15 minutes
Servings: 12 pieces
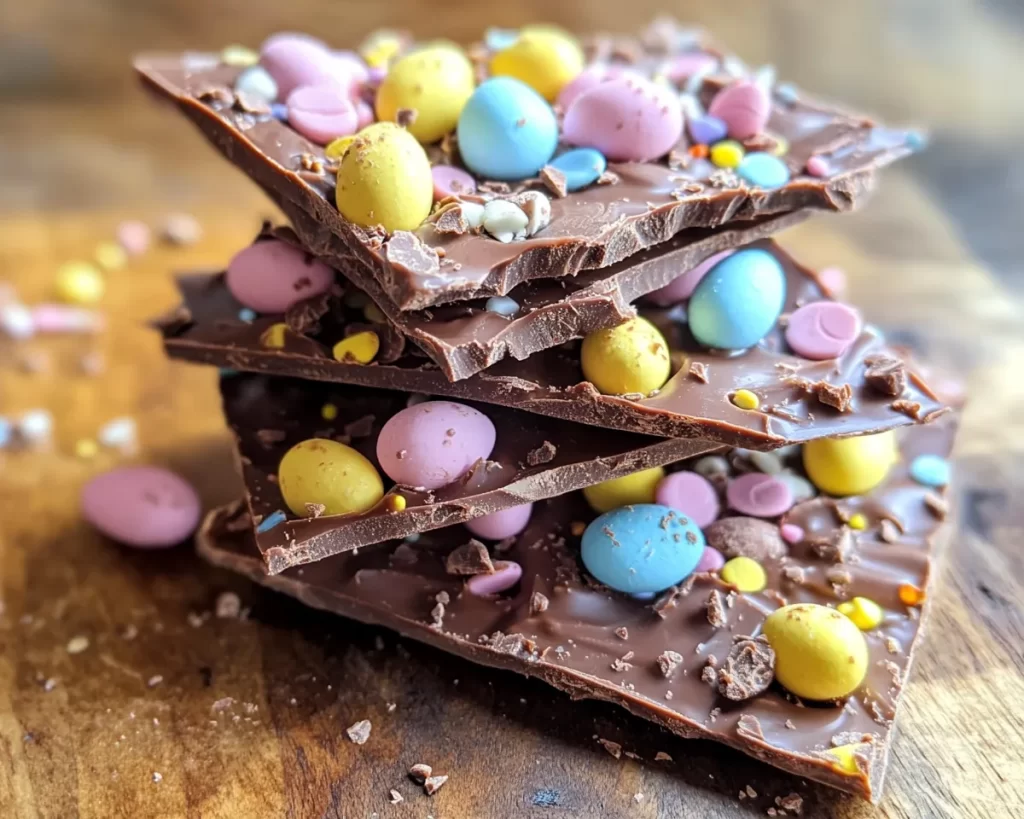
Indulge in the delightful world of **Easter Foods: Mini Egg Nest Chocolate Bark** that promises to be a hit for both the young and the young-at-heart! This easy yet visually charming dessert is perfect for Easter gatherings or a fun activity with the kids. In just **15 minutes**, you can whip up something unique that perfectly blends crunchy chocolate bark with colorful mini eggs, creating a treat that’s as pleasing to the eye as it is to the palate.
What Is Easter Foods: Mini Egg Nest Chocolate Bark in 15 Minutes?
This recipe combines the richness of chocolate with the playful essence of mini eggs, creating a sweet bark that resembles little nests. It’s a no-bake recipe that requires minimal effort while delivering maximum satisfaction. With its colorful topping and variation options, it transforms simple chocolate into an artistic creation that’s perfect for the Easter celebration.
Why You’ll Love This
There are many reasons to love this Easter chocolate bark:
- Quick and Easy: Takes only 15 minutes to prepare, making it great for busy parents.
- Kid-Friendly: Perfect for involving children in the kitchen, allowing them to shape their chocolate nests.
- Visually Stunning: The colorful mini eggs on top create a feast for the eyes.
- Customizable: You can adapt the recipe based on your favorite chocolates or toppings.
Ingredients You’ll Need
- Chocolate (Milk or Dark, 500g): The base of the bark; milk chocolate offers a sweeter taste, while dark chocolate lends a rich depth.
- Coconut Oil (2 tablespoons): Adds shine and makes the chocolate easier to handle.
- Mini Eggs (150g): These colorful candies add a festive touch and delightful crunch.
- Chopped Nuts (Optional, 50g): Almonds or walnuts give added texture. Feel free to substitute with your favorite nuts.
How to Make
- Melt the Chocolate: Begin by breaking the chocolate into small pieces and placing them in a heatproof bowl. Add the coconut oil for an extra glossy finish. Melt the mixture in the microwave on medium power for 30-second intervals, stirring between each round until completely melted and smooth.
- Prepare the Baking Tray: Line a baking tray or cookie sheet with parchment paper. This will prevent the chocolate from sticking and make removing the bark much easier once set.
- Spread the Chocolate: Pour the melted chocolate onto the parchment-lined tray. Use a spatula to spread it evenly and create a rectangle shape about 1/4 inch thick. Make sure the surface is smooth, as this will be the base of your bark.
- Add the Toppings: While the chocolate is still warm, sprinkle mini eggs evenly across the top. If using, add chopped nuts for added texture and flavor. Gently press the toppings into the chocolate to ensure they adhere well when set.
- Chill until Firm: Place the tray in the refrigerator for about 10 minutes, or until the chocolate has completely hardened. This quick cooling time is perfect for impatient bakers!
- Break into Pieces: Once fully set, remove the chocolate from the fridge. Break it into irregular pieces or cut using a sharp knife for more uniform squares or rectangles. Your beautiful chocolate bark is now ready to be enjoyed!
Variations & Substitutions
Nut-Free Version: If you want to keep your bark nut-free, simply omit the chopped nuts. You can substitute other crunchy toppings like crispy rice cereal or graham cracker crumbs for an enjoyable texture.
Dark Chocolate Delight: For a deeper flavor, use dark chocolate instead of milk chocolate. This variation pairs perfectly with a hint of sea salt sprinkled on top to enhance the rich chocolate taste.
Fun with Colors: Swap mini eggs for colorful M&Ms or jelly beans, creating a vibrant array of colors that appeal to kids and adults alike.
Vegan Option: To make this bark vegan, use dairy-free chocolate and coconut oil. This ensures that those with dietary restrictions can also enjoy the festive treat.
Common Mistakes to Avoid
While this recipe is straightforward, there are common pitfalls to be mindful of:
Not Melting the Chocolate Properly: Avoid overheating the chocolate when melting; it can become grainy. If it starts to thicken, you may be overheating it. Always melt in intervals and stir to maintain a smooth consistency.
Skipping Parchment Paper: Do not skip lining the tray with parchment paper. Without it, the chocolate bark could become stuck and difficult to remove, ruining your beautifully crafted desserts.
Overcrowding Toppings: It might be tempting to load on toppings, but overcrowding can lead to difficulty in breaking the bark into pieces. Make sure to leave enough space for the chocolate to set properly.
Storage, Freezing & Reheating Tips
To keep your Mini Egg Nest Chocolate Bark fresh, store it in an airtight container at room temperature for up to two weeks. If you live in a warm climate, consider refrigerating it to prevent melting or softening.
If you want to extend its freshness, you can freeze the bark. Wrap it well in plastic wrap and then in foil to prevent freezer burn. It can last up to three months in the freezer. When you are ready to enjoy, allow it to thaw at room temperature; do not microwave to avoid compromising its texture.
Frequently Asked Questions
Can I use other types of chocolate?
Absolutely! You can use white, milk, or dark chocolate based on your personal preference. Each type will yield a slightly different flavor profile, making it versatile for special occasions.
How can I make the chocolate bark more festive?
Consider adding festive sprinkles in addition to the mini eggs! They can enhance the visual appeal and make the bark look even more like a springtime treat.
Is this recipe suitable for kids to make?
Yes! It’s an incredibly simple recipe that can act as a fantastic introduction to cooking for older children. They’ll enjoy mixing, spreading, and decorating their chocolate bark.
How do I adapt this recipe for a larger crowd?
To make a larger batch, simply double the amounts of ingredients and use a larger baking tray. Adjust the setting time if needed, as a thicker layer may require extra chilling time.
Can I use chocolate chips instead of bars?
Definitely! Chocolate chips work perfectly for this recipe. Just remember that they often contain stabilizers, which can affect how they melt. For the best results with chocolate chips, opt for those specifically labeled for melting or baking.
Conclusion:
Creating **Easter Foods: Mini Egg Nest Chocolate Bark** allows you to celebrate the festivities with a treat that is not only delicious but also visually stunning. With easy preparation, opportunities for customization, and vibrant flavors, this delightful bark will surely be the highlight of your Easter celebrations. Whether enjoyed by the family or gifted to friends, the joy of homemade sweet treats and the smiles they bring are what makes this recipe truly special.