Prep time: 30 minutes
Cook time: 45 minutes
Total time: 2 hours 15 minutes
Servings: 8
Imagine stepping into a sunlit kitchen filled with the comforting aroma of coconut, where memories of holidays past intertwine with the promise of a delightful dessert. Easter Coconut Cream Pie is not just a dessert; it’s a celebration of flavors and textures that provide nostalgia, warmth, and joy. This decadently creamy pie, with its luscious coconut filling, is enveloped in a flaky crust and topped with fluffy whipped cream. Whether you grew up savoring every bite at family gatherings or you’re just discovering its charm, this recipe is guaranteed to bring smiles around the table. In this article, you will learn how to make the perfect Easter Coconut Cream Pie, along with tips and variations to cater to different tastes.
What Is Easter Coconut Cream Pie?
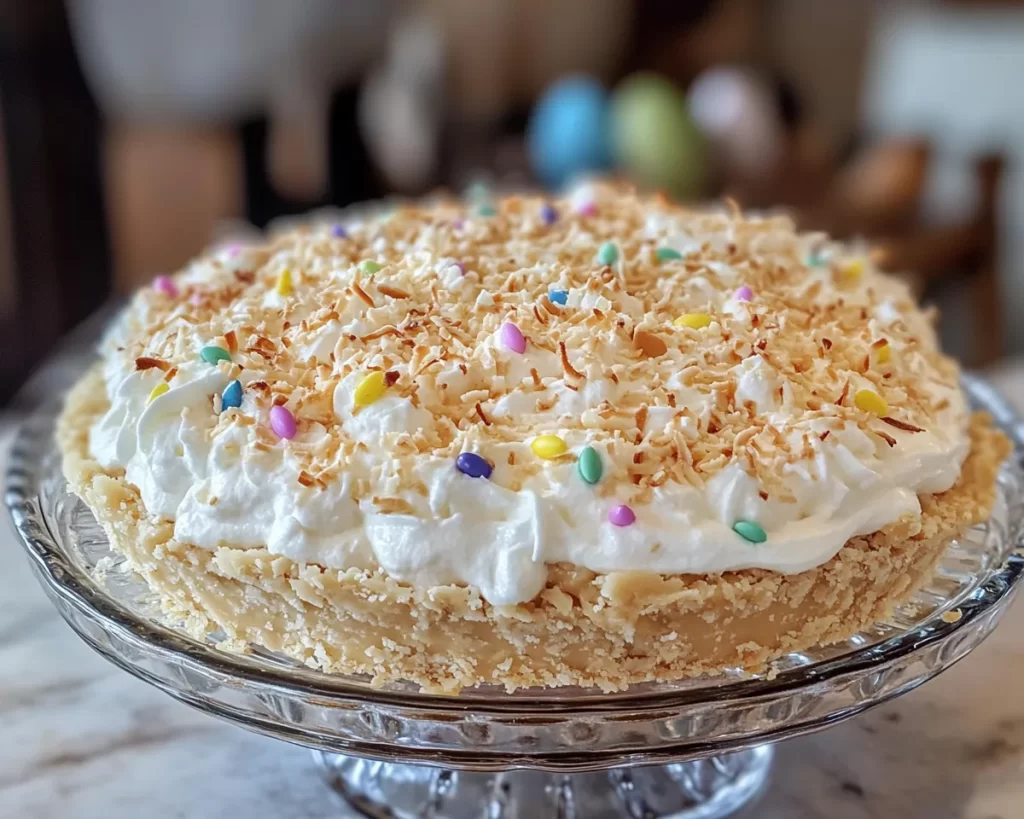
Easter Coconut Cream Pie is a classic dessert that hails from American kitchens, particularly popular during the Easter season. The pie features a rich, velvety filling made primarily from **coconut milk**, **heavy cream**, and **sweetened shredded coconut**, all of which come together to create a sumptuous texture that melts in your mouth. The combination of these ingredients results in a delightful balance of sweetness and creaminess, enhanced by the **crunchy crust** and the lightness of whipped cream topping.
Traditionally, this pie is baked in a **pre-made or homemade pie crust** that adds a flaky element to an otherwise creamy filling. The flavor profile of the pie is predominantly coconut, which lends itself wonderfully to the creamy base, making it a fantastic choice for those who love tropical flavors. The topping of whipped cream not only contributes to the overall presentation but also adds a light, airy contrast to the dense filling, elevating this dessert to something extraordinary.
Why You’ll Love This
When it comes to desserts, Easter Coconut Cream Pie captures attention for several compelling reasons. First and foremost is its **irresistible taste**; the combination of **sweet coconut** paired with a rich, creamy filling will leave your taste buds singing. Whether you’re serving it to family or friends, the compliments will pour in! It’s also a relatively easy recipe—ideal for busy parents and beginners alike. The straightforward preparation allows you to get the pie into the oven with minimal effort, leaving you with more time to focus on what truly matters: enjoying the holiday festivities with your loved ones.
Moreover, this pie is **affordable**, making it accessible to everyone. By swapping out certain ingredients, you can create a version that suits various dietary preferences. For instance, you could use a gluten-free pie crust or opt for a dairy-free version, ensuring that no one misses out on this delicious treat. Although it may be primarily associated with Easter, its delightful flavor makes it suitable for any occasion, whether you’re looking for an **easy dessert** after a family meal or a special dish to bring to potlucks.
Ingredients You’ll Need
To make this delicious Easter Coconut Cream Pie, you’ll need the following ingredients:
- 1 pie crust: Store-bought or homemade, this forms the foundation of your pie. If you’re using a store-bought crust, make sure it’s of good quality. Homemade crust will add a **personal touch**.
- 1 can (13.5 oz) coconut milk: This is the base of your filling and adds a rich, creamy texture. You may substitute it with almond milk for a lighter version, but this may alter the flavor slightly.
- 1 cup heavy cream: This adds richness and is essential for a creamy consistency. If you want a lighter option, try using **coconut cream** instead, which will boost coconut flavor.
- 1 cup granulated sugar: This is essential for sweetness. You may adjust this if you prefer a less sweet pie.
- 1/4 cup cornstarch: This thickens the filling. Ensure you stir it well when adding to avoid clumps.
- 1/4 teaspoon salt: Balances out the sweetness.
- 3 large eggs: Add richness; they help set the filling. If you want a vegan option, consider using flaxseed eggs, though the texture may vary slightly.
- 1 teaspoon vanilla extract: This enhances the flavor profile; never skip this ingredient!
- 1 cup sweetened shredded coconut: The star ingredient that gives the pie its signature taste. You may opt for unsweetened shredded coconut for less sweetness and to control the sugar levels.
- Whipped cream: For topping. You can use store-bought or homemade. Remember, the fresher, the better!
How to Make
Follow these step-by-step instructions to create the Easter Coconut Cream Pie that will become the highlight of your gathering:
- Preheat your oven: Start by preheating your oven to 350°F (175°C). Preparing your oven ahead of time ensures a consistent baking temperature, which is critical for pie crust to bake evenly.
- Prepare your pie crust: If you’re using a store-bought pie crust, place it in a 9-inch pie dish, and if the crust needs blind-baking, poke holes in the bottom with a fork to prevent bubbling. Bake in the preheated oven for about 10-12 minutes, until lightly golden. If you’re making a homemade crust, prepare it as per your recipe and then proceed to blind-bake.
- Make the filling: In a saucepan over medium heat, combine coconut milk, heavy cream, sugar, cornstarch, and salt. Whisk continuously until the mixture begins to thicken, becoming smooth and creamy. This should take about 5-7 minutes. Be sure to scrape the sides and bottom of the pan to prevent any sticking and ensure an even texture.
- Add the eggs and flavoring: Once your mixture has thickened, remove it from the heat and let it cool slightly. In a separate bowl, lightly beat the eggs. Gradually add a small amount of the hot coconut mixture to the eggs while whisking continuously; this process is called **tempering** and prevents the eggs from scrambling. After tempering, slowly incorporate the egg mixture back into the saucepan, whisking to combine. Add vanilla extract and shredded coconut, stirring to mix everything evenly.
- Fill the crust: Carefully pour the coconut filling into the baked pie crust. Use a spatula to smooth the top, ensuring it is evenly distributed. This helps in achieving a professional-looking pie.
- Bake the pie: Return the filled pie to the oven and bake for an additional 20-25 minutes, until the edges are set but the center may still be slightly wobbly. Letting it cool will complete the setting process. Be sure to check for doneness and avoid over-baking, as this will affect the texture.
- Cool completely: After baking, remove the pie from the oven and allow it to cool at room temperature for about an hour. Then, refrigerate for at least 1 hour or overnight to fully set. Chilling allows the flavors to meld beautifully, making the pie even more delectable.
- Serve with whipped cream: Before serving, whip up some heavy cream until soft peaks form and top the chilled pie generously with whipped cream. For an extra touch, sprinkle some toasted coconut on top for added texture and visual appeal.
Variations & Substitutions
Coconut Lime Variation: Adding lime juice and zest transforms this classic pie into a tangy delight. The citrus notes beautifully complement the **sweet coconut filling**, creating a refreshing twist that’s perfect for summer gatherings or any occasion where you want to impress. Just add about 1/4 cup of lime juice and the zest of one lime into the filling just before adding it to the crust. This variation works great even in a gluten-free crust, ensuring everyone can join in on the fun.
Dairy-Free Version: If you’re catering to a lactose-intolerant crowd, consider using **coconut cream** instead of heavy cream to enhance the coconut flavor while keeping the pie creamy. Substitute coconut milk for regular milk, and opt for dairy-free toppings to keep the dish entirely plant-based. This version remains rich and satisfying, ensuring no one misses out on the joy of coconut cream pie.
Chocolate Coconut Cream Pie: For chocolate lovers, incorporating melted dark chocolate into the filling can add a decadent twist. Simply melt about 4 ounces of dark chocolate and whisk it into the filling after it has thickened. This variation provides a luxurious richness and combines beautifully with the coconut elements. Serve it garnished with **chocolate shavings** for a stunning presentation.
Common Mistakes to Avoid
When making Easter Coconut Cream Pie, certain pitfalls could lead to disappointing results. One common mistake is **skipping the tempering step** with the eggs. If you add the eggs directly to the hot mixture without tempering, they will likely scramble, resulting in a grainy filling. Always remember to whisk a little of the hot mixture into the eggs first, which gradually raises their temperature.
Another mistake is **overbaking the pie**. If you leave the pie in the oven for too long, it will lose the luscious creaminess you strive for. Keep an eye on the time and check for doneness when the edges are set but the center has a slight jiggle. Lastly, not cooling the pie thoroughly before cutting into it can lead to a runny filling, as the cooling process is essential for the filling to set properly.
Storage, Freezing & Reheating Tips
When it comes to **storing** leftover Easter Coconut Cream Pie, you’ll want to keep it in the refrigerator. Cover the pie loosely with plastic wrap or aluminum foil. It should stay fresh for about 3-4 days. If you know you won’t finish the pie in that time, it can be frozen for up to 2 months. To freeze, slice the pie and wrap individual pieces tightly in plastic wrap, then place them in an airtight container or freezer bag.
To **reheat** frozen pie, place it in the refrigerator overnight to thaw. For best results, avoid reheating in the oven, as it may compromise the texture of the filling. Instead, allow it to come to room temperature for a couple of hours before enjoying it again. Keep in mind that the whipped cream topping should be freshly made before serving, as it’s best when enjoyed fresh.
Frequently Asked Questions
Can I use a different type of milk for the filling? Yes, you can substitute coconut milk with almond milk or any non-dairy milk. However, keep in mind that this may alter the flavor slightly, making it less coconut-forward. If using a non-dairy milk, opting for one that is unflavored will yield the best results.
How do I prevent the pie crust from getting soggy? To avoid a soggy crust, consider blind-baking your crust before adding the filling, allowing it to set properly. This will create a barrier that helps keep the crust crisp. Additionally, try brushing the pre-baked crust with egg wash and returning it to the oven for a few more minutes; this will seal the crust.
Can I make the pie in advance? Absolutely! Easter Coconut Cream Pie can be made a few days in advance. Ensure it is well-covered and stored in the refrigerator. The flavors will develop beautifully as it sits, but be sure to add the whipped cream topping just before serving for optimal freshness.
Is this pie gluten-free? If you use a gluten-free pie crust, your Easter Coconut Cream Pie can easily be made gluten-free. There are many pre-made gluten-free crusts available on the market, or you can make your own using almond flour or gluten-free graham crackers.
What can I use for decoration besides whipped cream? There are a variety of options for decorating your pie. Shaved chocolate, toasted coconut flakes, or fresh fruit like berries can create stunning garnishes. Not only do these enhancements look beautiful, but they also add a burst of flavor and texture.
Conclusion:
Easter Coconut Cream Pie stands as a timeless dessert that offers an abundance of flavors and textures with every delightful bite. Its simplicity combined with the opportunity for customization means that it is sure to satisfy every palate at your gathering. Whether you keep the recipe as is or explore variations to suit your loved ones’ tastes, this pie will undoubtedly earn a special place in your holiday traditions. So roll up your sleeves, gather your ingredients, and join the ranks of bakers crafting this heavenly dessert. Share the love by passing this recipe along to your friends and family! Enjoy your cooking adventure!