Prep time: 30 minutes
Cook time: 30 minutes
Total time: 1 hour
Servings: 12
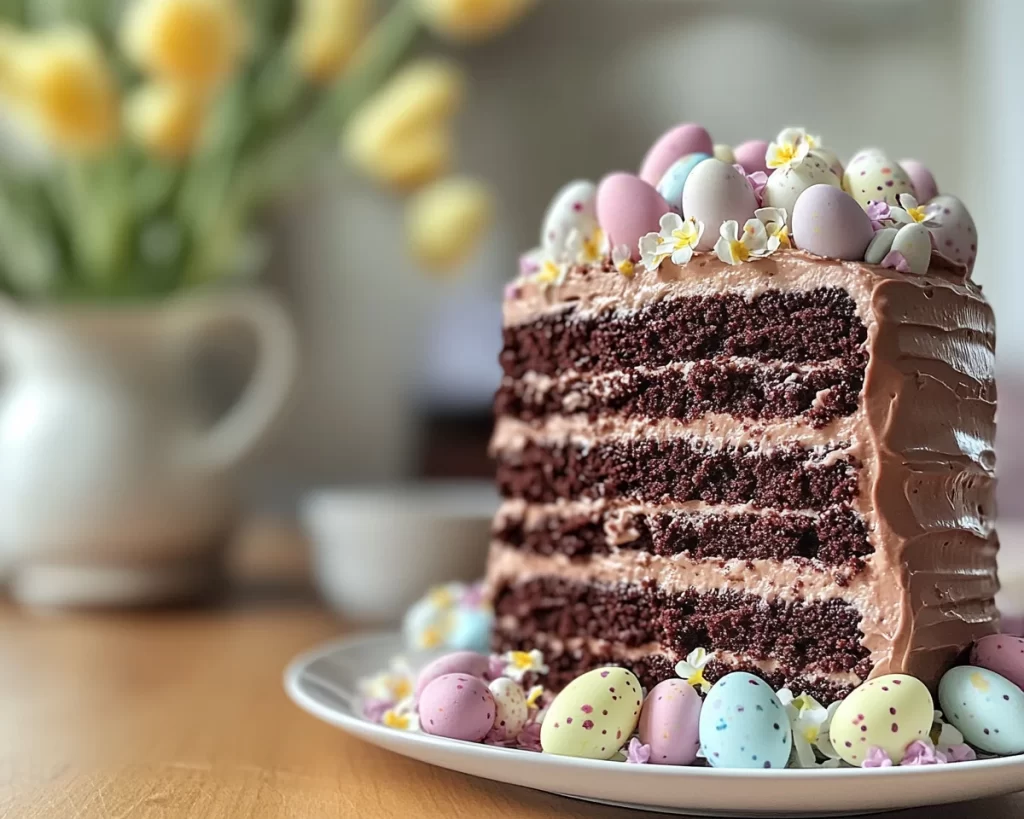
The aroma of freshly baked chocolate cake wafting through your home is undeniably inviting. There’s something magical about layer cakes, especially during special occasions like Easter. This Easter Chocolate Layer Cake not only satisfies your sweet tooth but also becomes the centerpiece of your celebration. As you slice into its rich, sumptuous layers, you’ll find velvety frosting and delightful textures that embrace your taste buds, making it a memorable experience for family and friends.
This cake is special for many reasons. The fluffy cake layers are impeccably balanced with sweet chocolatey flavors, while the rich frosting pulls it all together. It makes for an excellent dessert to impress your guests or simply enjoy during a festive gathering. In this recipe, you will discover the secrets to achieving the perfect cake, along with tips for decoration, variations, and even answers to common queries.
What Is Easter Chocolate Layer Cake?
Easter Chocolate Layer Cake is a beautiful and indulgent dessert often enjoyed during the spring holidays. While variations of chocolate cake exist worldwide, this specific recipe is crafted with a festive spirit in mind, using layers of moist chocolate cake paired with sumptuous frosting, which makes it ideal for Easter celebrations. Traditionally, this cake brings together the rich flavors of dark cocoa powder and the lusciously creamy frosting, creating a memorable experience for everyone at the table.
The texture of this cake is an essential aspect, featuring soft, tender layers that melt in your mouth. The flavor profile is deeply chocolatey, striking a balance between sweetness and richness, making it appealing to both kids and adults. Whether it’s for a brunch spread or a family gathering, this cake stands out as a quintessential dessert that embodies the spirit of the season.
Why You’ll Love This
You will absolutely love this Easter Chocolate Layer Cake for numerous reasons. First and foremost, the taste is divine. The combination of moist chocolate layers and decadent frosting creates an unforgettable experience on the palate. This recipe caters to all skill levels, including busy parents and novice bakers. If you’re looking for a cake that is simple yet effective in impressiveness, look no further.
Beyond the taste, this cake is cost-effective, using pantry staples you’re likely to have on hand. It is more affordable than purchasing a pre-made cake from a bakery, yet it provides a similar, if not better, elegant touch to celebrations. Moreover, you have the freedom to customize toppings, making it versatile for various preferences and dietary needs.
There are some common misconceptions regarding layer cakes; some tend to think they are overwhelmingly complex and require special skills. But with this recipe, you’ll see that it’s easier than you might think. For instance, many bakers overlook the importance of allowing the layers to cool completely before frosting; doing so can prevent the frosting from melting or sliding off.
Ingredients You’ll Need
- All-purpose flour: This serves as the base for your cake. It provides structure and stability. For a gluten-free option, you can substitute it with a gluten-free all-purpose blend.
- Cocoa powder: High-quality unsweetened cocoa powder gives the cake its rich chocolate flavor. Brands like Dutch-process cocoa elevate the taste.
- Baking soda and baking powder: These leavening agents help the cake rise and achieve a light texture. Ensure they are fresh for optimal results.
- Sugar: Granulated sugar sweetens the cake and enhances its moisture. For a healthier alternative, consider using coconut sugar.
- Salt: A pinch of salt elevates the cake’s overall flavor profile by balancing sweetness.
- Eggs: Eggs provide moisture and structure. You can use flax eggs for a vegan version.
- Milk: Dairy milk keeps the cake moist. For a dairy-free alternative, almond milk or oat milk works well.
- Vegetable oil: This keeps the cake tender. Substituting it with melted coconut oil can offer a unique flavor.
- Vanilla extract: Vanilla enhances all the other flavors; opt for pure vanilla extract for the best taste.
- Butter: Unsalted butter is used for the frosting, providing a creamy and rich consistency.
- Powdered sugar: This is necessary for the frosting to achieve the perfect sweetness and texture. You could swap it with a sugar alternative for a healthier version.
- Cream: Heavy cream enriches the frosting and makes it incredibly smooth and spreadable.
How to Make
- Preheat your oven to 350°F (175°C). Greasing and lining two 9-inch round cake pans is essential at this stage. This step ensures that the cake layers do not stick and maintain a beautiful shape.
- In a large mixing bowl, combine the dry ingredients: all-purpose flour, cocoa powder, baking soda, baking powder, salt, and granulated sugar. Whisk these together until fully blended. Whisking properly helps prevent clumps and ensures an even texture in your cake.
- In a separate bowl, whisk the wet ingredients: eggs, milk, vegetable oil, and vanilla extract. Mixing these separately helps to incorporate air, resulting in a lighter cake. Once combined, pour the wet ingredients into the dry mixture.
- Combine the wet and dry ingredients gently. Be careful not to over-mix, as this can make the cake dense. Stop mixing when you see a few flour streaks, as the mixture will continue to blend during baking.
- Evenly distribute the batter into the prepared cake pans. Use a spatula to smooth the tops, ensuring they will bake evenly for the best texture. Tap the pans gently on the countertop to remove air bubbles trapped in the batter.
- Bake for 25-30 minutes or until a toothpick inserted into the center comes out clean. Keep an eye on the cake, as ovens vary. Overbaking can lead to a dry cake.
- Once done, allow the cakes to cool in the pan for about 10-15 minutes before transferring them to a wire rack. Cooling in the pan initially retains moisture, ensuring the layers do not dry out.
- While cooling, start preparing your frosting. In a bowl, beat the softened unsalted butter until creamy. Gradually add powdered sugar and heavy cream while mixing on low speed until fully incorporated.
- Increase the mixer speed for about 2-3 minutes to make the frosting fluffy. You want a smooth, spreadable consistency. Taste and adjust sweetness with more powdered sugar, if desired.
- Once the cake layers are completely cool, place one layer onto a serving plate. Spread a generous layer of frosting on top. Position the next layer carefully, and then frost the top and sides of the entire cake.
- To decorate, consider adding chocolate shavings, sprinkles, or fresh berries. This adds a visually enticing touch, enhancing the cake’s festive vibe.
- Slice and serve to your eager guests, and watch as their faces light up with joy!
Variations & Substitutions
Gluten-Free Chocolate Layer Cake: If you require a gluten-free version of this delightful dessert, simply swap the all-purpose flour with a gluten-free flour blend. Ensure that the blend contains xanthan gum for the right texture. The chocolate flavor will remain rich and satisfying, providing everyone with an equally great experience at the table.
Double Chocolate Cake: For an even richer chocolate experience, include chocolate chips in the batter. This extra layer of chocolate will melt during baking, resulting in gooey pockets within your cake layers. This version is particularly loved by true chocolate aficionados!
Vegan Chocolate Layer Cake: Achieve a vegan chocolate layer cake by substituting eggs with flax eggs (1 tablespoon of ground flaxseed mixed with 3 tablespoons of water, let it sit until thick). For a dairy-free frosting, use vegan butter and plant-based cream. The cake will still taste divine and cater to those with dietary restrictions.
Mint Chocolate Layer Cake: Incorporate peppermint extract into your frosting for a refreshing twist. Consider garnishing with crushed peppermint candies or mint leaves for decoration. This variant is perfect for the holiday season and can be an unexpected yet delightful treat for your guests.
Fruit Layer Cake: Another exciting alternative is to add layers of fruit, such as fresh raspberries or strawberries, between the cake layers or on top of the frosting. The tartness of the berries contrasts beautifully with the sweetness of the chocolate, creating a symphony of flavors.
Common Mistakes to Avoid
When making a chocolate layer cake, a common pitfall is over-mixing the batter. Over-mixing activates the gluten in the flour too much, resulting in a dense rather than fluffy cake. Always mix until just combined to maintain the cake’s light texture.
Another frequent mistake is not allowing the cake layers to cool fully before frosting. An improperly cooled cake can cause the frosting to melt or slide off, leading to a messy appearance. Always let the layers cool on a wire rack to stabilize them so they maintain their shape.
Finally, many bakers underestimate the importance of ingredient temperature. Room temperature eggs and milk blend more cohesively into the batter, ensuring even distribution and aiding in the cake’s rise. Take your ingredients out of the fridge well before mixing to ensure they blend seamlessly for optimal results.
Storage, Freezing & Reheating Tips
Proper storage of your Easter Chocolate Layer Cake maximizes its freshness and flavor. If you have leftover cake, store it in an airtight container at room temperature for up to three days. If you prefer to refrigerate it, it can last a week. Just ensure it’s well-wrapped to prevent it from absorbing fridge odors.
For longer storage, consider freezing the cake layers. Wrap each layer tightly in plastic wrap and store them in an airtight container. This can preserve their freshness for up to three months. When ready to enjoy, allow the layers to thaw overnight in the refrigerator before frosting.
When reheating, simply slice a portion and microwave it for 10-15 seconds to warm it slightly while keeping the frosting intact. Alternatively, you can enjoy it cold as a refreshing dessert that balances well with its chocolatey richness.
Frequently Asked Questions
Can I make this cake ahead of time?
Absolutely! This cake can be baked up to two days in advance. Wrap the cooled layers tightly in plastic wrap and store them in the refrigerator or at room temperature. Frosting can also be made ahead; just re-whip it before using to restore its airy texture.
Can I substitute other flours in this recipe?
Yes, you can use various types of flour. Alternatives like whole wheat flour or cake flour can yield different textures. However, ensure you adhere to appropriate measurements and ratios for the best results.
Is it possible to reduce sugar in this cake?
While you can reduce the sugar, keep in mind that sugar not only adds sweetness but also contributes to the overall texture and moisture of the cake. Consider using natural sweeteners like honey or agave syrup, but be cautious with quantities, as they can change the liquid ratio in the batter.
How do I know when my cake is done?
Check for doneness using a toothpick; if it comes out clean or with minimal crumbs attached, your cake is done. Check for a slightly springy top when lightly pressed; if it bounces back, it’s ready to be taken out of the oven.
What can I use as a topping besides frosting?
Instead of frosting, consider a light dusting of powdered sugar, drizzling with chocolate ganache, or serving with whipped cream. Fresh fruits like berries or sliced oranges can also provide a bright, fresh contrast to the rich chocolate flavor.
Conclusion:
Easter Chocolate Layer Cake is not just a dessert; it’s a celebration of flavors, textures, and joy. Its versatility makes it an excellent choice for various occasions, and with the proper care and attention, it can become a beloved recipe in your kitchen. Whether you’re planning an Easter feast or a weekend treat, this cake will surely impress. Feel free to customize it as per your preference or family tradition. Get ready to create memories as you serve this delectable cake! Don’t hesitate to share it with friends and family — they won’t be able to resist a second slice!