Prep time: 15 minutes
Cook time: 0 minutes
Total time: 15 minutes
Servings: 4
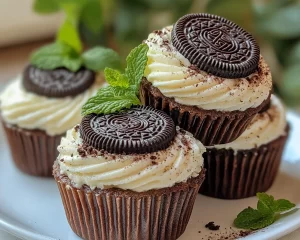
Dessert Recipes: No Bake Oreo Cheesecake Cups in 15 Minutes is an easy and delicious treat perfect for any occasion. Picture this: a smooth, creamy cheesecake filling, whipped to perfection, nestled in crunchy Oreo crumbs. What’s more, there’s no baking involved! This recipe is not only quick but also requires minimal effort, making it ideal for busy parents, kitchen beginners, or anyone looking to impress guests without spending hours in the kitchen.
What Is Dessert Recipes: No Bake Oreo Cheesecake Cups in 15 Minutes?
No Bake Oreo Cheesecake Cups are a delightful no-fuss dessert made by layering a creamy cheesecake mixture with crushed Oreos in stylish cups. The beauty of this recipe lies in its simplicity and the rich, decadent flavors that come together effortlessly. It’s a dessert that whispers indulgence while being quick to whip up, offering a satisfying finish to any meal.
Why You’ll Love This
There are countless reasons why this recipe will become a cherished favorite. First and foremost, it can be made in just **15 minutes**, making it perfect for last-minute gatherings or a sweet craving. Additionally, the **no-bake** nature of this dessert means you won’t have to turn on the oven, keeping your kitchen cool. The combination of cream cheese and whipped topping creates a deliciously airy texture, contrasted beautifully by the crunch of Oreo cookies. Moreover, it’s easily customizable, allowing you to incorporate your favorite flavors.
Ingredients You’ll Need
- Oreo cookies (15 cookies) – These will form the foundation of your cheesecake cups, providing a crunchy texture and rich chocolate flavor.
- Cream cheese (8 oz) – This is essential for a smooth and creamy cheesecake filling, giving it that classic taste.
- Powdered sugar (1/2 cup) – It adds sweetness and smoothness to the filling without creating a grainy texture.
- Vanilla extract (1 tsp) – This enhances the flavor of the cheesecake and brings warmth to the overall taste.
- Whipped topping (8 oz) – This adds lightness and fluffiness, making the dessert airy and easy to eat.
- Cocoa powder (1 tbsp) – This will deepen the chocolate flavor of the cheesecake mixture.
- Chocolate syrup (optional) – You can drizzle this on top for an extra treat!

How to Make
- Start by crushing the Oreo cookies into fine crumbs. You can do this by placing them in a zip-top bag and using a rolling pin or by pulsing them in a food processor. Aim for a texture similar to sand.
- In a mixing bowl, beat the cream cheese until smooth and creamy. This will take about **1 to 2 minutes**. Ensure there are no lumps to achieve a silky filling.
- Add the powdered sugar and cocoa powder to the cream cheese. Continue to mix until fully incorporated. The mixture should be sweet and chocolatey. Take a moment to taste and adjust sweetness if necessary.
- Gently fold in the whipped topping and vanilla extract. Use a spatula, folding gently to maintain the airy texture of the whipped cream. The filling should feel light and fluffy at this stage.
- Now, it’s time to layer! In dessert cups or small glasses, add about one tablespoon of the crushed Oreo at the bottom. Then, spoon in a generous layer of the cheesecake filling on top of the crumbs. Repeat the layers until you fill the cup, ending with the cheesecake layer on top.
- To finish, drizzle chocolate syrup over the top if desired, and add mini Oreo cookies or chocolate shavings for decoration. Chill your cheesecake cups in the fridge for **at least 1 hour** to allow the flavors to meld.
Variations & Substitutions
Fruit Twist: Instead of using only Oreo cookies, you can layer various fruits such as strawberries or raspberries between the layers of cheesecake. This adds a refreshing contrast to the rich flavors and makes the dessert lighter. Try adding a layer of **pureed fruit** at the base or mixing chopped fruits into the filling.
Nutty Delight: For those who love nuts, consider adding chopped almonds or walnuts into the cheesecake mix. This variation adds a unique crunch and enhances the flavor profile significantly. If you prefer a nut-based crust, you can substitute some of the Oreo crumbs with ground almonds or hazelnuts for a richer experience.
Chocolate Lovers: If you want to take the chocolate flavor to the next level, mix melted chocolate into the cream cheese filling or use a double chocolate Oreo for the crust. You can also sprinkle chocolate chips in between layers for extra indulgence.
Vegan Option: To make this recipe vegan-friendly, substitute cream cheese with a plant-based cream cheese and the whipped topping with coconut cream. Also, use gluten-free Oreos if you need a gluten-free dessert that everyone can enjoy.
Common Mistakes to Avoid
Don’t forget to properly blend the cream cheese; otherwise, you may end up with a lumpy filling. This will ruin the smooth texture of your dessert! Always use room-temperature cream cheese for easier mixing. Additionally, make sure not to overfold the whipped topping; otherwise, the mixture will lose its airy quality. Be gentle! Moreover, remember to let the cheesecake cups chill completely in the fridge to allow the flavors to meld together effectively.
Storage, Freezing & Reheating Tips
To ensure your No Bake Oreo Cheesecake Cups last, store them in the refrigerator, covered with plastic wrap or in airtight containers. They can typically be kept for up to **3 days** in the fridge. However, if you want to keep them longer, consider freezing them. To freeze, place the cups in the freezer, ensuring they are well covered. They can last for about **2 months** frozen. When ready to enjoy, allow them to thaw overnight in the refrigerator.
For safe food handling, always maintain proper refrigeration. Avoid leaving cheesecake cups at room temperature for longer than **two hours** to prevent bacterial growth. Always check for signs of spoilage before consuming.
Frequently Asked Questions
Can I make Oreo cheesecake cups ahead of time?
Absolutely! You can prepare these cheesecake cups a day in advance. This is actually beneficial because it allows the flavors to develop more fully as they chill. Just be sure to cover them well to keep them fresh.
How do I adjust the sweetness of the cheesecake filling?
You can easily adjust the sweetness by adding more or less powdered sugar based on your personal preference. Keep in mind to taste the filling before layering it into the cups to ensure it meets your ideal level of sweetness.
What can I use if I don’t have Oreo cookies?
If you don’t have Oreos, you can try using any chocolate wafer cookies or even graham crackers for a different flavor profile. Just keep in mind that the taste and texture will slightly differ based on your choice.
Can I add different flavors to the cheesecake?
Definitely! You can incorporate different flavor extracts such as almond, peppermint, or coconut into the filling. Additionally, some zest from citrus fruits can add a refreshing twist to the classic flavor.
Is this dessert suitable for kids?
Yes! This dessert is a hit among children and adults alike due to its rich taste and fun presentation. Just be mindful of any allergies they may have when selecting your ingredients, such as gluten or dairy sensitivities.
Conclusion: These No Bake Oreo Cheesecake Cups are not only quick and easy to make but are also guaranteed to satisfy any sweet tooth. You can whip up this delightful treat and enjoy a bit of indulgence without the fuss of baking. Whether you’re hosting a party or just looking to treat yourself, this dessert will surely impress and delight everyone who tries it. Enjoy every creamy, chocolaty spoonful!