### Delightful Nun’s Puffs for Sweet Lovers
You know that feeling when you’re strolling through a quaint, cobblestone street, the sun warming your face as the scent of freshly baked goods wafts through the air? That unmistakable aroma beckons you closer, drawing you to the cozy pastry shops where treats are lovingly crafted. This is the exact inspiration behind my recipe for Delightful Nun’s Puffs – a sweet treat that captures the essence of simple, home-baked joy in every bite. If you’re a fan of fluffy pastries with a hint of sweetness, then you’re in for a real treat!
In this article, we will embark on a scrumptious journey to create these delightful puffs, exploring their history, what makes them special, and how to make them at home. You’ll learn not just the recipe, but the little tips and tricks that make these puffs truly irresistible.
## What are Nun’s Puffs?
Nun’s Puffs, or “pets-de-sœur” in French (which amusingly translates to “sisters’ farts”), are charming little delights adored across many cultures. Their origins trace back to the medieval convent kitchens of France, where nuns perfected this recipe, bringing sweetness and laughter into their humble lives. The name may bring a chuckle, but these pastries are nothing short of an elegant sweetness.
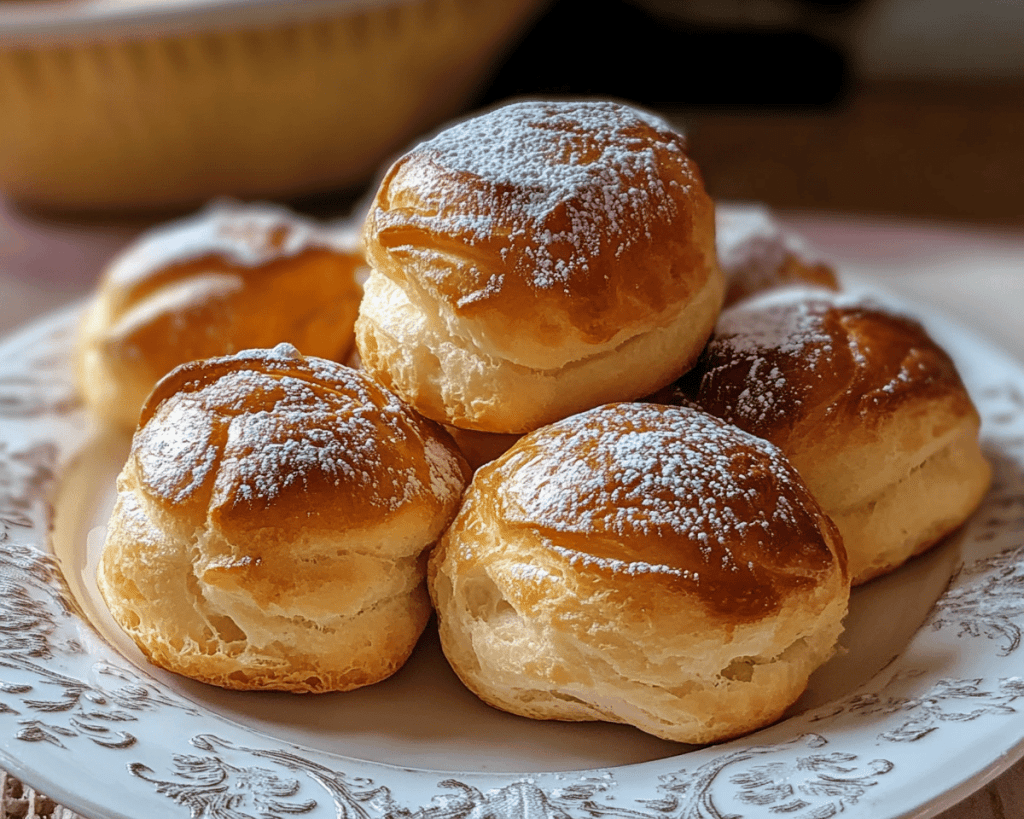
Firstly, let’s talk about their texture. Nun’s Puffs have a beautiful, airy structure; think of light, sponge-like clouds that you can almost see through. When you take a bite, you are met with an explosion of delicate flavors – buttery richness punctuated by the sweetness of sugar and a hint of vanilla. The outside is slightly crusty while the inside offers a soft, pillowy bite that just melts in your mouth, making every puff an adventure for your taste buds.
## Why You’ll Love This Nun’s Puffs Recipe
You might be wondering why you should whip up a batch of these delightful pastries. Well, let me share some enticing reasons! Firstly, Nun’s Puffs are incredibly simple to make, meaning you can treat yourself or impress guests without spending hours in the kitchen. They are perfect for all occasions – whether it’s a family brunch, a cozy dessert after dinner, or a sweet gift for your neighbor, these puffs fit the bill.
Moreover, they’re versatile! You can infuse them with a range of flavors – add lemon zest for a citrus twist, swap vanilla for almond extract, or even fold in chocolate chips for a decadent spin. Not to mention, they are utterly budget-friendly and can be made with pantry staples. You’ll have a gourmet treat ready in no time, making these puffs one of my favorite go-to recipes.
## Ingredients You’ll Need
Here’s what you’ll need to create your own Nun’s Puffs:
1. **Butter (1/2 cup)**: Establishes a rich, flavorful base. Use unsalted for better control over the sweetness.
2. **Water (1 cup)**: Helps dissolve the butter and creates the necessary steam for puffing.
3. **All-Purpose Flour (1 cup)**: The backbone of the puffs. Ensure it’s well-sifted for a light texture.
4. **Eggs (4 large)**: Brings moisture, richness, and helps to bind the puffs together while also providing structure.
5. **Sugar (1/2 cup)**: Adds sweetness and a hint of crunch as it caramelizes slightly during baking.
6. **Vanilla Extract (1 tsp)**: The warm, comforting flavor that enhances the overall taste. Try to use pure vanilla for the best results.
7. **Salt (1/4 tsp)**: Balances the sweetness and elevates the flavors.
### Optional Additions
– **Lemon Zest**: For a bright, fresh flavor.
– **Chocolate Chips**: If you want a sweeter variation.
Choosing top-quality ingredients makes all the difference. When picking your butter or eggs, opt for fresh, high-quality products whenever possible. Trust me, your Nun’s Puffs will thank you!
## How to Make Nun’s Puffs
Let’s get you started on heavenly Nun’s Puffs! Follow these simple steps to create your own batch of delightful treats.
### Step 1: Prepare the Dough
In a medium saucepan, combine the **butter** and **water** over medium heat. Stir gently until the butter is melted and the mixture starts to boil. This fat-water mixture is crucial as it creates the steam necessary for the puffs.
### Step 2: Incorporate the Flour
Once the mixture is boiling, reduce the heat to low and immediately stir in the **flour** all at once. Keep stirring vigorously until a cohesive dough forms and pulls away from the sides of the pan. This typically takes about 2-3 minutes. Your dough will look slightly glossy; that’s perfect!
### Step 3: Cool the Mixture
Transfer the dough to a mixing bowl and let it cool for about 5-10 minutes. This is an essential step as it prevents the eggs from cooking when you add them.
### Step 4: Add the Eggs
Once cooled, carefully mix in the **eggs**, one at a time, using a wooden spoon or a spatula. Make sure each egg is fully incorporated before adding the next. Your dough should now be smooth, thick, and somewhat sticky. Stir in the **sugar**, **vanilla**, and **salt** until everything is well-combined.
### Step 5: Shape the Puffs
Preheat your oven to 400°F (200°C). Line a baking sheet with parchment paper. Use a small ice cream scoop or spoon to drop rounded tablespoons of dough onto the prepared sheet, spacing them about 2 inches apart. They will puff out, so give them space!
### Step 6: Bake
Bake in the preheated oven for about 20-25 minutes or until they are puffed up and golden brown. Avoid opening the oven door midway through baking; let them rise undisturbed. When they’re perfectly golden, remove them, and let them cool.
## Tips, Tricks & Variations
1. **Storage**: Store uneaten Nun’s Puffs in an airtight container at room temperature for up to two days or in the fridge for up to a week. They’re best enjoyed fresh but can still taste delightful the next day.
2. **Reheating**: If you have leftovers, pop them back in a warm oven for a few minutes to revitalize that fresh-baked texture before serving.
3. **Flavor Variations**: Consider adding a tablespoon of lemon zest or almond extract for a unique twist. You can also fold in mini chocolate chips for a chocolatey treat.
4. **Garnishing Options**: Dusting with powdered sugar adds an elegant touch, or consider drizzling with a simple glaze made from powdered sugar and milk for a lovely finishing touch.
5. **Vegan Version**: Swap the eggs for a flaxseed meal and water mixture (1 tablespoon of flaxseeds mixed with 2.5 tablespoons of water per egg as a substitute) and use a plant-based butter alternative for a vegan take on these delightful puffs.
## What to Serve With Nun’s Puffs
These Nun’s Puffs are delicious enough to stand alone, but why not elevate the experience? Serve them alongside a warm cup of freshly brewed coffee or a delicate tea. They pair wonderfully with a berry compote for an added touch of sweetness and acidity. You could also drizzle them with a homemade caramel or chocolate sauce for an indulgent dessert experience.
Consider arranging them on a pretty platter with a dusting of powdered sugar, and perhaps some fresh berries for color. This will not only look inviting but also enhance the flavors to create a well-rounded dessert table.
## Nutrition & Health Benefits
While Nun’s Puffs may not be considered a health food, they do provide a comforting treat that can be enjoyed in moderation. Each puff is light and airy, minimizing the heaviness associated with many pastries.
A typical serving contains about 100 calories, primarily from carbohydrates and fats, but pair it with fresh berries for a dose of antioxidants! The use of whole ingredients like butter and eggs provides essential fats and proteins as well. Remember, a balanced diet can accommodate sweet treats, especially when made with love!
For a deeper understanding of nutrition in pastries and sweets, check out this [Healthline article](https://www.healthline.com/nutrition/sweets) on treats and indulgence.
## Frequently Asked Questions
**1. Can I freeze Nun’s Puffs?**
Absolutely! To freeze, allow the puffs to cool completely, then place them in a single layer on a baking sheet. Freeze until solid, then transfer them to a zip-top freezer bag. They can last for up to three months. Just reheat them in a 350°F (175°C) oven when you’re ready to enjoy.
**2. Why did my Nun’s Puffs not rise?**
There could be a few reasons. Make sure you added the eggs after the dough cooled slightly to prevent cooking the eggs in the hot dough. Also, check if your baking powder is fresh, as old leavening agents can affect the rise.
**3. What if my dough is too thick?**
If your dough seems too thick to scoop, add a tablespoon of water or milk at a time until it reaches a smooth, pipeable consistency. Just be cautious not to overdo it; you want it to hold its shape.
**4. Can I use whole wheat flour instead of all-purpose?**
Using whole wheat flour will alter the texture slightly, giving it a denser quality. If you want to use whole wheat, try a half-and-half mix with all-purpose flour to keep some lightness.
**5. How do I ensure my Nun’s Puffs are crispy on the outside?**
To achieve that perfectly browned and crispy outside, avoid opening the oven door while baking and ensure your oven is properly preheated. You can also brush the tops with a bit of egg wash before baking for extra sheen!
## Conclusion
As you explore the world of baking with this Delightful Nun’s Puffs recipe, I hope you discover the pure joy that comes with creating something sweet and beautiful. Each puff is a little piece of happiness – soft, airy, and bursting with flavor, capturing a delightful history of convent kitchens and joyful gatherings.
So, roll up your sleeves and find that cozy spot in your kitchen tonight! You won’t regret indulging in these little bites of heaven. If you loved this recipe, please leave a comment, and don’t forget to tag me on Instagram when you share your delicious creations. Happy baking!


