Prep time: 15 minutes
Cook time: 20 minutes
Total time: 35 minutes
Servings: 4 servings
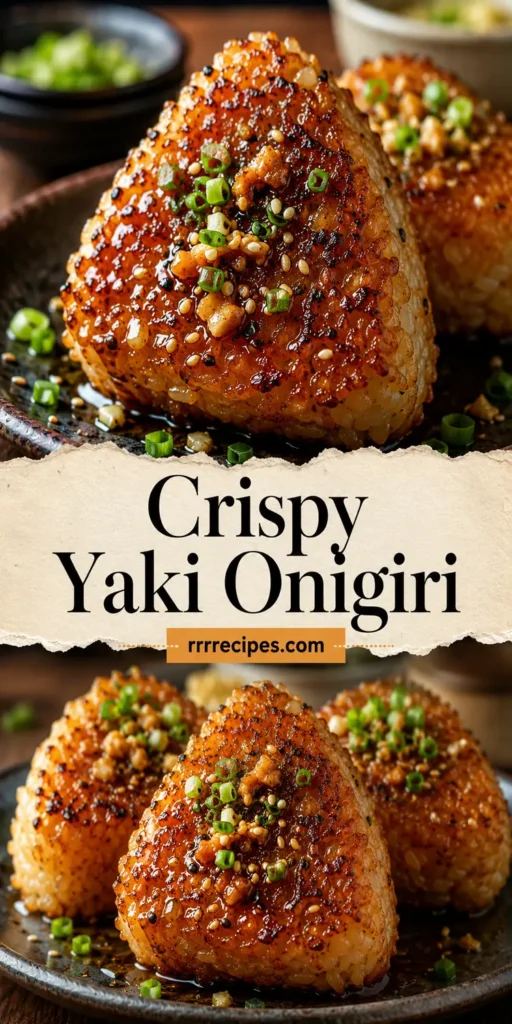
Crispy Yaki Onigiri with Garlic Butter Sauce is a delightful twist on traditional Japanese rice balls. These onigiri are not just portable and easy to make; they are filled with flavor and perfect for lunchboxes, picnics, or quick dinners. Imagine taking a bite into a perfectly crispy exterior that contrasts beautifully with the fluffy rice inside, drizzled with a savory garlic butter sauce that elevates each mouthful. This dish is sure to charm both kids and adults alike, making it a go-to recipe for busy parents seeking quick yet delicious meals.
What Is Crispy Yaki Onigiri with Garlic Butter Sauce?
Crispy Yaki Onigiri are grilled rice balls often associated with Japanese cuisine. Traditionally, they are made from short-grain rice that is sticky and easy to mold. The “Yaki” means “grilled,” indicating that the onigiri is cooked on a hot surface for a crispy finish. In this recipe, we take it a step further by infusing the onigiri with a rich garlic butter sauce that gives an additional burst of flavor. These rice balls can be stuffed or topped with various ingredients, making them versatile and suitable for a wide array of tastes.
Why You’ll Love This
There are a multitude of reasons to love Crispy Yaki Onigiri with Garlic Butter Sauce. First, they are incredibly versatile. You can customize the filling and toppings based on your preferences, dietary needs, or whatever you have on hand. Second, the combination of crispy exterior and flavorful garlic butter sauce creates a mouthwatering experience. Lastly, they are portable, making them a great option for packed lunches or picnics. Whether you are a kitchen beginner or a seasoned cook, this recipe is easy enough to follow while still impressing your friends and family.
Ingredients You’ll Need
- 2 cups short-grain rice: This type of rice is sticky and perfect for molding. Rinse the rice until the water runs clear to remove excess starch and improve texture.
- 2 1/2 cups water: Essential for cooking the rice to the right consistency.
- 1 tablespoon salt: Enhances the flavor of the rice.
- 2 tablespoons soy sauce: Adds an umami flavor to the rice balls.
- 3 tablespoons unsalted butter: For the garlic butter sauce, contributing richness and flavor.
- 3 cloves garlic, minced: Provides the star flavor in the garlic butter sauce.
- 2 green onions, chopped: Adds a fresh, aromatic quality to the dish.
- Sesame seeds (for garnish): Optional, for additional texture and flavor.

How to Make
- Start by rinsing the short-grain rice under cold water until the water is cloudy. Rinse until the water runs clear. Place the rinsed rice into a rice cooker or a pot, along with 2 1/2 cups of water and 1 tablespoon of salt. If using a cooker, follow its cooking instructions. If cooking on the stovetop, bring to a boil, then reduce the heat to low, cover, and cook for about 18-20 minutes until all the water is absorbed. Allow it to rest for 10-15 minutes.
- After the rice is cooked and has rested, transfer it to a mixing bowl. Add 2 tablespoons of soy sauce to the cooked rice and mix thoroughly, ensuring every grain gets the flavor. Allow the rice to cool slightly, making it easier to handle in the next step.
- With wet hands, take a scoop of rice and mold it into triangular or oval shapes, pressing gently to maintain their form. This should yield about 8-10 rice balls. Make sure that the rice is compact so that it holds its shape while grilling.
- Heat a non-stick skillet over medium heat and add a little oil to prevent sticking. Place the molded rice balls in the skillet and cook for about 3-4 minutes on each side, or until they are golden and crispy. Keep a close eye on them to avoid burning.
- While the onigiri are cooking, prepare the garlic butter sauce. In a separate pan, melt 3 tablespoons of unsalted butter over medium-low heat. Add the minced garlic and cook until fragrant, about 1-2 minutes. Be careful not to let the garlic burn, as it can turn bitter.
- After the rice balls are crispy and golden, remove them from the skillet and drizzle them with the garlic butter sauce. Top with chopped green onions and sesame seeds for added texture and flavor. Serve immediately while they are hot and crispy.
Variations & Substitutions
Vegetable-filled Onigiri: You can switch out the filling for something more plant-based. Consider using sautéed mushrooms, bell peppers, or spinach mixed with tofu. Simply cook your vegetables until tender and mix them into your rice before molding the rice balls.
Spicy Tuna Onigiri: If you prefer a bit of heat, try mixing canned tuna with sriracha and mayonnaise. Place a spoonful of this mixture inside the onigiri before shaping them. This adds an exciting burst of flavor to the crispy exterior.
Cheese-stuffed Onigiri: For a gooey interior, try adding a cube of cheese (like mozzarella or cheddar) into the center of each rice ball before shaping them. The melted cheese contrasts beautifully with the crispy outside and is sure to be a hit.
Sesame Oil Replacement: Instead of using butter, you can make a vegan version by replacing it with sesame oil and adding more garlic for flavor. This switch not only makes it plant-based but also adds an authentic nutty flavor.
Common Mistakes to Avoid
One common mistake is not rinsing the rice sufficiently before cooking. Failing to rinse can lead to overly sticky rice that doesn’t hold its shape well. Additionally, ensure your rice is fully cooked and sticky enough for molding. If it’s too dry, your onigiri may crumble when you try to mold them.
Another mistake is overcooking the onigiri in the skillet. Monitor the cooking process closely to prevent burning. The onigiri should be golden brown, not blackened. Adjust the heat if necessary.
Lastly, be sure to let the onigiri cool slightly before serving. Serving them too hot can lead to burns and make them difficult to handle. Allow a few minutes for them to settle and have the flavors blend.
Storage, Freezing & Reheating Tips
Crispy Yaki Onigiri can be stored in an airtight container in the refrigerator for up to three days. To maintain their crispiness, it’s advisable to reheat them using an oven rather than a microwave, which can make them soggy. Preheat your oven to 350°F (175°C) and bake them for about 10 minutes.
If you want to store them for a longer period, you can freeze the formed but uncooked onigiri. Lay them flat on a baking sheet until frozen, then transfer them to a zip-top freezer bag. When you’re ready to enjoy, simply grill from frozen, adding a few extra minutes to the cooking time.
Make sure to keep any leftover garlic butter sauce in the fridge as well, as it can be used for drizzling over freshly made onigiri later.
Frequently Asked Questions
Can I make onigiri without a rice cooker?
Absolutely! You can cook short-grain rice in a pot on the stovetop. Just follow the same ratio of rice to water and make sure to bring it to a boil before reducing the heat to cook covered.
What type of rice is best for onigiri?
Short-grain rice is typically used because of its stickiness and ability to hold shape. If you can’t find short-grain rice, medium-grain rice can work as a substitute but may not yield the same texture.
Can I make them ahead of time?
Yes, you can prepare the onigiri ahead of time and simply grill them right before serving. They can also be stored in the fridge and reheated. Just remember to reheat them properly to maintain their crispiness.
What can I use as toppings besides garlic butter sauce?
You can use a variety of toppings such as teriyaki sauce, wasabi, or even a sprinkle of furikake, which is a Japanese rice seasoning blend. Experiment with flavors that you enjoy!
Is it possible to make them vegan?
Definitely! You can substitute the butter with plant-based alternatives and still achieve great flavor. Use vegetable oil in place of butter for frying, and proceed with your choice of fillings.
Conclusion: Whether you’re preparing a quick meal for yourself, packing lunches for your family, or looking for a delicious and versatile dish to impress guests, Crispy Yaki Onigiri with Garlic Butter Sauce checks all the boxes. With simple, wholesome ingredients and straightforward instructions, you’ll find this recipe becoming a staple in your kitchen. Enjoy crafting these delightful rice balls, and relish the tantalizing flavors they bring to your table.


