Let’s Get Real
Ah, chocolate cherry cookies — the kind of dessert that literally makes me feel like I’m winning at life every time I bake them. You know those days when you’re sitting inside, staring out at the gloomy weather (thanks, Mother Nature), and all you can think about is putting your face in a tub of ice cream? Yeah, I was there. But instead of throwing in the towel, I decided to channel my inner pastry chef and created some rich, fudgy chocolate cherry cookies that would make even the most hardcore cookie skeptics weep tears of joy.
As a kid, I was *not* a fan of these bad boys. My mom would try to sneak fruit into my desserts, thinking that somehow, cherries in chocolate would create a magical balance between healthy and delicious. Spoiler alert: it didn’t work. I was convinced cherries were a fruit best left off my desserts. But oh, how the tides have turned! Now? I can’t seem to get enough of the glorious combination of rich chocolate mingling with sweet, tart cherry goodness. Seriously, it’s a flavor explosion in your mouth that makes you want to do a little happy dance. Also, if you’re asking if I ever do that: yes. Yes, I do, especially when there’s chocolate involved.
So grab your mixer, cozy up with your favorite playlist, and let’s dive into a recipe that’ll make you reevaluate all those childhood thoughts about cherries. I promise, these cookies are the real deal.
Ingredients, Unfiltered
What’s Really in Chocolate Cherry Cookies
Let’s break down what’s going into these delightful morsels, shall we? I want you to be as into these ingredients as I am — and trust me, they’re worth squealing about!
– All-Purpose Flour: The backbone of any cookie. Seriously, without flour, we’d just be left with melted chocolate. I choose King Arthur brand for my flour because it feels like the high-end fancy stuff but doesn’t break the bank. Pro tip: spoon and level your flour or your cookies will end up as sad little pancakes, and nobody wants that.
– Cocoa Powder: The dark magic element that brings in the fudginess level. I use Hershey’s Special Dark Cocoa because I’m a firm believer that chocolate needs to be dark and powerful. Peekaboo — you thought you were just making cookies, but now we’re deep into a chocolate awakening!
– Baking Soda: Yes, please! This is what gives our cookies that delightful rise. Just a teaspoon will do, and it’s basically like the secret superhero swooping in to save the day (or, in this case, the cookies).
– Salt: Don’t underestimate the power of salt! It amplifies flavors like a cheerleader at a pep rally. I use kosher salt because it feels fancy, and it’s really good at pulling flavors out of the ingredients. A pinch of salt could make you rethink your whole cookie game!
– Butter: But of course. I’m all about that rich, buttery goodness. Use unsalted so you can control the saltiness to your liking and let it come to room temperature before you cream it with the sugars. Fun fact: it’s totally okay to forget about it and have it chilling in the microwave for half the day. It’ll melt a bit, and you’ll have a weird dough that ends up being delicious because butter should really have its own fan club.
– Granulated Sugar: Classic and straightforward. It helps create a nice balance in the cookie, and we’re adding it in along with brown sugar for extra flavor depth. Think of it as bringing out happy memories of childhood sweets. Spoiler alert: it totally is!
– Brown Sugar: Ah, the rich counterpart to granulated sugar. I go for light brown sugar because it’s still got that molasses magic without going too crazy. It adds a chewy texture; think about that lovely interplay between gooey and chewy in every bite!
– Egg: Only one, thank you very much. The egg binds everything together; it’s the glue in our cookie love affair. Whisk it first, and then toss it in the buttery sugar goodness. That’s when the magic starts blending.
– Vanilla Extract: Okay, this is where I get a little extra. I use pure vanilla extract because artificial vanilla tastes like a sad knockoff of what it should be. It adds that inviting aroma and flavor depth that’ll make your neighbors ask what on earth you’re baking (and possibly wander over, hoping for free samples).
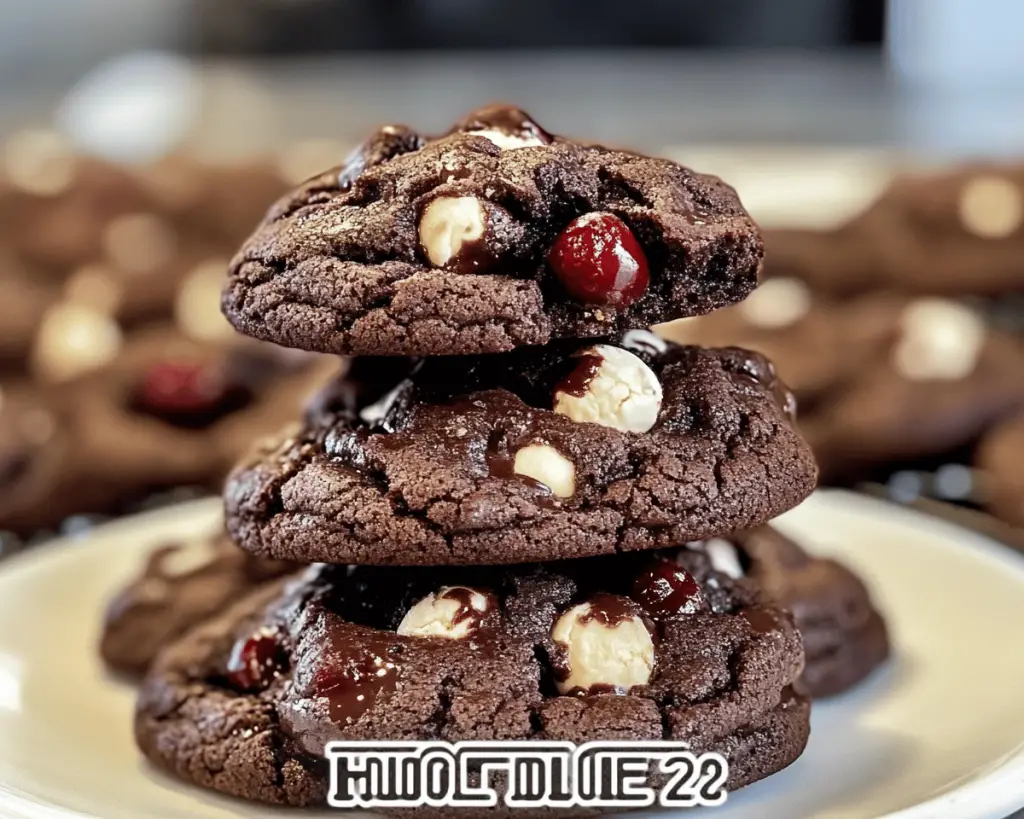
– Dried Cherries: Sweet-tart chewy goodness. I love using dried tart cherries; they’re like the cherry on top (literally) when paired with chocolate. Make sure you chop them up a bit so they aren’t overwhelming — nobody wants a cherry bomb in their cookie!
– Chocolate Chips: Ah, the pièce de résistance. I’m totally down for Nestlé Toll House semi-sweet chocolate chips, but honestly, play around with whatever chocolate vibe strikes your fancy. Dark chocolate chunks? White chocolate if you’re feeling wild? Go for it! Just keep that chocolate ratio on fleek because we’re cookie-focused here.
Let’s Talk Health (or Not)
Is This Even Healthy? Let’s Discuss
Alright, let’s get real for a second. Is this cookie healthy? Well, let’s break it down. Yes, there’s butter. And yes, there’s sugar — two things I’ve come to terms with over the years. Some might say, “But what about my diet?” And I say, “Eat the cookie first; ask questions later.”
Look, I’m not here to lecture you on health. The world is a chaotic mess. Sometimes we need cookies, and I’m here for it. Do you want to have the best fudgy chocolate cherry cookies that make your heart sing? Yes, you do! When it all comes together, you’ll realize that these cookies are worth any temporary guilt. It’s called “self-care,” my friends, and eating cookies is a major part of that.
Your Grocery List
Here’s What You’ll Need
– 1 ½ cups all-purpose flour
– ½ cup cocoa powder (I prefer Hershey’s Special Dark)
– 1 tsp baking soda
– ½ tsp salt
– ½ cup unsalted butter, softened
– ½ cup granulated sugar
– ½ cup brown sugar (light)
– 1 large egg
– 1 tsp vanilla extract
– 1 cup dried cherries, roughly chopped
– 1 cup chocolate chips (another fun option to mix in would be a combination of semi-sweet and dark chocolate chips — just try to keep the chaos to a minimum!)
This will yield about 24 glorious cookies. Enough to share (maybe), or enough for you to binge-eat in one sitting while hanging out with your favorite show on Netflix. No judgment here, seriously.
The Actual Cooking Part
Okay, Let’s Make This
1. **Preheat That Oven!** Set your oven to 350°F (175°C). This step is crucial; you want your cookies baking in the perfect heat, and no one wants a sad undercooked cookie, right?
2. **Mix It Up.** Grab mixing bowls because it’s time to sift those dry ingredients together. In a large bowl, combine your flour, cocoa powder, baking soda, and salt. This is where I also spill half of it on the counter. Whoops! It’s fine — I’ll just scoop it back in because I am a cajoling kitchen disaster sometimes, but you know what? It adds character!
3. **Creamy Goodness.** In another mixing bowl, cream together the softened butter, granulated sugar, and brown sugar until it’s light, fluffy, and looks like a dream you’d like to sleep on. Use a hand mixer or whisk if you feel ambitious. It’s a workout for your arms, but I swear it’s worth it!
4. **Egg-cellent Addition.** Once creamed, beat in the egg and vanilla extract until fully incorporated. Yes, you might look like you’re performing some kind of baking ritual, but listen! This is the foundation of cookie magic.
5. **Dry Meets Wet.** Gradually mix your dry ingredients into the wet mixture, folding until everything is well combined. Don’t rush this part; we don’t want any floury pockets ruining our chocolate-time!
6. **Cherry and Chocolate Infusion.** Time to fold in the chopped dried cherries and chocolate chips. It’s exhilarating when they’re mixed in, and I may or may not have eaten about five chocolate chips through the process. You know, for quality control.
7. **Scoop It Up.** Now, use a tablespoon or a cookie scoop to drop dough onto parchment-lined baking sheets. Leave some space between each scoop because these babies will spread just a tad. This is where the anticipation levels rise — we’re almost there!
8. **Baking Bliss.** Slide those trays into your preheated oven and let them bake for about 10-12 minutes. Try to avoid opening the oven to peek too much; we want to maintain that steady heat. And be sure to set a timer because, let me tell you, I once became so lost in an episode of a cooking show that I forgot my cookies… and they almost turned into a charcoal experiment on my watch!
9. **Cooling Zone.** Once they’re ready, remove the trays from the oven and let them cool on the baking sheets for 5 minutes before transferring them to a wire rack. This cooling step is integral and allows the flavors to settle. Plus, they’re dangerously hot. Trust me, you don’t want a molten chocolate situation burns to your tongue.
Side Notes & Sassy Hacks
Bonus Tips You Didn’t Ask For
– *Swap Out Flours*: I have experimented with almond flour for gluten-free options, and let me tell you, it creates an entirely different cookie, but still worth a try!
– *Frozen Cherries*: If you have frozen cherries lying around (don’t lie, I know you do!), those can work too! Just make sure you thaw and drain them so they’re not liquid bombs in your dough.
– *Microwave Melting*: If you’re impatient like me, use the microwave for melting the chocolate chips. Just make sure to check every 20 seconds until it’s melted. I still remember the first time I tried to melt chocolate — it was an absolute disaster when I forgot it for too long and came back to find a burnt chocolate mess. Learn from my mistake!
– *Mix Up the Chocolate*: Experiment with different chocolate types! You can do caramel-filled chocolate chips, dark chocolate chunks, or those fancy ones with sea salt. Life is too short for boring chocolate. While we’re at it, consider adding a pinch of espresso powder for an extra chocolate-enhancer!
– *Presentation*: For a fancy touch at gatherings, sprinkle a few extra chocolate chips and dried cherries on top before popping them in the oven. You’ll have guests thinking you’ve been taking culinary classes all year.
– *Storing the Cookies*: Shove those cookies in an airtight container and reign the world over — they’ll taste divine for days (if you can resist polishing them off in one sitting). If they last longer than three days, you’ve won the baking lottery!
Final Words of (Culinary) Wisdom
There you have it, my friend! Chocolate cherry cookies that’ll elevate your baking game and bring a smile to your face (and maybe a dance party in your kitchen). If you try baking these beauties, tag me on social media. I want to see your cookie creations and cheer you on from my cozy corner of the internet. And if you end up in a cookie coma afterward, don’t blame me — just embrace it!
Remember, the kitchen is for experimentation and adventure. If you want to add something random, go for it! Let that creativity flow because at the end of the day, it’s just cookie dough that brings us together. Enjoy those fudgy chocolate cherry cookies, and here’s to lots more delicious baking adventures ahead! Happy eating, and happy baking!


