Prep time: 20 minutes
Cook time: 0 minutes
Total time: 20 minutes
Servings: 8
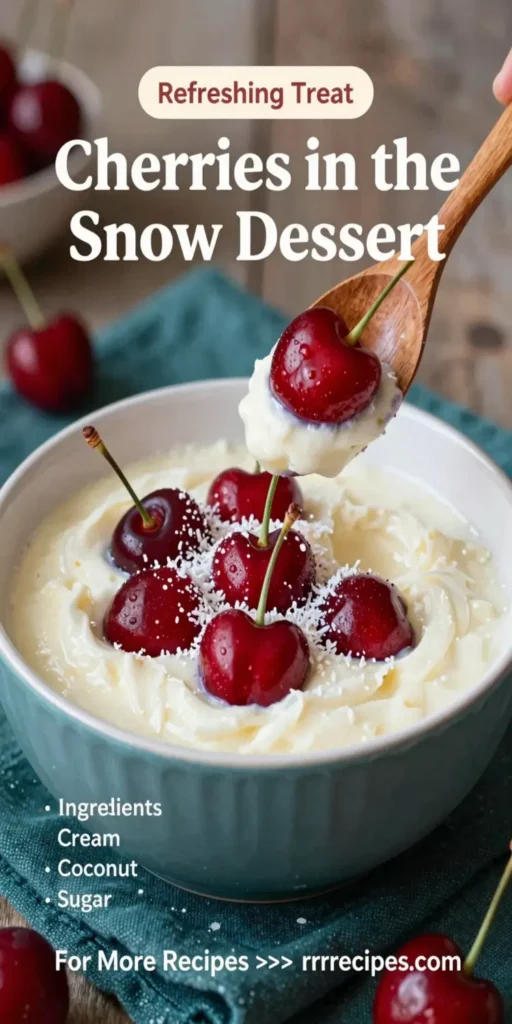
Cherries in the Snow Dessert is a delightful and light treat that takes no baking time, making it perfect for busy parents or anyone new to the kitchen. This dessert combines the sweetness of cherries with fluffy, creamy layers that resemble soft snow. It’s a visually captivating dish that is both easy to make and delicious. With its vibrant colors and light texture, this dessert is sure to impress your family and friends.
What Is Cherries in the Snow Dessert?
Cherries in the Snow Dessert is a no-bake dessert that features a creamy filling layered with fresh cherries. The dessert gets its name from the light and airy layers that remind one of snow. Typically, it consists of a creamy base, often made with whipped cream or cream cheese, intermixed with sweet, juicy cherries. This dessert is perfect for warm weather, as it is cold and refreshing. Its simplicity and elegance make it a popular choice at parties, potlucks, and holiday gatherings.
Why You’ll Love This
You’ll love Cherries in the Snow Dessert for numerous reasons. Firstly, it’s incredibly easy to prepare—as mentioned, there’s no baking involved! This means you can whip it up quickly, making it ideal for last-minute gatherings. Secondly, it offers a perfect balance of flavors: the tartness of cherries complements the sweet and creamy filling beautifully. Moreover, it is customizable; depending on your preferences, you can tweak the ingredients or add various toppings. Lastly, the presentation is stunning, with vibrant red cherries standing out against the white, fluffy layers, making it a great conversation starter at any gathering.
Ingredients You’ll Need
- 1 ½ cups of cherries: Fresh or frozen cherries add a burst of flavor and color to the dessert.
- 2 cups of heavy whipping cream: This is the base for your creamy mixture, providing a rich and airy texture.
- ⅔ cup of powdered sugar: This sweetens your filling without overpowering the fresh cherry flavor.
- 1 cup of cream cheese: The cream cheese adds a slight tanginess and richness to the filling.
- 1 teaspoon of vanilla extract: This adds warmth and enhances all the flavors in the dish.
- Grated chocolate or coconut for garnish (optional): These can be added for an extra touch, enhancing the visual appeal.

How to Make
- Prepare the cherries: If using fresh cherries, wash and pit them. For frozen cherries, allow them to thaw and drain any excess juice. This helps to prevent your dessert from becoming too watery. Set the cherries aside while you prepare the filling.
- Make the filling: In a large mixing bowl, combine the heavy whipping cream and powdered sugar. Use an electric mixer on medium speed to whip the cream until stiff peaks form. This might take about 4-5 minutes. Aim for a light and airy consistency, and be careful not to overwhip.
- Mix in the cream cheese: In another bowl, beat the cream cheese until smooth. Then, gradually add it to the whipped cream mixture. Fold the cream cheese into the whipped cream gently using a spatula, ensuring you do not deflate the mixture. Add the vanilla extract and mix until well incorporated.
- Layer the dessert: In a glass dish or a trifle bowl, start by adding a layer of the whipped cream mixture. Spread it evenly before adding a layer of cherries on top. Repeat these layers until you have used all the filling and cherries, ensuring the top layer is cream. This gives a beautiful contrast when serving.
- Chill: Cover the dessert with plastic wrap and let it chill in the refrigerator for at least 2 hours. This allows the flavors to meld and the cream to firm up. The longer it chills, the better the taste.
- Serve: Once chilled, garnish with grated chocolate or coconut if desired. Use a serving spoon to scoop out portions, ensuring each serving has enough cherries and cream. Enjoy the light, sweet, and creamy dessert!
Variations & Substitutions
Chocolate Cherries: For a chocolate twist, consider mixing cocoa powder into the whipped cream before layering. You could also use chocolate pudding instead of some of the cream cheese for added richness. This variation adds a decadent touch, perfect for chocolate lovers. Pair it with dark chocolate shavings on top for an elegant finish.
Berry Medley: Instead of cherries, try using a combination of berries like strawberries, blueberries, and raspberries. Mixing different berries not only introduces a variety of flavors but also provides stunning colors that make the dessert visually appealing. Each berry has its unique taste, offering a lively explosion of flavors in every bite.
Vegan Alternative: To make this dessert vegan-friendly, use coconut cream instead of heavy whipping cream, and opt for non-dairy cream cheese. Sweeten the coconut cream with maple syrup to preserve the lightness of the dessert. Adding a splash of almond extract instead of vanilla can enhance the nutty flavor.
Nut Crumble Topping: For an added texture, sprinkle a nut crumble on top of the layers. Simply mix some crushed nuts with melted coconut oil and a bit of honey, then bake until golden. This adds a delightful crunch that complements the soft, creamy layers beautifully.
Common Mistakes to Avoid
When preparing Cherries in the Snow Dessert, there are a few pitfalls to watch out for. First, overwhipping the cream can lead to a grainy texture instead of a light, fluffy consistency. Stop whipping as soon as stiff peaks form to avoid this. Second, using too much cherry juice can make the dessert soggy. Be sure to drain cherries properly, especially if using frozen ones. Finally, not chilling the dessert long enough can result in a less stable structure. Allow ample time in the refrigerator to let the layers set properly.
Storage, Freezing & Reheating Tips
Cherries in the Snow Dessert should be stored in the refrigerator, covered with plastic wrap or in an airtight container. It’s best enjoyed within 3-4 days for optimal freshness. If you wish to store it longer, you can freeze the layers separately. To do this, place the whipped cream mixture and cherries in separate airtight containers. The filling can be frozen for up to 2 months. However, freezing can alter the texture of the whipped cream, making it less fluffy upon thawing. Thaw in the refrigerator before serving, and assemble once completely defrosted if you decide to freeze.
Frequently Asked Questions
Can I use other fruits in this dessert?
Yes, you can absolutely use a variety of fruits! Berries like strawberries, blueberries, or even peaches can be substituted for cherries to add different flavors and colors. If you choose to use a fruit that has a lot of moisture, be sure to drain it well to avoid watering down your dessert.
How can I make this dessert ahead of time?
Cherries in the Snow Dessert is an excellent choice for making ahead of time. You can prepare it a day before serving, allowing the flavors to meld beautifully. Just be sure to keep it refrigerated until ready to serve, and check the texture before serving to ensure it maintains its creamy and fluffy qualities.
Is this dessert suitable for kids?
Definitely! This dessert is not only delicious but is also visually appealing, making it a hit with kids. Just be cautious of any allergies related to the ingredients used. The lightness of the dessert makes it appealing and easy for children to enjoy.
Can I reduce the amount of sugar?
You can adjust the sugar to your liking; however, keep in mind that reducing sugar may alter the taste and texture. Since the recipe is quite sweet, you might consider reducing the sugar in the whipped cream slightly while keeping enough to balance out the flavors of the cherries.
Conclusion:
Cherries in the Snow Dessert is a delightful addition to any gathering, providing a refreshing, sweet ending to any meal. With its simple ingredients and easy-to-follow instructions, it’s perfect for busy parents or kitchen beginners looking to impress. Feel free to explore variations and adaptations to make this dessert your own. Each bite offers a delightful contrast of creamy and tart, making it a dessert that will surely leave a lasting impression on all who try it. Now, gather your ingredients and create this beautiful dessert that’s as much a feast for the eyes as it is for the palate!
[Read also: Easy Dessert Recipes for Beginners]


