Prep time: 15 minutes
Cook time: 25 minutes
Total time: 40 minutes
Servings: 12 muffins
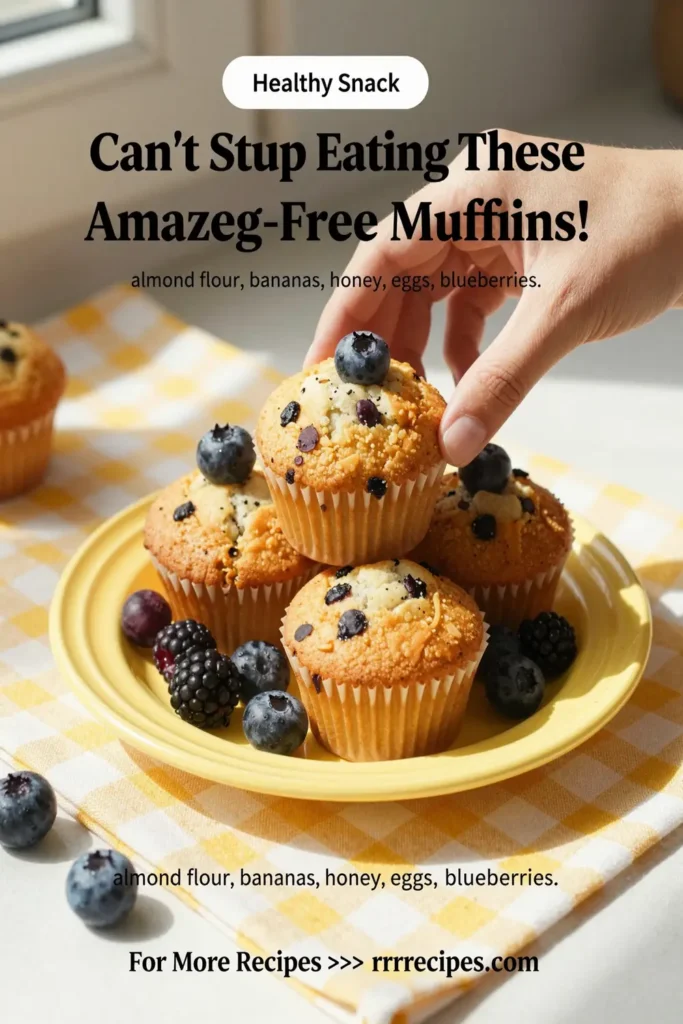
Imagine biting into a freshly baked muffin that’s soft, moist, and packed with flavors. These **amazing gluten-free muffins** are not just any ordinary muffins; they’re truly something you’ll find hard to resist. Perfect for breakfast, an afternoon snack, or even as a sweet treat after dinner, these delightful muffins will keep you coming back for more.
What Is Can’T Stop Eating These Amazing Gluten-Free Muffins!?
These **gluten-free muffins** are crafted using the finest gluten-free ingredients. They are soft, fluffy, and have a delightful sweetness that makes them stand out. Thanks to wholesome ingredients like almond flour or coconut flour and just the right amount of sweetness from honey or maple syrup, these muffins deliver a delicious flavor without compromising on texture. Whether you’re gluten-sensitive or just want to incorporate more gluten-free options into your diet, these muffins fit the bill perfectly.
Why You’ll Love This
There are countless reasons to love these **gluten-free muffins**. For starters, they are incredibly easy to make, which is a huge plus for busy parents and kitchen beginners. With simple, wholesome ingredients, you can whip them up in no time and have a scrumptious snack ready for your family. Additionally, they are versatile—the base recipe can be modified to include various flavors like berries, chocolate chips, or nuts, making them suitable for different taste preferences. Plus, they are a great option for meal prep, allowing you to make a batch at the beginning of the week for quick breakfasts or snacks.
Ingredients You’ll Need
- Almond flour: 2 cups – This serves as the base for your muffins, providing a nutty flavor and moistness without gluten.
- Baking powder: 2 teaspoons – This helps the muffins rise, giving them that light and airy texture.
- Salt: ½ teaspoon – Enhances the flavors of all other ingredients.
- Honey or maple syrup: ½ cup – Acts as a natural sweetener while contributing moisture.
- Eggs: 3 large – Binds the ingredients together and provides structure.
- Vanilla extract: 1 teaspoon – Adds depth and enhances the overall flavor profile.
- Milk (dairy or non-dairy): ½ cup – Moistens the batter; use your favorite variety.
- Mix-ins (chocolate chips or berries): 1 cup – Feel free to customize with your favorite add-ins.

How to Make
- Start by preheating your oven to 350°F (175°C). This step ensures that your muffins bake evenly and get that beautiful golden-brown crust.
- In a large mixing bowl, combine the almond flour, baking powder, and salt. Whisk these dry ingredients together until thoroughly mixed. This helps to aerate the flour and ensures uniform distribution of the baking powder.
- In a separate bowl, whisk together the honey (or maple syrup), eggs, and vanilla extract until the mixture is smooth. The combination should look glossy and well-blended, ensuring that the sweetness is evenly distributed throughout the batter.
- Slowly add the wet mixture to the dry ingredients. Gently fold the mixture until combined, being careful not to overmix. The batter should be thick yet lusciously moist, and you will see some small lumps—this is perfectly fine.
- Now it’s time to add the milk to the batter. Stir in the milk gradually until you achieve a homogenous mixture, adjusting the consistency as needed with a bit more milk if it’s too thick.
- Finally, fold in your chosen mix-ins, whether chocolate chips or berries, integrating them evenly throughout the batter. This step not only adds flavor but also gives your muffins a burst of color and texture.
- Line a muffin pan with paper liners or grease it lightly. Spoon the batter evenly into each muffin cup, filling them about ¾ full. This allows room for the muffins to rise.
- Bake in the preheated oven for 20-25 minutes or until the tops are golden brown and a toothpick inserted in the center comes out clean. Allow them to cool slightly before transferring to a wire rack.
Variations & Substitutions
Chocolate Chip Muffins: For a sweet treat, add 1 cup of dark chocolate chips to your batter. The melted chocolate creates a gooey center that complements the fluffy muffin texture. These muffins make a delightful dessert or a sweet snack option.
Berry Delight Muffins: Incorporate 1 cup of your favorite berries such as blueberries, raspberries, or diced strawberries for a fresh, fruity twist. The natural sweetness of the berries adds flavor and moisture while creating a vibrant color throughout the muffins.
Coconut Muffins: To infuse a tropical flavor, mix in ½ cup of shredded coconut and replace some of the almond flour with coconut flour. This variation results in a chewy yet tender muffin that will remind you of sunny beaches.
Lemon Poppy Seed Muffins: Zest and juice one lemon and mix into your batter along with 2 tablespoons of poppy seeds. This combination adds a bright, tangy flavor and a lovely crunch, making the muffins refreshing and perfect for spring.
Nut Butter Muffins: Swapping half of the oil or butter in the recipe for nut butter such as almond or peanut can add richness and depth. This variation is particularly good for an extra protein boost.
Common Mistakes to Avoid
One common mistake is overmixing the batter. Overmixing can lead to dense muffins rather than light, fluffy ones. Remember to stop mixing as soon as the ingredients are combined, even if it’s a little lumpy.
Another issue is inaccurate oven temperature. Old or inaccurate ovens can lead to underbaked or overly browned muffins. Using an oven thermometer can help ensure that your temperature settings are accurate, giving you perfectly baked muffins every time.
Lastly, don’t skip the cooling step. Cooling the muffins completely before storing helps prevent them from becoming soggy. Air circulation is essential for maintaining their delightful texture.
Storage, Freezing & Reheating Tips
To store your muffins, let them cool completely and then place them in an airtight container. They can be kept at room temperature for 2-3 days, or you can refrigerate them to extend their shelf life for about a week.
If you wish to freeze them, wrap each muffin tightly in plastic wrap and place them in a freezer-safe bag. They can be stored in the freezer for up to 3 months. When you’re ready to enjoy them, simply thaw them at room temperature or pop them in the microwave for a few seconds to warm them up.
To reheat, preheat your oven to 350°F (175°C) and place the muffins on a baking sheet for about 10-12 minutes. This will refresh their crust and make them taste just like fresh-baked.
Frequently Asked Questions
Are these gluten-free muffins safe for those with celiac disease? Yes, as long as all the ingredients used are certified gluten-free, these muffins are safe for those with celiac disease. Always check labels to ensure there’s no cross-contamination during production.
Can I make these muffins vegan? Absolutely! To make these muffins vegan, substitute the eggs with flax eggs (1 tablespoon of ground flaxseed mixed with 2.5 tablespoons of water per egg), and for the milk, you can use any plant-based alternative.
What can I substitute for almond flour? If you don’t have almond flour, you can use coconut flour; however, be aware that coconut flour absorbs more moisture, so you will likely need to adjust the amount of liquid in the recipe.
Can I use fresh fruits instead of dried ones? Yes, you can substitute dried fruits with fresh while preparing your batter. However, it’s good to keep in mind that fresh fruits may add more moisture, so you may need to slightly reduce the liquid content in the recipe.
How can I tell when the muffins are done baking? A simple way to check for doneness is to insert a toothpick into the center of one muffin. If it comes out clean or with a few crumbs, the muffins are done. If it has batter stuck to it, they need more baking time.
Conclusion: With these **amazing gluten-free muffins**, you now have not only a recipe that is delicious but a path to baking joy. Their versatility, ease of preparation, and mouthwatering flavors make them an essential part of your kitchen repertoire. Enjoy them fresh out of the oven or save them for a delightful treat throughout the week; either way, they’re sure to become a favorite. Happy baking!