Prep time: 30 minutes
Cook time: 2 hours
Total time: 2 hours 30 minutes
Servings: 10-12
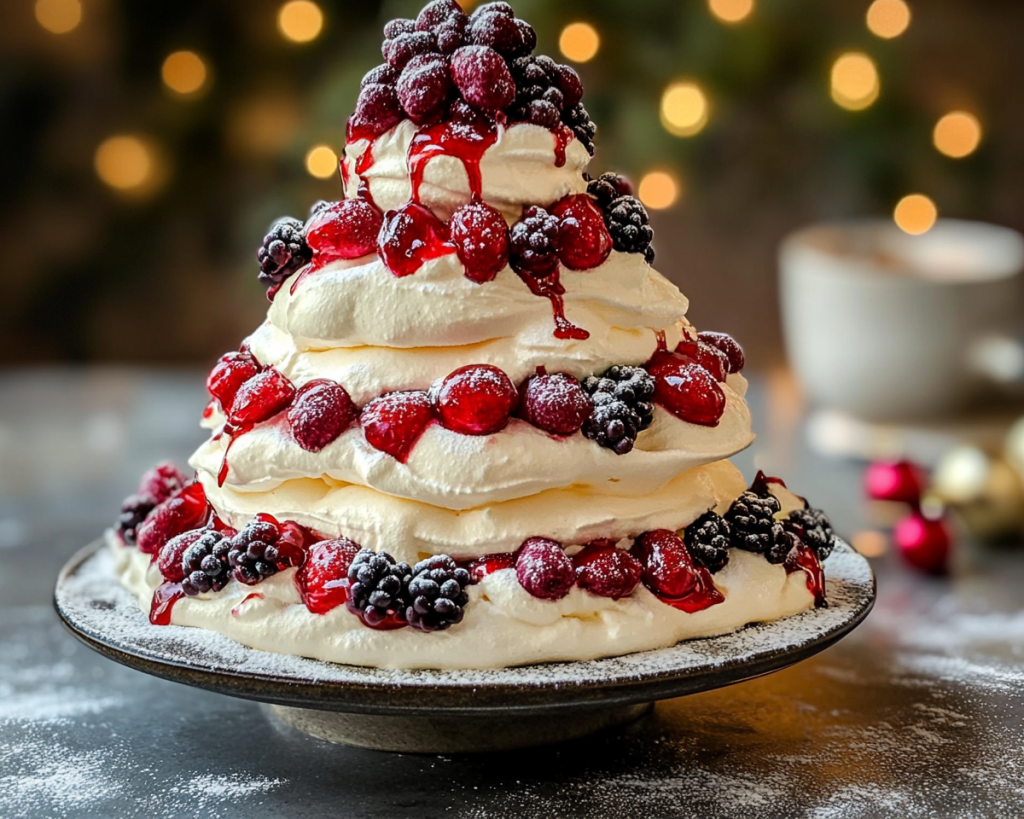
Imagine a festive dessert that makes your holiday table not just a feast for the stomach, but a stunning visual delight. The **Pavlova Christmas Tree** not only serves this purpose but also tantalizes your taste buds with its exquisite texture and flavor. This layered sweet treat combines crisp meringue with luscious whipped cream and vibrant fruits, creating a mouthwatering experience that will have your guests asking for seconds. In this article, you will learn how to create this stunning dessert, explore variations and substitutions, and discover tips for perfecting your Pavlova.
What Is Can You Make This Stunning Pavlova Christmas Tree Recipe?
The **Pavlova** is named after the famous Russian ballerina Anna Pavlova and is believed to have been created in her honor during her tour of Australia and New Zealand in the 1920s. It is a meringue-based dessert characterized by a crisp crust and soft, light inside, much like a delicate dance. When shaped into a tree, it becomes an incredible centerpiece for any festive occasion.
Traditionally, the base of a Pavlova is made with egg whites and sugar, which are whipped to form stiff peaks before being baked slowly at a low temperature. This process allows the outside to achieve a beautiful, crunchy shell while the inside retains a soft, marshmallow-like texture. Topping the Pavlova with whipped cream and fresh fruits enhances the flavor, adding creaminess and a burst of juiciness.
Creating a Pavlova Christmas Tree not only serves as a delicious dessert but also allows for artistic expression. The layers can be arranged in a way that mimics the shape of a Christmas tree, making it both visually stunning and delicious.
Why You’ll Love This
One of the incredible things about the Pavlova Christmas Tree is its aesthetic appeal, making it ideal for festive gatherings and celebrations. Beyond its beauty, this dessert also offers amazing versatility; it can be customized with various toppings to suit your preference or dietary needs. Whether you choose to use fresh berries, tropical fruits, or even edible flowers, the possibilities are endless.
Additionally, the Pavlova’s primary components—**egg whites** and **sugar**—are quite cost-effective, making it an accessible option for home bakers on a budget. It’s naturally gluten-free, making it suitable for those with specific dietary restrictions. Many people believe that making meringue is a daunting task, but with a few helpful tips and techniques, anyone can enjoy the satisfaction of crafting a successful Pavlova.
Don’t be deterred by previous baking endeavors that might not have gone as planned; this recipe is perfect for beginners eager to impress. You will gain confidence in the kitchen, especially when you see your guests’ delighted reactions!
Ingredients You’ll Need
- 4 large egg whites: These are the key ingredient for the meringue base. Fresh eggs work best for achieving stable peaks.
- 1 cup (200g) granulated sugar: Provides sweetness and contributes to the Pavlova’s crisp texture.
- 1 teaspoon vanilla extract: Adds depth of flavor to the Pavlova.
- 1 teaspoon cornstarch: Helps stabilize the meringue and gives it a soft texture.
- 1/2 teaspoon white vinegar: Helps improve the meringue structure and adds a touch of tanginess.
- 1 cup (240ml) heavy cream: Whipped to form a luscious topping that complements the meringue nicely.
- Fresh fruits: Use a variety of berries, kiwis, and other seasonal fruits for decoration and flavor.
- Edible glitter (optional): For adding a festive sparkle to your Pavlova tree.
Each ingredient plays a significant role in the overall success of your Pavlova. The **egg whites** must be room temperature for optimal whipping. If you want to experiment with different flavors, consider using flavored extracts or adding citrus zest.
How to Make
- Prepare your oven and baking sheet: Preheat your oven to 250°F (120°C). Line a baking sheet with parchment paper, creating a Christmas tree shape template using a pencil if needed. This will help guide you when forming the layers.
- Whip the egg whites: In a large mixing bowl, use an electric mixer to beat the egg whites until they form soft peaks. This typically takes about 4-5 minutes. Make sure your mixing bowl is completely clean and free from any grease.
- Add sugar gradually: Once you have soft peaks, begin slowly adding the granulated sugar, a tablespoon at a time, while continuing to whisk the egg whites. This process could take an additional 8-10 minutes until the mixture becomes glossy and stiff peaks form.
- Add flavorings: Gently fold in the vanilla extract, cornstarch, and white vinegar. These ingredients will enhance the flavor while contributing to a smooth texture. Avoid over-mixing; you want to keep as much air in the meringue as possible.
- Shape the meringue: Spoon the meringue mixture onto the prepared baking sheet, shaping it into the tree form. Use a spatula to create height and texture, forming peaks and valleys for visual interest.
- Bake slowly: Place the baking sheet in the preheated oven and bake for approximately 1.5 hours. The meringue should be dry to the touch and easily peel away from the parchment paper. Turn off the oven and leave the meringue inside to cool completely. This will help prevent cracking.
- Whip the cream: Once the meringue is completely cooled, whip the heavy cream in a separate bowl until stiff peaks form. This will create a rich topping that complements the sweetness of the Pavlova.
- Assemble the Pavlova Tree: Begin layering the whipped cream onto each meringue layer, spreading it with an offset spatula. Top with your choice of fresh fruits, allowing their juices to enhance the overall flavor of the dessert.
- Finish with decorations: If desired, sprinkle edible glitter across the top for extra festivity. This addition will elevate the visual appeal and impress your holiday guests.
- Serve immediately: For the best taste experience, serve the Pavlova immediately to enjoy its texture; otherwise, the meringue will start to absorb moisture and lose its crispness.
As you navigate through these steps, take note of texture cues—the meringue should be glossy and stiff after whipping, while the cream should form stiff peaks without becoming butter. Remember, patience is key, especially while baking the meringue.
Variations & Substitutions
Chocolate Pavlova: For chocolate lovers, you can incorporate cocoa powder into the base for a delicious twist. Replace 2 tablespoons of granulated sugar with 2 tablespoons of cocoa powder before mixing. This variation provides a rich chocolate flavor in each bite, making it perfect for festive gatherings.
Fruit-Only Pavlova: If you want to keep things simple or avoid dairy, consider skipping the whipped cream entirely and piling the **Pavlova** high with a myriad of fresh fruits. Think tart **raspberries**, juicy **kiwis**, and bright **mangoes**. This fruity topping will not only look designer but is also refreshing.
Vegan Meringue: For those looking for plant-based options, you can use aquafaba (the liquid from canned chickpeas) as a substitute for egg whites. Whip aquafaba until it forms stiff peaks, then gradually add sugar following the same process as in traditional meringue preparation.
Common Mistakes to Avoid
One of the most frequent issues while making meringue is whipping the egg whites too long, resulting in a grainy and dry texture. Be sure to check often—once stiff peaks form, stop mixing to maintain smoothness. Another common mistake is baking at too high a temperature, leading to the meringue cracking or browning. Always follow temperature guidelines closely for the best results.
If your Pavlova is not holding its shape or collapses upon cooling, it may be that the meringue wasn’t whipped long enough or sufficient sugar wasn’t incorporated. Make sure to be patient during the process of mixing for ideal results.
Storage, Freezing & Reheating Tips
Proper storage is essential for preserving the Pavlova’s texture. You can store leftover meringue layers in an airtight container at room temperature for up to 3 days. If you prefer to prepare the Pavlova in advance, consider assembling it just before serving to keep the cream fresh and the meringue crunchy.
For freezing, it’s best to freeze the uncooked meringue shape without any toppings. After piping and shaping it, wrap it tightly in plastic wrap and place it in an airtight bag. It can be frozen for up to a month. When ready to use, bake straight from frozen, increasing the baking time slightly.
Avoid reheating meringue in the microwave or oven, as this will ruin its texture. Instead, serve it fresh for the best experience.
Frequently Asked Questions
Can the Pavlova be made ahead of time? Yes, you can make the meringue ahead of time. Once baked and cooled, store it in an airtight container. However, it’s best to assemble the Pavlova with topping just prior to serving to maintain the desired texture.
What kind of fruits work best for the toppings? A variety of fruits can be used, typical choices include strawberries, blueberries, kiwis, and passionfruit. Feel free to mix and match seasonal fruits for a colorful and flavorful presentation.
Can I use powdered sugar instead of granulated sugar? It’s best to use granulated sugar as the coarser texture helps in creating the right structure for the meringue. Powdered sugar can make it too dense.
How do I know when the meringue is done? The perfect meringue should have a dry exterior and peel away easily from the baking parchment. It should feel light and airy but firm to the touch.
Why is my Pavlova cracking? Cracking can occur due to sudden temperature changes, so it’s important to leave your Pavlova in the oven while it cools. High baking temperatures can also contribute, so ensure you stick to low and slow baking styles for the best outcome.
Conclusion:
This Pavlova Christmas Tree recipe is a delightful blend of art and culinary expertise. Its stunning presentation and delicious flavor will impress any audience, making it a must-try for your holiday gatherings. Embrace the beautiful layers of meringue and cream, and don’t shy away from customizing it to suit your unique taste. Share it with friends and family who’ll also enjoy its romantic appearance and delightful taste. Your holiday season is sure to be memorable with this show-stopping dessert on the table!