**Meta Title:** Fruity Pebbles Bread: Colorful & Fun Cereal Treats
**Meta Description:** Discover how to make Fruity Pebbles Bread, a fun and colorful treat bursting with sweet cereal crunch. Perfect for breakfast or a snack!
—
You know that feeling when you walk down the cereal aisle and see a vibrant box of Fruity Pebbles grinning back at you? It’s hard not to feel a wave of nostalgia wash over you—the bright colors, the sweet aroma of breakfast goodness, and those delightful crunchy bites invoking childhood joy. Well, friends, what if I told you that you could capture that same joy in a warm, fluffy loaf of bread? Yes, that’s right—let me introduce you to the wonders of **Fruity Pebbles Bread**!
This recipe brings together the best of both worlds: the nostalgic flavors of everyone’s favorite cereal and the delightful textures of freshly baked bread. As a chef who believes in getting creative in the kitchen, I’m excited to share this colorful creation with you. Get ready to unleash your inner child and discover how to make this deliciously fun treat that’s sure to make everyone smile. Whether you’re enjoying it for breakfast, snack time, or just because, this fruity bread is guaranteed to bring a burst of flavor and color to your day!
What is Fruity Pebbles Bread?
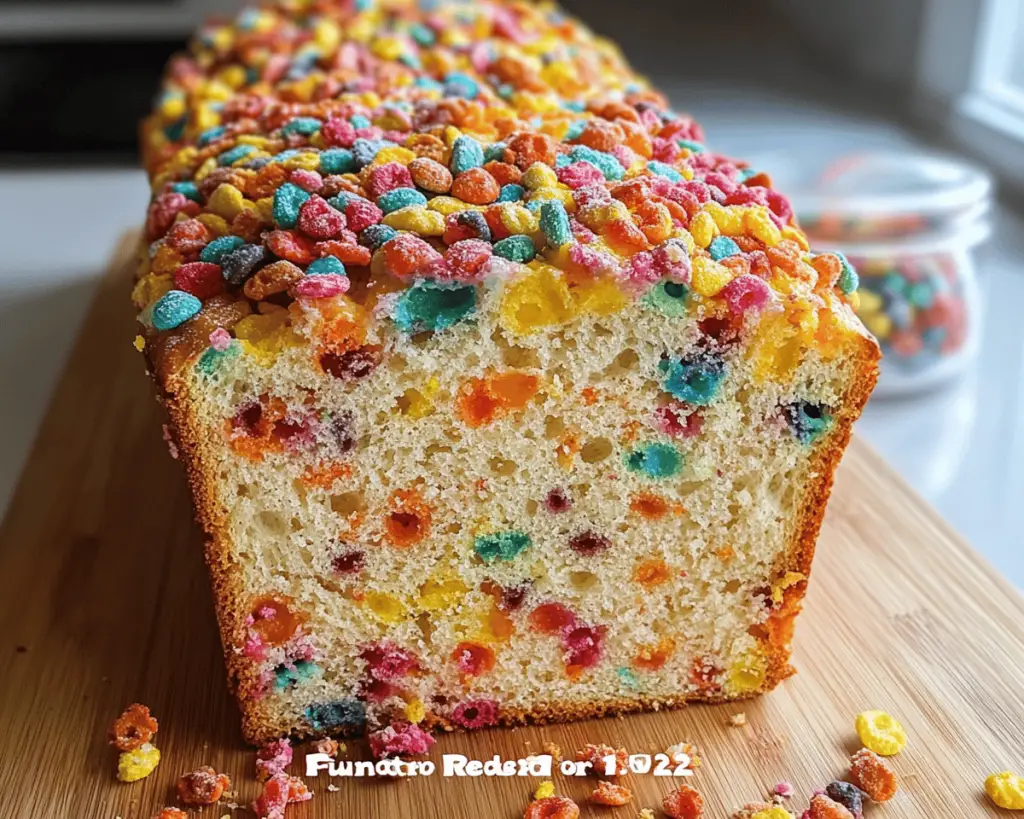
Fruity Pebbles Bread is a playful twist on traditional bread, taking inspiration from the iconic breakfast cereal known for its vibrant colors and sweet, fruity flavor. Often made with a light, fluffy bread dough, this colorful creation incorporates crushed Fruity Pebbles to create a beautiful visual appeal and a delightful crunch that surprises your palate.
The origins of using cereals in bread baking stem from a desire to combine flavors and textures in unexpected ways. While Fruity Pebbles may have started as a breakfast staple, they have made their way into desserts, cakes, and now, bread! The sweet explosion of flavors plays well with the soft chewiness of the bread, making each slice a delightful experience. Picture this: a slice of bread adorned with marshmallow-like sweetness and a rainbow of colors peeking through. It’s not just bread; it’s an edible celebration!
Why You’ll Love This Fruity Pebbles Bread
Let’s take a moment to revel in why this recipe should be on your must-try list. First of all, it’s an absolute showstopper—you can’t help but smile when you see a vibrant loaf of Fruity Pebbles Bread on your kitchen counter. Imagine slicing into it and revealing those colorful pieces that remind you of carefree mornings spent enjoying your favorite cereal.
But it’s not just about the looks; this recipe is also incredibly simple and family-friendly. You can whip it up in under two hours, making it a great option for a quick breakfast or snack. Kids love helping out in the kitchen, and this bread provides the perfect opportunity to get them involved in the baking process. Plus, it’s budget-friendly; you’re likely to have the ingredients on hand already!
The taste? This bread is a delightful combination of sweet and fruity, with hints of vanilla and butter that perfectly complement the colorful cereal. Each bite is a crunchy surprise, making it impossible to stop at just one slice. You’re also celebrating creativity—food should be fun, and this recipe allows you to embrace that spirit in the most delicious way possible!
Ingredients You’ll Need
To make this vibrant Fruity Pebbles Bread, gather the following ingredients:
1. **All-purpose flour (3 cups)**: This is the backbone of your bread. It provides structure and is perfect for creating soft, airy textures. If you’re looking to add some whole grains, you could substitute up to half with whole wheat flour.
2. **Granulated sugar (1/4 cup)**: Sweetening the dough without overpowering it. This sugar helps with browning and gives a hint of sweetness that complements the cereal.
3. **Salt (1 teaspoon)**: A necessary element to enhance flavor and balance the sweetness. It also strengthens the dough structure.
4. **Active dry yeast (2 1/4 teaspoons or 1 packet)**: Essential for leavening your bread. Make sure your yeast is fresh for the best rise!
5. **Warm milk (1 cup)**: This hydrates the dough and wakes up the yeast. Use whole milk for richer flavor, but any milk can work in a pinch.
6. **Unsalted butter (1/4 cup, melted)**: Adds richness and flavor, keeping the bread soft. Be sure to cool it slightly before adding to the dough.
7. **Egg (1 large)**: Acts as a binding agent, adding moisture and richness to your bread. For a dairy-free alternative, you could use applesauce or a flax egg (1 tablespoon ground flaxseed mixed with 2.5 tablespoons water).
8. **Fruity Pebbles cereal (1 cup)**: The star of the show! This will add the sweet, colorful crunch we crave. Try to use fresh cereal for maximum crunch and flavor.
9. **Vanilla extract (1 teaspoon)**: A delightful flavor enhancer that pairs well with the fruity notes of the cereal, making your bread taste like a treat.
How to Make Fruity Pebbles Bread
Now that you have your ingredients ready, let’s dive into the step-by-step process of creating this colorful loaf!
1. **Activate the Yeast**: In a small bowl, combine the **warm milk** with **active dry yeast** and **1 tablespoon of sugar**. Stir gently and let it sit for about 5-10 minutes until it becomes frothy. This step is crucial—if your yeast doesn’t bubble up, it might be old and won’t leaven your bread.
2. **Make the Dough**: In a large mixing bowl, whisk together the **flour**, **remaining sugar**, and **salt**. In another bowl, beat the **egg** and add in the melted **butter**, the frothy yeast mixture, and **vanilla extract**. Pour this wet mixture into the dry ingredients, and stir until a rough dough forms.
3. **Kneading**: Turn the dough out onto a lightly floured surface. Knead the dough for about 8-10 minutes until it becomes smooth and elastic. Add a little extra flour if it feels too sticky. As you knead, let the dough come alive under your hands—get a feel for its texture!
4. **First Rise**: Place the kneaded dough into a greased bowl, cover it with a kitchen towel or plastic wrap, and let it rise in a warm, draft-free place for about an hour or until it doubles in size. This is when the magic happens; the yeast is working hard to create that fluffy texture.
5. **Incorporate Fruity Pebbles**: After the dough has risen, punch it down to release any air bubbles. Fold in the **Fruity Pebbles cereal** gently, ensuring it’s evenly distributed without crushing it too much. Visualize those colorful bites throughout your loaf.
6. **Shape and Final Rise**: Grease a 9×5 inch loaf pan. Shape the dough into a loaf by flattening it out gently, then rolling it up from one end. Pinch the seams to seal and place it into the prepared pan. Cover it again and let it rise for another 30-40 minutes until it puffs up nicely.
7. **Preheat and Bake**: Preheat your oven to 350°F (175°C) about 10 minutes before your dough is done rising. Bake the loaf for 30-35 minutes, or until golden brown and it sounds hollow when tapped. Your kitchen will be filled with a heavenly sweet aroma that’s nearly impossible to resist!
8. **Cooling and Enjoying**: Once baked, carefully remove the bread from the pan and let it cool on a wire rack. Resist the urge to slice it too soon; allowing it to cool will give it the best texture for slicing.
Tips, Tricks & Variations
Here are a few expert tips to ensure your Fruity Pebbles Bread turns out perfectly every time:
1. **Storage**: Keep your bread wrapped in plastic wrap or in a sealed container at room temperature for up to three days. For longer storage, slice it and freeze it in a freezer-safe bag. To enjoy, simply toast or reheat in the oven.
2. **Mix Up the Cereal**: While Fruity Pebbles are delightful, feel free to get creative! You can substitute with other colorful cereals like Trix or Cap’n Crunch for a different flavor profile.
3. **Add-ins Galore**: Enhance your bread by incorporating chocolate chips, nuts, or dried fruits into the mix for added texture and flavor layers.
4. **Frost it Up**: For a sweeter treat, consider drizzling a glaze made from powdered sugar and milk on top after the bread cools. It adds an extra layer of sweetness!
5. **Toasting Magic**: Serve slices toasted with a smear of butter or cream cheese for a decadent breakfast that will leave your taste buds dancing!
What to Serve With Fruity Pebbles Bread
Fruity Pebbles Bread is delicious on its own, but if you’d like to elevate your experience, here are a few suggestions for what to serve alongside:
– **Creamy Daydreams**: A dollop of whipped cream cheese or a light mascarpone spread adds a luscious, creamy contrast to the sweet bread.
– **Fruity Compote**: Pair it with a homemade berry compote. The fruits’ tartness balances the sweetness beautifully, making each bite a burst of flavor.
– **Beverages**: Enjoy it with a glass of fresh milk, a sweetened iced coffee, or even a bright lemonade for a refreshing balance.
– **Greek Yogurt**: A side of tangy Greek yogurt topped with fruits gives a delightful freshness that complements the sweetness of the bread.
Nutrition & Health Benefits
Fruity Pebbles Bread provides a fun treat, but it also has the nutritional value typical of homemade bread. On average, a slice contains around 180 calories, with carbohydrates coming from the flour and sugar, while the egg and milk add protein and healthy fats. Just remember, moderation is key! If you’re intrigued by the nutritional aspects of bread and cereals, feel free to check out resources at [Healthline](https://www.healthline.com/) or [USDA](https://www.usda.gov/).
Frequently Asked Questions
**1. Can I use whole wheat flour instead of all-purpose?**
Certainly! You can substitute half of the all-purpose flour with whole wheat flour for added fiber and nutrition. Just be aware that it may change the texture slightly, making it denser.
**2. What should I do if my dough doesn’t rise?**
If your dough doesn’t rise, it might be due to inactive yeast or not a warm enough environment. Ensure your yeast is fresh, and try placing your dough in a slightly warmed oven to encourage rising.
**3. Can I make this bread ahead of time?**
Absolutely! You can prepare the dough, let it rise, then shape it. Instead of baking right away, cover it and refrigerate for up to 24 hours. Let it come to room temperature and rise again before baking.
**4. What’s the best way to slice this bread?**
To get even slices without squishing the loaf, use a serrated knife and let the bread cool completely before cutting. This ensures a clean slice with minimal crumble.
**5. Can I freeze Fruity Pebbles Bread?**
Yes! Slice the bread and freeze it in an airtight container or freezer bag. It can last up to three months in the freezer. Just thaw and toast when you’re ready to enjoy!
—
Recapping the magic of Fruity Pebbles Bread, this vibrant creation is more than just a loaf of bread; it’s a nostalgic journey wrapped in colorful swirls and sweet bites. Perfect for breakfast or as an afternoon treat, it’s a recipe that promises joy in every slice. So go ahead, bring this playful recipe into your kitchen tonight—you’ll be thrilled with the delightful results! And if you loved it, leave a comment or tag me on Instagram! Let’s celebrate the joy of fruity fun together.