Prep time: 20 minutes
Cook time: 25 minutes
Total time: 45 minutes
Servings: 12
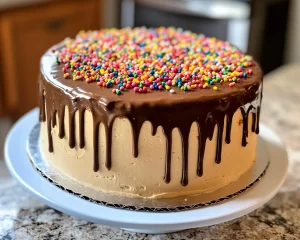
Creating the perfect cake for a special celebration can sometimes feel daunting, but this **Birthday Cake: Chocolate Peanut Butter Drip Birthday Cake in 45 Minutes** is designed to empower even the busiest of bakers. With its rich chocolate layers, creamy peanut butter frosting, and an eye-catching drizzle, this cake embodies all the delightful flavors that make birthday celebrations memorable. This recipe takes only 45 minutes from start to finish and is sure to impress your friends and family.
What Is Birthday Cake: Chocolate Peanut Butter Drip Birthday Cake in 45 Minutes?
This delightful cake combines the classic flavor of chocolate cake with creamy peanut butter frosting, topped with a glossy chocolate drip. It’s a celebration in every bite! Perfect for birthday parties, this recipe offers a fun and efficient way to create a stunning centerpiece without spending hours in the kitchen. The layers are moist, decadent, and full of flavor, making it hard to resist a second slice.
Why You’ll Love This
Not only does this cake taste amazing, but it also comes together quickly, making it a lifesaver for busy parents or anyone who wants to celebrate without the fuss. The **Chocolate Peanut Butter Drip** adds a luxurious finish that will have everyone reaching for their forks. You’ll love how the contrasting flavors of rich chocolate and nutty peanut butter complement each other perfectly. Additionally, the recipe is straightforward enough for kitchen beginners, ensuring success every time.
Ingredients You’ll Need
- 1 ¾ cups all-purpose flour: This provides the structure needed for a fluffy cake.
- 1 ½ cups granulated sugar: Adds sweetness and helps with browning.
- ¾ cup unsweetened cocoa powder: Essential for that rich chocolate flavor.
- 1 ½ teaspoons baking powder: Helps the cake rise for a light texture.
- ½ teaspoon baking soda: Works together with baking powder for the perfect rise.
- ½ teaspoon salt: Enhances the flavors in the cake.
- 2 large eggs: They bind the ingredients and add moisture.
- 1 cup milk: This adds moisture and richness to the cake.
- ½ cup vegetable oil: Keeps the cake moist.
- 2 teaspoons vanilla extract: Enhances flavors with a sweet aroma.
- 1 cup creamy peanut butter: The star of the frosting, providing a nutty flavor.
- 4 cups powdered sugar: For a sweet and fluffy frosting.
- ½ cup heavy cream: Needed for the chocolate drip to achieve that glossy finish.
- ½ cup semi-sweet chocolate chips: Used for the chocolate drip.
How to Make
- Preheat your oven to 350°F (175°C). Prepare two 9-inch round cake pans by greasing and lining the bottoms with parchment paper to ensure easy removal later. The parchment paper will help keep the cake from sticking, giving you clean, beautiful layers.
- In a large mixing bowl, combine the dry ingredients. Whisk together the flour, granulated sugar, cocoa powder, baking powder, baking soda, and salt. This step is crucial as it ensures that all the leavening agents are evenly distributed throughout the cake batter.
- Add the wet ingredients. Make a well in the center of the dry ingredients, then add in the eggs, milk, vegetable oil, and vanilla extract. Mix until just combined, careful not to overmix, as this can affect the cake’s texture.
- Divide the batter evenly between the prepared pans. Smooth the tops with a spatula to level it out before placing them in the oven. Bake in the preheated oven for 25 minutes, or until a toothpick inserted in the center comes out clean.
- Cool the cakes in the pans for 10 minutes. Then, transfer to wire racks to cool completely. Allowing them to cool thoroughly prevents the frosting from melting when you layer the cake.
- Prepare the peanut butter frosting. In a mixing bowl, beat together the peanut butter and powdered sugar until there are no lumps. Gradually add heavy cream, mixing until you achieve a smooth, spreadable consistency.
- Layer the cakes. Once the cakes are completely cool, place one layer on a serving platter. Spread a generous amount of peanut butter frosting on top, then place the second layer on top. Use the remaining frosting to cover the top and sides of the cake.
- Make the chocolate drip. In a microwave-safe bowl, combine the chocolate chips and heavy cream. Heat in 30-second intervals, stirring in between, until smooth. Let it cool slightly before pouring it over the top of the cake, allowing it to drip down the sides.
Variations & Substitutions
Gluten-Free Option: You can easily adapt this recipe for a gluten-free version by using a gluten-free all-purpose flour. Make sure to measure carefully to maintain the right texture, and consider adding a bit of xanthan gum for better structure.
Nut-Free Option: If you have nut allergies, replace the peanut butter with sunflower seed butter or a nut-free butter option. This alteration still provides a creamy texture without compromising flavor.
Chocolate Cake Variation: For an even more intense chocolate experience, substitute some of the flour with additional cocoa powder. This will create a denser, richer cake that chocolate lovers will adore.
Common Mistakes to Avoid
One common mistake is overmixing the batter. This can lead to a tough cake. Remember to mix just until combined. Also, allowing the cake layers to cool completely is essential before frosting. If they’re still warm, the frosting will melt and not set properly. Lastly, be cautious not to pour the chocolate drip while it’s too hot; allowing it to cool slightly will prevent it from running off the cake entirely.
Storage, Freezing & Reheating Tips
To store the cake, keep it in an airtight container at room temperature for up to three days. For longer storage, you can freeze the cake. Wrap each layer in plastic wrap and then aluminum foil to prevent freezer burn. It can last in the freezer for up to three months. When ready to enjoy, let it thaw overnight in the refrigerator. Reheat individual slices in the microwave for about 10-15 seconds to bring back the cake’s moist texture.
Frequently Asked Questions
Can I use other types of frosting?
Absolutely! While peanut butter frosting is decadent, you can opt for a classic vanilla buttercream, cream cheese frosting, or even a ganache. Each alternative will give you a unique flavor profile while complementing the chocolate cake beautifully.
How can I achieve a perfect chocolate drip?
For a flawless drip, make sure your chocolate ganache is the right consistency; it should be pourable but not too thin. Allow it to cool slightly before applying it to the cake, and start from the center, letting it drip naturally over the edges.
Is this cake suitable for other occasions besides birthdays?
Without a doubt! The **Chocolate Peanut Butter Drip Cake** is perfect for any celebration, be it holidays, anniversaries, or even simply a treat for weekends. Its rich flavors and beautiful presentation make it a crowd-pleaser for any event.
Can I make this cake in advance?
Yes! You can bake the layers a day or two ahead and store them wrapped in plastic in the fridge. Frosting and decorating can be done closer to when you plan to serve to ensure freshness.
What should I do if my cake sinks in the middle?
A sinking cake can be due to several factors, including underbaking or adding too many wet ingredients. Always check for doneness with a toothpick, and if it comes out clean, you’re good to go. If it sinks, no worries; a bit of frosting can cover any imperfections.
Conclusion:
This **Birthday Cake: Chocolate Peanut Butter Drip Birthday Cake in 45 Minutes** is not only a treat for the taste buds but also a visually stunning dessert that brings joy to any celebration. With its rich chocolate and creamy peanut butter blend, it’s bound to be a hit. Plus, the ease and speed of preparation make it accessible for all bakers, whether seasoned or new. Enjoy making this delightful cake and share the experience with those special to you!