Prep time: 20 minutes
Cook time: 12 minutes
Total time: 32 minutes
Servings: 24 cookies
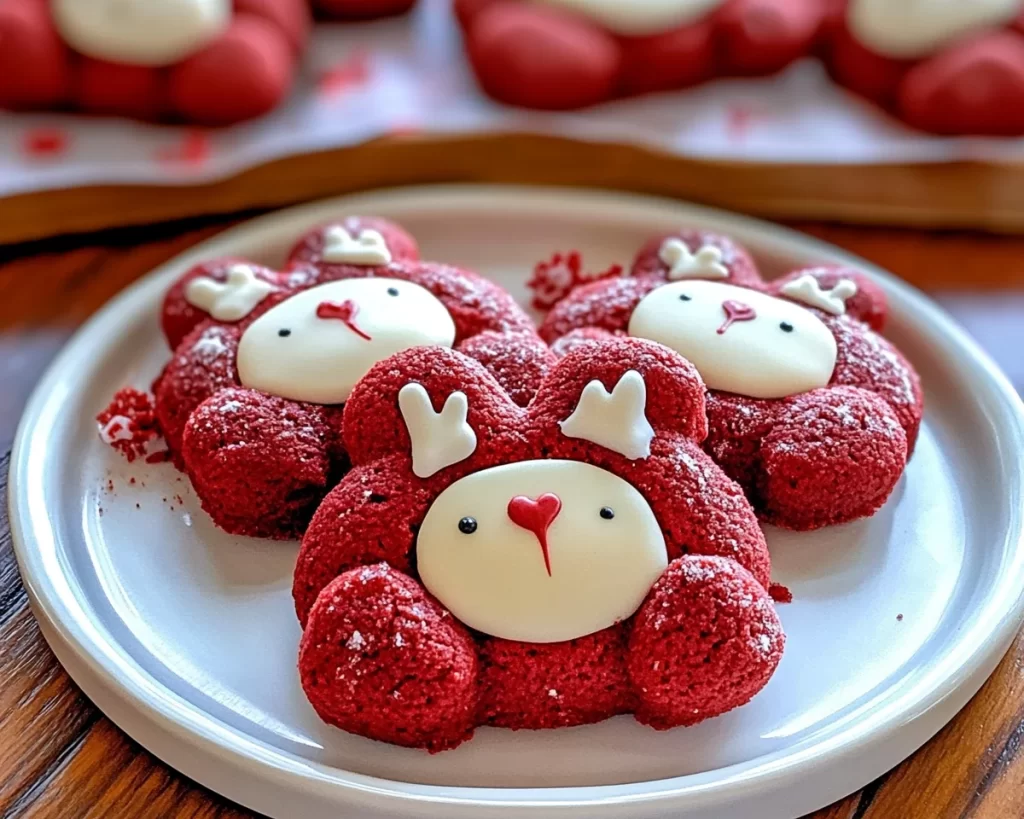
Classic Red Velvet Bear Cookies are more than just sweet treats; they evoke a sense of nostalgia and warmth that can bring a smile to anyone’s face. Imagine a cozy kitchen filled with the scent of freshly baked cookies, and you can already feel the joy these cute, inviting cookies bring. Whether you’re a busy parent looking to create delightful snacks for your kids or someone just stepping into the world of baking, this recipe is tailored for you. You will learn not just the ins and outs of making these cookies but also the tips and tricks that will ensure they turn out perfect every single time.
Beyond their charming appearance, these Classic Red Velvet Bear Cookies are a celebration of flavor and texture. They are wonderfully soft and chewy with a unique hint of cocoa that complements the red hue beautifully. While the traditional red velvet cake often feels rich and indulgent, these cookies strike an ideal balance, making them perfect for any occasion — be it a birthday party, holiday gathering, or just a sweet treat after dinner. As you delve into the details, prepare to uncover the secrets behind achieving that inspired taste while also exploring helpful tips for variations and substitutions that accommodate your dietary needs.
What Is Classic Red Velvet Bear Cookies?
Classic Red Velvet Bear Cookies are delightful, cake-like cookies that boast the signature red color associated with red velvet desserts. This unique hue comes primarily from the addition of red food coloring, but it is the combination of flavors that truly makes these cookies stand out. The subtle cocoa flavor enhances the sweetness while contributing to a rich texture that feels indulgent yet is relatively easy to achieve. These cookies capture the essence of red velvet cake in a fun and inviting shape, often styled to look like adorable little bears.
Originally, red velvet cake has roots that can be traced back to the United States, with its popularity soaring during the 20th century. It’s often characterized by its striking visual appeal, thanks to the deep red color that contrasts beautifully with cream cheese frosting. By taking this beloved dessert and transforming it into cookies, we maintain the iconic taste while introducing a level of convenience that home bakers adore. Each bite of these Classic Red Velvet Bear Cookies is a mix of nostalgia and whimsy, making them a perfect choice for sharing with loved ones or even for school bake sales.
The texture of these cookies is incredibly soft, almost like a chewy brownie but not as dense. The key to achieving that perfect texture lies in how you handle your ingredients — a touch of care can prevent them from becoming too dry or crumbly. The vibrant red color not only creates visual appeal; it also adds a layer of excitement to any event, making these cookies a sought-after treat. You’ll find that their unique taste and playful design refresh the standard cookie repertoire, making them a must-try for any baking enthusiast.
Why You’ll Love This
There are many reasons why you will fall in love with Classic Red Velvet Bear Cookies. Firstly, their incredible flavor profile combines sweetness with a hint of cocoa that tantalizes the taste buds. They do not overwhelm the palate but serve as a delightful alternative to more traditional cookies. From family gatherings to children’s parties, their vibrant color and adorable shape make them a hit among both kids and adults alike.
In addition to their taste, these cookies are incredibly easy to make, which is perfect for novice bakers or those pressed for time. The straightforward steps require minimal specialized equipment, making it approachable for anyone with a standard kitchen setup. Plus, you can easily prepare the dough ahead of time and bake them fresh when needed. This flexibility means you can have fresh cookies on the table with minimal fuss, a win-win for busy parents or individuals looking to impress without spending hours in the kitchen.
Moreover, they’re budget-friendly. The ingredients required are commonly found in most pantries, and variations allow you to adjust based on what you have on hand. Whether you’re feeding your family or hosting friends, these cookies will not stretch your wallet while providing a delightful experience for everyone. They also lend themselves well to various dietary needs, making them versatile for different occasions. The unique attributes of these cookies, combined with their aesthetic appeal and ease of preparation, solidify their status as a must-try for anyone seeking something special.
Ingredients You’ll Need
- All-purpose flour: This forms the base of your cookies and provides structure. You can substitute with gluten-free flour to cater to those with gluten sensitivities.
- Granulated sugar: Adds sweetness and contributes to the cookie’s tender texture. Try using brown sugar for deeper flavor.
- Cocoa powder: Just a tablespoon provides that signature hint of chocolate flavor that pairs perfectly with the sweet elements.
- Baking soda: This leavening agent helps the cookies rise slightly, creating that fluffy texture.
- Salt: A small amount of salt enhances the sweetness and balances the flavors. Always use fine salt for better distribution.
- Vegetable oil: Keeps the cookies moist and tender; you can also use melted butter for a richer flavor.
- Egg: Provides binding and moisture; it’s a crucial ingredient that should not be omitted. For a vegan version, consider using a flax egg.
- Red food coloring: Essential for that vibrant color; gel food coloring works best as it provides a richer hue without altering the dough’s consistency.
- Vanilla extract: Adds warmth and depth; do not skip this as it enhances the overall flavor of the cookies.
- Powdered sugar: For dusting the cookies or for making a simple glaze; a little added sweetness never hurts.
Each ingredient plays a crucial role in achieving that magical taste and texture. Understanding their individual contributions allows for better customization and variations based on your preferences or dietary needs. For example, a simple switch from regular cocoa powder to Dutch-processed cocoa can create a slightly different flavor profile, so feel free to experiment!
How to Make
- Preheat your oven: Start by preheating your oven to 350°F (175°C). This is essential for ensuring that your cookies bake evenly and in time. Taking the time to preheat ensures that you achieve the perfect texture and that the leavening agents work properly, resulting in soft, delightful cookies.
- Mix dry ingredients: In a large mixing bowl, combine all-purpose flour, granulated sugar, baking soda, salt, and cocoa powder. Whisk these ingredients together until they are completely combined. This step guarantees an even distribution of the leavening agents and cocoa powder throughout your dough, which is crucial for consistent baking results.
- Combine wet ingredients: In another bowl, mix together the vegetable oil, egg, vanilla extract, and red food coloring. Use a whisk or a fork to blend these ingredients until they are smooth. This mixture will add moisture and richness to the cookies, so make sure everything is well-combined to get that signature red velvet flavor.
- Incorporate the dry into the wet: Gradually add the dry mixture to the wet mixture. Stir gently until a dough forms. Be careful not to overmix, as that can lead to tough cookies. The goal is to combine everything just until you no longer see dry flour, ensuring a tender texture.
- Shape the cookies: Using a tablespoon or cookie scoop, portion out the dough onto a lined baking sheet. Leave enough space (about 2 inches) between each to allow for spreading during baking. For the bear shapes, you can mold the dough into small balls, leaving them slightly taller than wider.
- Bake: Place the baking sheet in the preheated oven and bake for about 10-12 minutes. Keep an eye on the cookies during the last few minutes so they don’t overbake; they should be slightly firm around the edges but still soft in the center.
- Cool: Remove the cookies from the oven and let them cool on the baking sheet for five minutes before transferring them to a wire rack to cool completely. This step allows the cookies to firm up a bit, making them easier to handle without falling apart.
Following these steps carefully will help you yield a batch of delicious, beautiful Classic Red Velvet Bear Cookies. Baking is as much about following the steps as it is about intuition and adapting based on your observations, so don’t hesitate to trust your instincts!
Variations & Substitutions
Chocolate Chip Red Velvet Bear Cookies: If you want to add a little richness, consider folding in some semi-sweet or white chocolate chips into your dough. This variation brings an extra layer of flavor and a chewy texture that contrasts nicely with the tender cookie base. It’s a wonderful treat for chocolate lovers and can help offset some sweetness, making them truly irresistible.
Vegan Red Velvet Bear Cookies: For those following a vegan lifestyle, you can easily adapt this recipe. Replace the egg with a flax egg by mixing one tablespoon of ground flaxseed with three tablespoons of water and letting it sit until it thickens. You can also substitute the vegetable oil with coconut oil for a richer flavor, making these cookies delightfully safe for everyone to enjoy!
Gluten-Free Red Velvet Bear Cookies: If gluten is a concern for you or your guests, simply substitute the all-purpose flour with a gluten-free blend that measures cup-for-cup like the regular version. This adjustment ensures that everyone can indulge in these delightful treats without compromising flavor or texture. Just be mindful of the brand you choose to ensure it has a good mix of flours to recreate the cookie’s texture.
Red Velvet Cheesecake Cookies: Combine two classics with this delightful variation. Incorporate a small dollop of cheesecake filling into the center of each cookie before baking. Simply mix cream cheese, sugar, and a little vanilla extract for the filling. This creates a lovely surprise inside each bite, combining that classic red velvet flavor with creamy cheesecake richness.
Raw Red Velvet Bear Cookies: For a healthy twist, try making raw red velvet cookies. Blend soaked dates, nuts, cocoa powder, and red beet powder for coloring in a food processor until it forms a dough. Shape into bear forms and chill. This method not only avoids baking but also offers a nutritious treat packed with energy — perfect for those looking for something on the healthier side!
Each of these variations can bring an exciting twist to your Classic Red Velvet Bear Cookies while still retaining the essence of the original recipe. Embrace the chance to tweak ingredients based on your dietary needs, preferences, or simply for variety. It’s a great exercise in creativity that can make baking even more enjoyable!
Common Mistakes to Avoid
When making Classic Red Velvet Bear Cookies, avoid the common pitfall of overmixing your dough. Overmixing can lead to tough cookies, which is not desirable for a cookie that should be soft and chewy. Gently mix until the dry ingredients are just combined with the wet, which helps to retain a light texture.
Another mistake to avoid is underbaking. Always pay attention to the visual cues; cookies may appear to be slightly underdone when you pull them out, but they will set as they cool. This is crucial for maintaining a soft, gooey center while also allowing the edges to crisp up slightly. Trust your instincts based on what you see; they should have a slight sheen and soft appearance.
Even measuring ingredients incorrectly can throw off your results. Baking is a science, so take the necessary time to measure precisely, particularly with dry ingredients like flour and cocoa powder. A kitchen scale can be beneficial for ensuring accuracy.
Finally, don’t forget about the importance of a quality red food coloring. Using a subpar product can result in a muted color, so opt for gel food coloring that provides vibrant results without impacting the dough’s consistency. This aspect is especially important when presenting your cookies at gatherings, as the visual appeal can elevate the overall experience.
Storage, Freezing & Reheating Tips
For the best results, store your Classic Red Velvet Bear Cookies in an airtight container at room temperature. They will typically stay fresh for about a week, but you may want to indulge sooner rather than later to enjoy their optimum taste and texture!
If you wish to freeze them for longer storage, first ensure that they are completely cooled. Place them in a single layer on a baking sheet and freeze for a few hours until solid. Once frozen, transfer the cookies to a freezer-safe bag or container with parchment paper between layers to prevent sticking. They will keep well for up to three months this way.
When reheating, allow the cookies to come to room temperature or warm them in a microwave for brief intervals (about 10-15 seconds) to maintain their delightful softness. For a gooey experience, consider wrapping them in a damp paper towel while reheating in the microwave — this creates steam that reintroduces moisture.
These tips on storage and reheating ensure that every bite remains enjoyable and fresh, making it easy to indulge in these cookies anytime you crave a delightful treat.
Frequently Asked Questions
Can I make the dough ahead of time? Absolutely! Preparing the dough ahead of time is a great way to save yourself some hassle later on. After mixing the dough, simply wrap it tightly in plastic wrap and refrigerate it. You can keep it in the fridge for up to two days. When you’re ready to bake, allow it to soften slightly at room temperature before shaping and baking.
Can I use less food coloring? Yes, you can adjust the amount of red food coloring to your preference. However, for those who want the classic deep red appearance, it’s best to stick with the recommended amount. If you are concerned about using artificial coloring, consider natural alternatives like beet juice, although this may yield a different final shade.
What can I use instead of eggs? If needed, you can substitute one egg with a flax egg or applesauce. For a flax egg, mix one tablespoon of ground flaxseeds with three tablespoons of water and allow it to sit until it thickens. This helps bind the ingredients together while keeping the cookies tender.
Can I add nuts or chocolate chips? Definitely! Adding nuts like walnuts or pecans can introduce a lovely crunch to your cookies, while chocolate chips can elevate the flavor even further. Just be sure to fold any mix-ins gently into the batter to avoid overworking the dough.
How do I prevent my cookies from spreading too much? The key to preventing cookie spread lies in proper measurements and chilling the dough when necessary. Make sure your butter or oil is measured accurately, and if you find your dough is too soft, refrigerate it for about 30 minutes before baking. This helps the cookies maintain their shape while baking.
Conclusion:
The Classic Red Velvet Bear Cookies recipe brings together a delightful mix of flavors, textures, and charming designs that make them irresistible. With their easy preparation, adaptability, and eye-catching appearance, they’re perfect for any occasion — or simply for enjoying at home. I encourage you to not only try making these adorable cookies but also to add your own twist with variations mentioned throughout. You have the creativity to customize and make them your own, so dive into the fun experience of baking! Share these treats with friends, family, and coworkers, and watch their faces light up with joy with each delicious bite. Happy baking!