Prep time: 20 minutes
Cook time: 10 minutes
Total time: 30 minutes
Servings: 24 cookies
Every now and then, a recipe captures our hearts and memories, evoking warmth and joy. The Swirl Cookies Recipe, particularly perfect for Valentine’s Day, offers a delightful combination of sweet flavor and vibrant colors with its stunning pinwheel design and fun sprinkles. Whether you’re eager to impress your loved ones or just want to indulge your sweet tooth, these cookies can effortlessly brighten up any occasion. The best part? They’re simple to make. In this article, I’ll take you through everything you need to create these delicious cookies and share tips and variations to elevate your baking experience.
From their captivating appearance to their deliciously sweet flavor, these swirl cookies are a treat that brings everyone together. The dough combines the childhood nostalgia of playful baking with the sophisticated touch of sprinkles, making them perfect for birthdays, holidays, or just a delightful afternoon snack. With an easy-to-follow recipe and minimal ingredients, you’ll find making them to be a joyous escape from daily routines. Let’s dive into the details of this charming recipe and discover the various possibilities it has to offer!
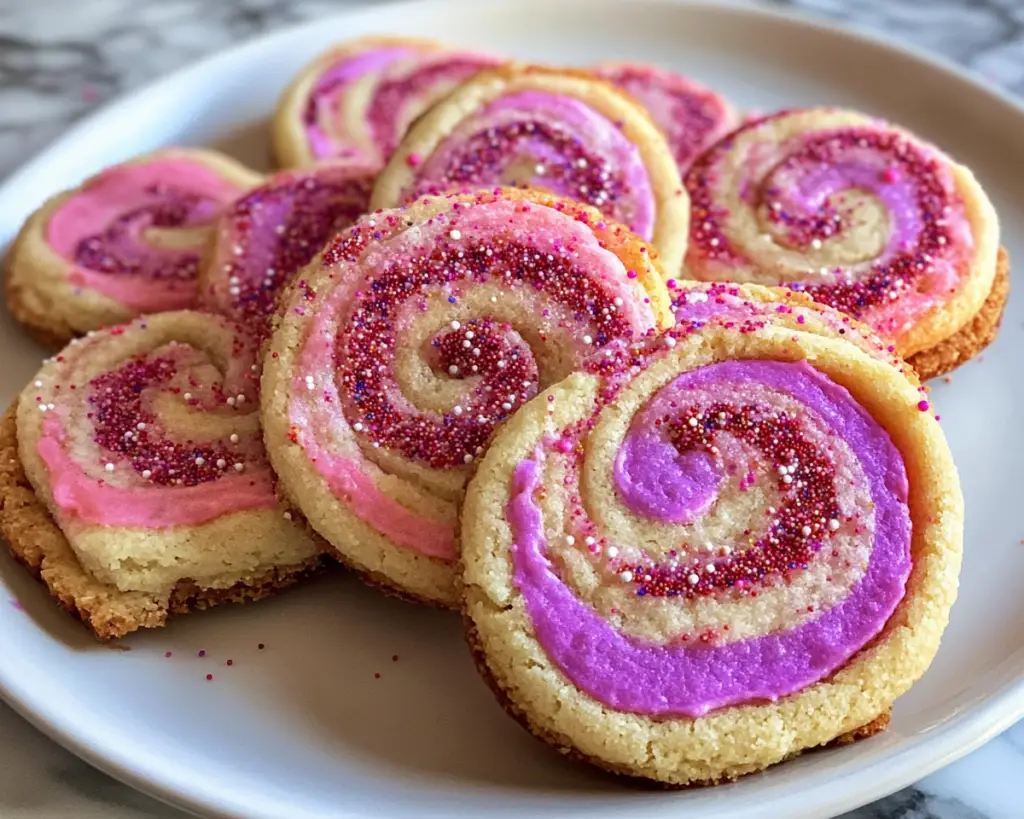
What Is Swirl Cookies Recipe – Easy Valentine’s Day Pinwheel Treats with Sprinkles?
Swirl cookies, often referred to as pinwheel cookies, are a visual delight that layers two different doughs to create an eye-catching spiral effect when sliced. This recipe combines a classic vanilla cookie dough with colored sprinkles, resulting in a delightful treat that’s not only tasty but also fun to decorate. The texture of swirl cookies is soft and slightly chewy, allowing for a satisfying bite that pairs harmoniously with a cup of tea or coffee.
The origins of pinwheel cookies trace back to traditional baking customs that value visual appeal and taste. Their vibrant colors make them a celebratory treat, especially around Valentine’s Day when love is in the air. Each bite offers a burst of flavor and sweetness, enticing you to go back for seconds—or thirds! This delightful twist on a classic cookie is especially appealing to both children and adults, making them perfect for family baking days. We’ll explore not just how to bake them, but also how to make them uniquely yours.
Why You’ll Love This
You will absolutely love this recipe for several reasons. First and foremost, the taste is undeniably delicious—these cookies blend the sweetness of sugar with the buttery richness of dough, complemented by colorful sprinkles that add texture and excitement. The ease of the recipe is a treasure for busy parents or beginner bakers who may feel intimidated by complex baking. Each step has been simplified, allowing for a straightforward baking experience that yields impressive results.
Cost-wise, these cookies are budget-friendly. Most of the ingredients are staples found in your kitchen, making them an affordable and easy choice for baking. Additionally, you can customize the flavors and colors to adapt them to various occasions or personal preferences. This versatility ensures that whether for a birthday party or a cozy family gathering, these cookies will always be an appropriate choice. There’s no need to worry too much about common baking mistakes, as this straightforward recipe guides you to delicious results without the stress.
Ingredients You’ll Need
- 1 cup unsalted butter: Softened butter is essential for creating a tender and flavorful cookie. You can substitute with margarine if needed, although the flavor will differ slightly.
- 1 cup granulated sugar: This sweetener helps balance the rich flavors of the butter. You can also experiment with brown sugar for deeper flavors.
- 1 large egg: An egg provides moisture and act as a binder for the dough. Vegan alternatives like flaxseed meal or applesauce are great substitutes.
- 2 cups all-purpose flour: Flour gives the structure to your cookies. Make sure it’s spooned and leveled to avoid over-measuring.
- 1 teaspoon baking powder: This leavening agent helps the cookies rise slightly, giving them that perfect, soft texture.
- 1 teaspoon vanilla extract: Vanilla enhances the overall flavor profile. Consider using almond extract for a different twist.
- Food coloring: A few drops to add vibrant colors to the dough. Gel food coloring is recommended for a more vibrant hue without additional liquid.
- Sprinkles: Colorful sprinkles add a fun and festive touch. Feel free to select your favorite types!
Each ingredient plays a pivotal role in the success of your cookies. The perfect balance of these simple ingredients leads to cookies that stand out both in appearance and flavor. Now that you have the essentials, let’s delve into the process of making these delightful treats.
How to Make
1. **Prepare Your Ingredients:**
Start by setting out all your ingredients to ensure that you have everything needed for a smooth baking experience. Preheat your oven to 350°F (175°C) and line your baking sheets with parchment paper. This helps prevent sticking and makes cleanup a breeze.
2. **Cream Butter and Sugar:**
In a large mixing bowl, combine the softened unsalted butter with granulated sugar. Using a hand mixer or stand mixer, beat the mixture until it becomes light and fluffy. This process typically takes about 3-5 minutes. You should see a noticeable color change. The fluffy consistency incorporates air, ensuring the cookies have a light texture once baked.
3. **Add Egg and Vanilla:**
Crack the large egg into the butter-sugar mixture, followed by the vanilla extract. Mix until the egg is fully integrated. Take a moment to smell the wonderful aroma of vanilla wafting through your kitchen—it’s one of the best parts of baking!
4. **Combine Dry Ingredients:**
In a separate bowl, whisk together the all-purpose flour and baking powder. Gradually add this dry mixture into the wet ingredients, mixing until just combined. Be careful not to overmix at this stage, as it could lead to tough cookies.
5. **Divide and Color the Dough:**
Now you’ll need to split the dough into two equal sections. To the first section, add a few drops of food coloring. Mix until the color is evenly distributed. Feel free to use any color you prefer—red or pink is great for Valentine’s Day! Keep the second section white. Let the vibrant hues dance together as you envision the end result.
6. **Roll Out the Dough:**
On a lightly floured surface, roll out each portion of dough separately into rectangles, about 1/4 inch thick. Observe the way the colors play off each other, tempting you to create something beautiful. Aim for similar sizes to ensure they stack well.
7. **Layer the Dough:**
Carefully lift one of the dough rectangles and lay it on top of the other. Gently press them together to ensure they adhere. You want the sheer beauty of the colors to show through when sliced.
8. **Roll into a Log:**
Starting from one side, gently roll the combined dough into a log shape, being sure to keep it tight yet not overly pressed. The vision of your final cookies is becoming clearer with each roll!
9. **Chill the Dough:**
Wrap the log in plastic wrap and chill in the refrigerator for at least 30 minutes. This step is important as it firms up the dough, making it easier to slice once it’s time to bake.
10. **Slice and Bake:**
Preheat the oven again if you’ve let the dough sit for a while. Remove the chilled log from the refrigerator and slice it into rounds about 1/2 inch thick. Place the rounds on your prepared baking sheet, spacing them about 2 inches apart. Sprinkle colorful sprinkles on top for that festive look. Bake for about 10-12 minutes until the edges are lightly golden.
11. **Allow to Cool:**
Once baked, remove the cookies from the oven and allow them to cool on the baking sheet for a few minutes before transferring to wire racks. The aroma will envelop your kitchen, making you eager to enjoy these delightful treats.
12. **Serve and Enjoy:**
Once they’ve cooled, you can either dive in right away or store them for a later treat. Feel the excitement as you share these cookies with family and friends!
Variations & Substitutions
Chocolate Swirl Variation: For those chocolate lovers in your life, consider swapping out half of the all-purpose flour for unsweetened cocoa powder. This will create a delicious chocolate layer that pairs wonderfully with the vanilla. The rich chocolate flavor contrasts with the colorful sprinkles beautifully, making every bite intriguing.
Gluten-Free Option: If you or anyone you’re baking for is gluten intolerant, simply replace the all-purpose flour with a gluten-free flour blend. Be sure to check that your baking powder is also gluten-free. The texture may differ slightly, but you will still end up with tasty cookies that everyone can enjoy.
Vegan Variation: To make this recipe vegan, substitute the egg with one of the following: ¼ cup unsweetened applesauce, 1 tablespoon ground flaxseed mixed with 2.5 tablespoons water (let sit for a few minutes), or a commercial egg replacer. Use vegan butter in place of regular butter for an equally satisfying cookie treat.
Decorative Options: Instead of sprinkles, try adding a dusting of powdered sugar or a light glaze on top. This adds not just more sweetness but a sophisticated flair. Chocolate drizzle can also enhance the visual aspect while adding a rich chocolate flavor.
Flavor Infusions: Beyond vanilla, you could infuse your cookies with different extracts such as almond or peppermint for a twist. Just a teaspoon is enough to impart delightful flavor without being overwhelming.
Common Mistakes to Avoid
One common mistake in cookie baking is overmixing the dough, which can lead to dense, tough cookies. Be sure to mix just until the flour is incorporated, leaving lumps for a tender cookie. Also, ensure your butter is at the right temperature; it should be soft but not melted, as this is crucial for proper creaming with sugar.
Another issue many run into is underbaking. Cookies will continue to cook slightly after you remove them from the oven, so taking them out when they’re just slightly golden around the edges will help maintain a soft center. Always remember to allow them to cool on the baking sheet before moving them; this helps them set properly.
Lastly, don’t forget to chill your dough. This step is critical for preventing the cookies from spreading too much. If you’re in a rush, pop the dough in the freezer instead of the fridge for quick cooling.
Storage, Freezing & Reheating Tips
When it comes to storing your swirl cookies, they can be kept in an airtight container for up to one week at room temperature. To maintain optimal freshness, layer between parchment paper to prevent sticking. Alternatively, you can freeze the cookies by wrapping them tightly in plastic wrap and placing them in a freezer-safe bag. They will stay fresh for up to three months.
When you’re ready to enjoy frozen cookies, allow them to thaw at room temperature, or you can pop them in a microwave for 10-15 seconds to warm them just slightly. This will bring back that fresh-out-of-the-oven texture that’s so comforting.
For safe eating, be sure to consume the cookies within a reasonable time frame, especially if they include highly perishable ingredients like cream cheese frosting.
Frequently Asked Questions
Can I use other types of flour for this recipe?
Absolutely! You can use alternatives such as almond flour or even a 1:1 gluten-free flour blend. However, be aware that the texture and flavor may slightly change. Always check binding ratios and moisture as it may impact the final product.
How can I adjust the sweetness of the cookies?
If you’d like a less sweet cookie, consider reducing the sugar by ¼ cup. Alternatively, you can try using natural sweeteners like coconut sugar or maple syrup, but be cautious with the amount and adjust other liquid ingredients accordingly.
Can I make the dough in advance?
Yes! You can make and chill the dough a day in advance. Just wrap it tightly in plastic wrap and store it in the refrigerator. This way, you can easily have freshly baked cookies yet still save time on prep.
Are these cookies suitable for kids to help make?
Absolutely! This recipe is perfect for getting little helpers in the kitchen. Just supervise them during the dough rolling and slicing, and let them sprinkle their own toppings for a fun, interactive cooking experience.
What should I do if my dough is too sticky?
If you find the dough is overly sticky, simply add small amounts of flour until you achieve the right consistency. However, be careful not to add too much, as that could lead to dry cookies.
Conclusion:
This Swirl Cookies Recipe promises delightful layers of flavor and an engaging baking experience. Its festive appearance makes it perfect for various occasions while being easy enough for beginners to tackle. I encourage you to not only try this recipe but to make it your own by experimenting with different colors, flavors, and toppings. You’ll find joy in the creativity of baking, and these cookies are bound to become a staple in your culinary repertoire. So roll up your sleeves, gather your ingredients, and make a batch of these beautiful swirl cookies today! Share your creations and inspire others to join in the fun of baking!